Based on 3 reviews
100%
(3)
0%
(0)
0%
(0)
0%
(0)
0%
(0)


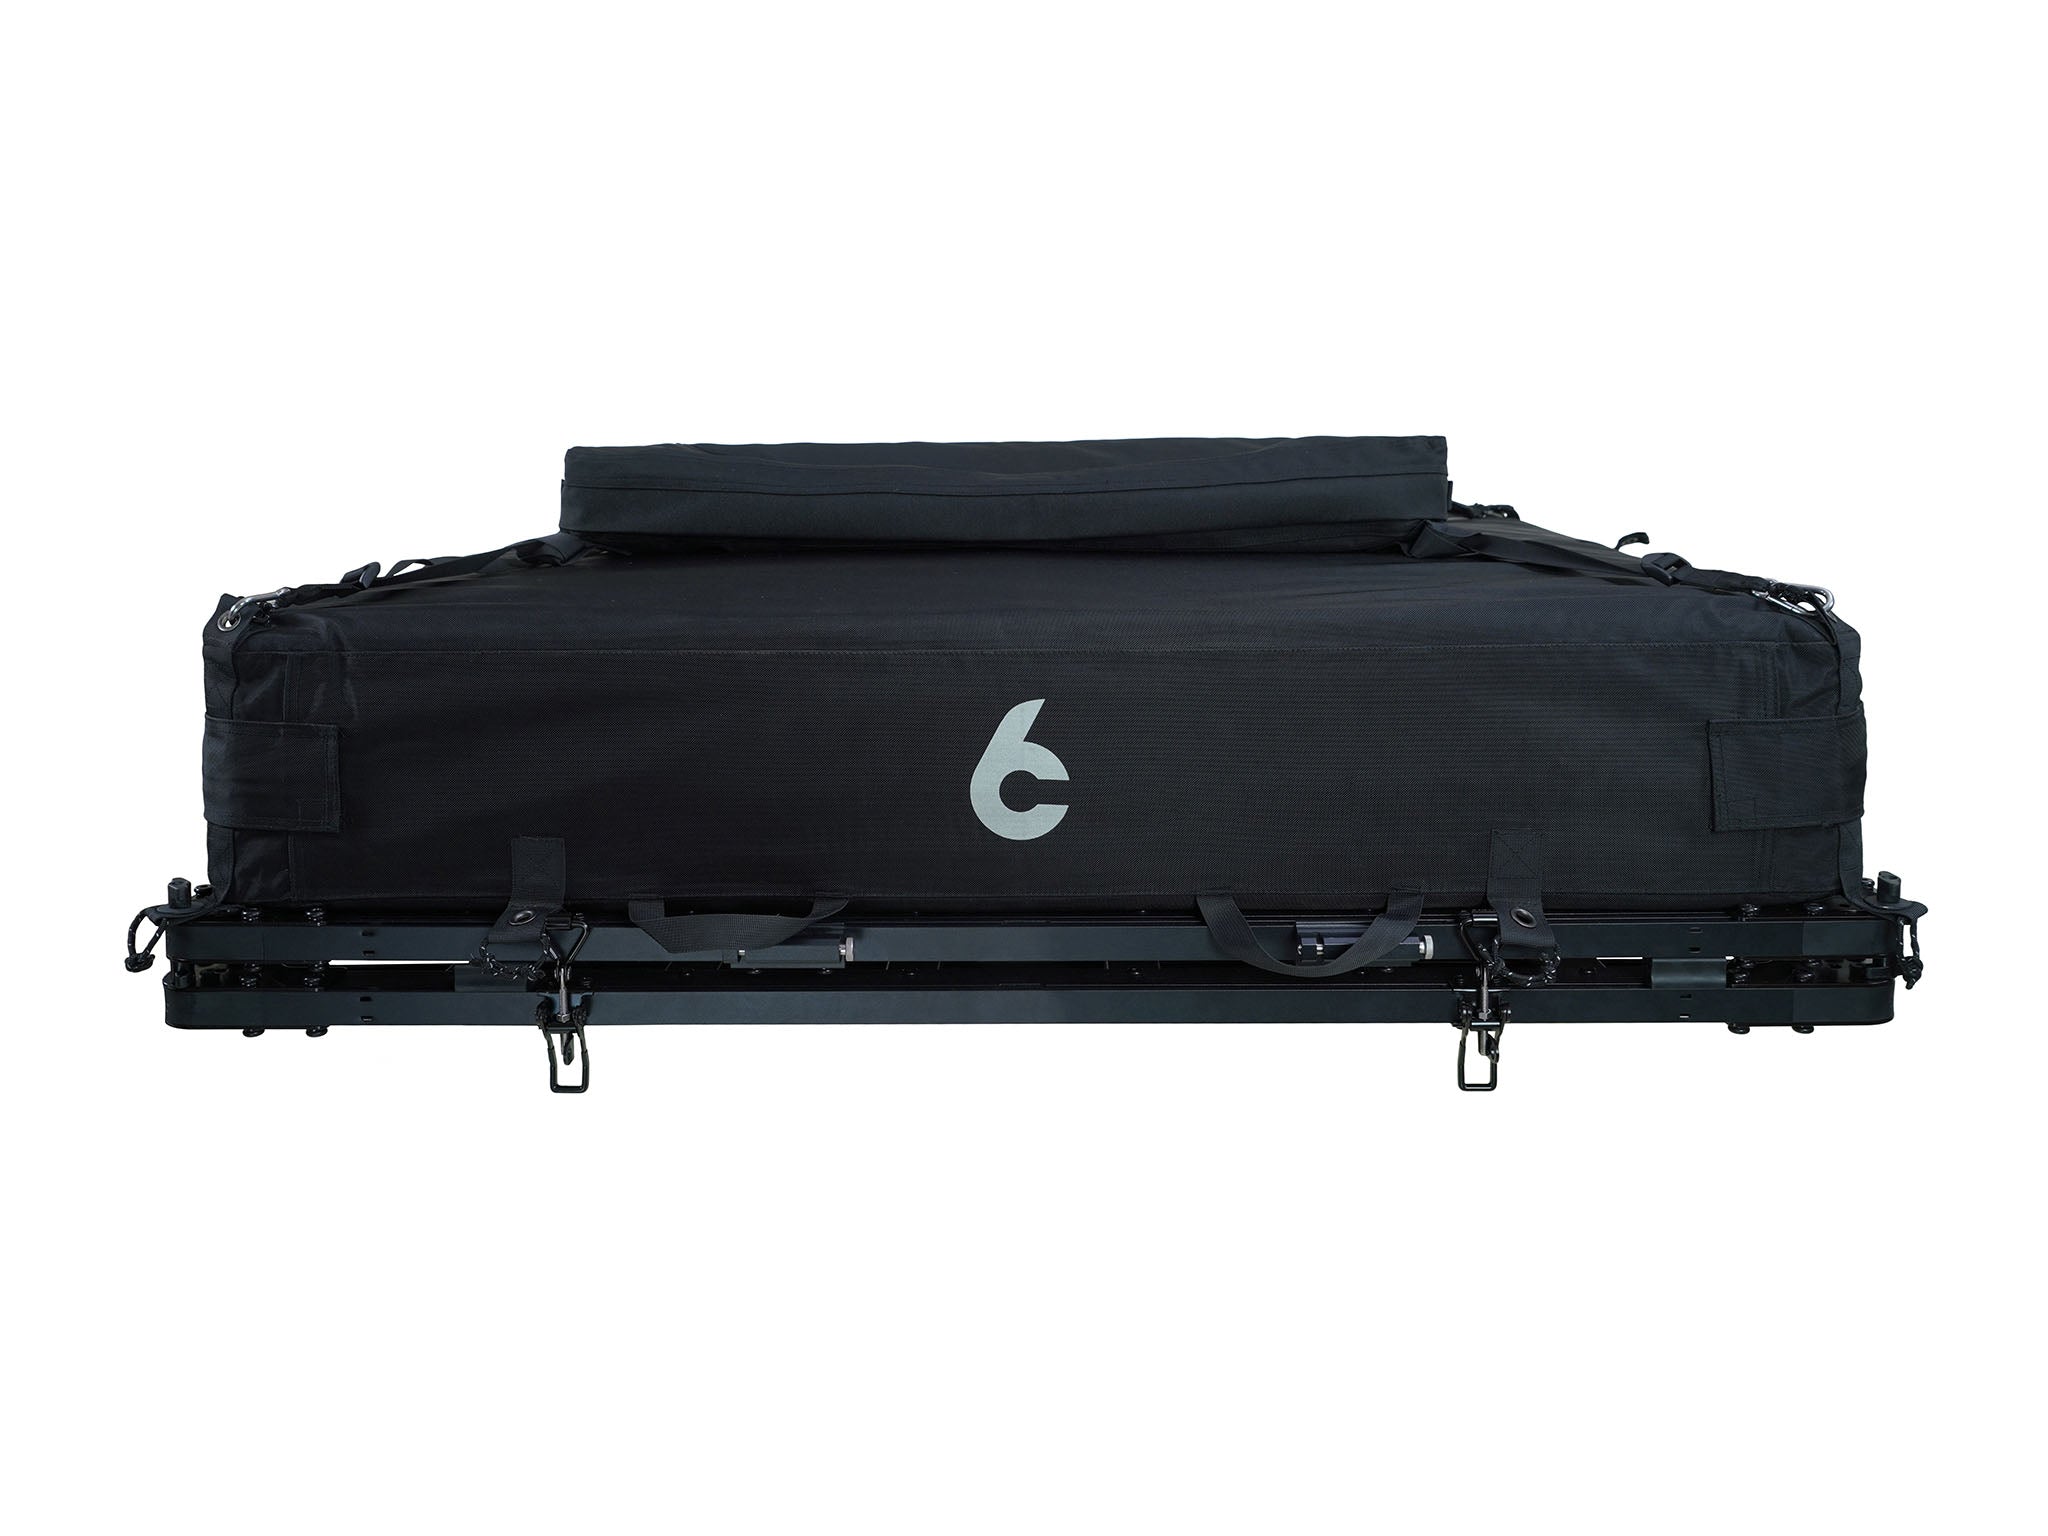
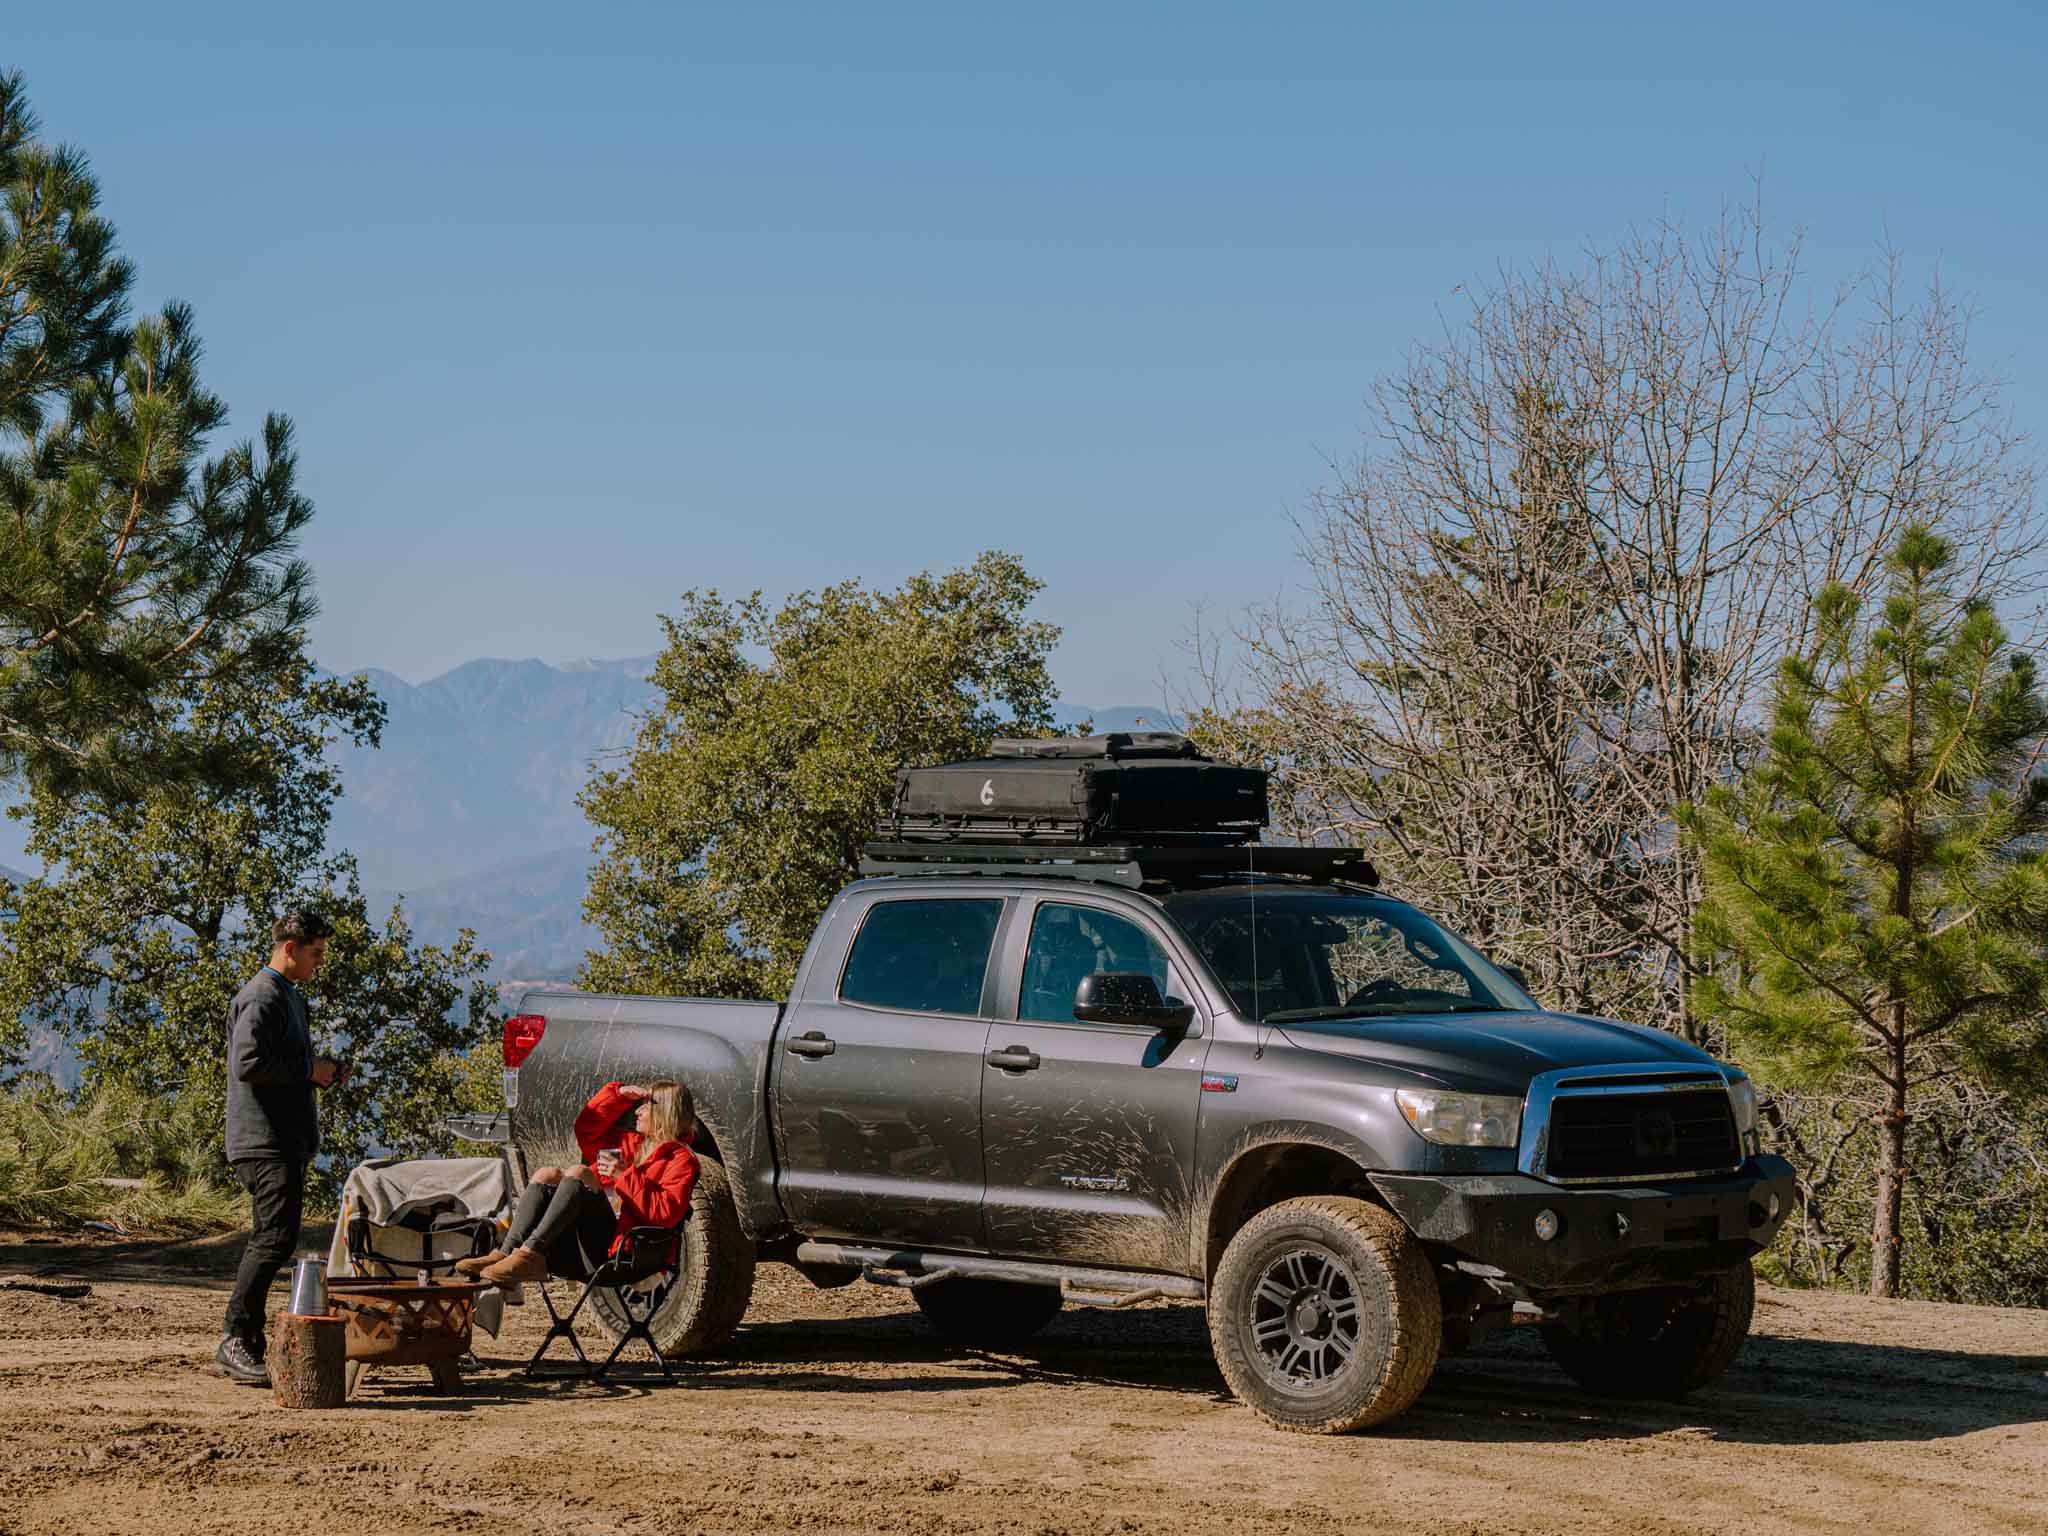
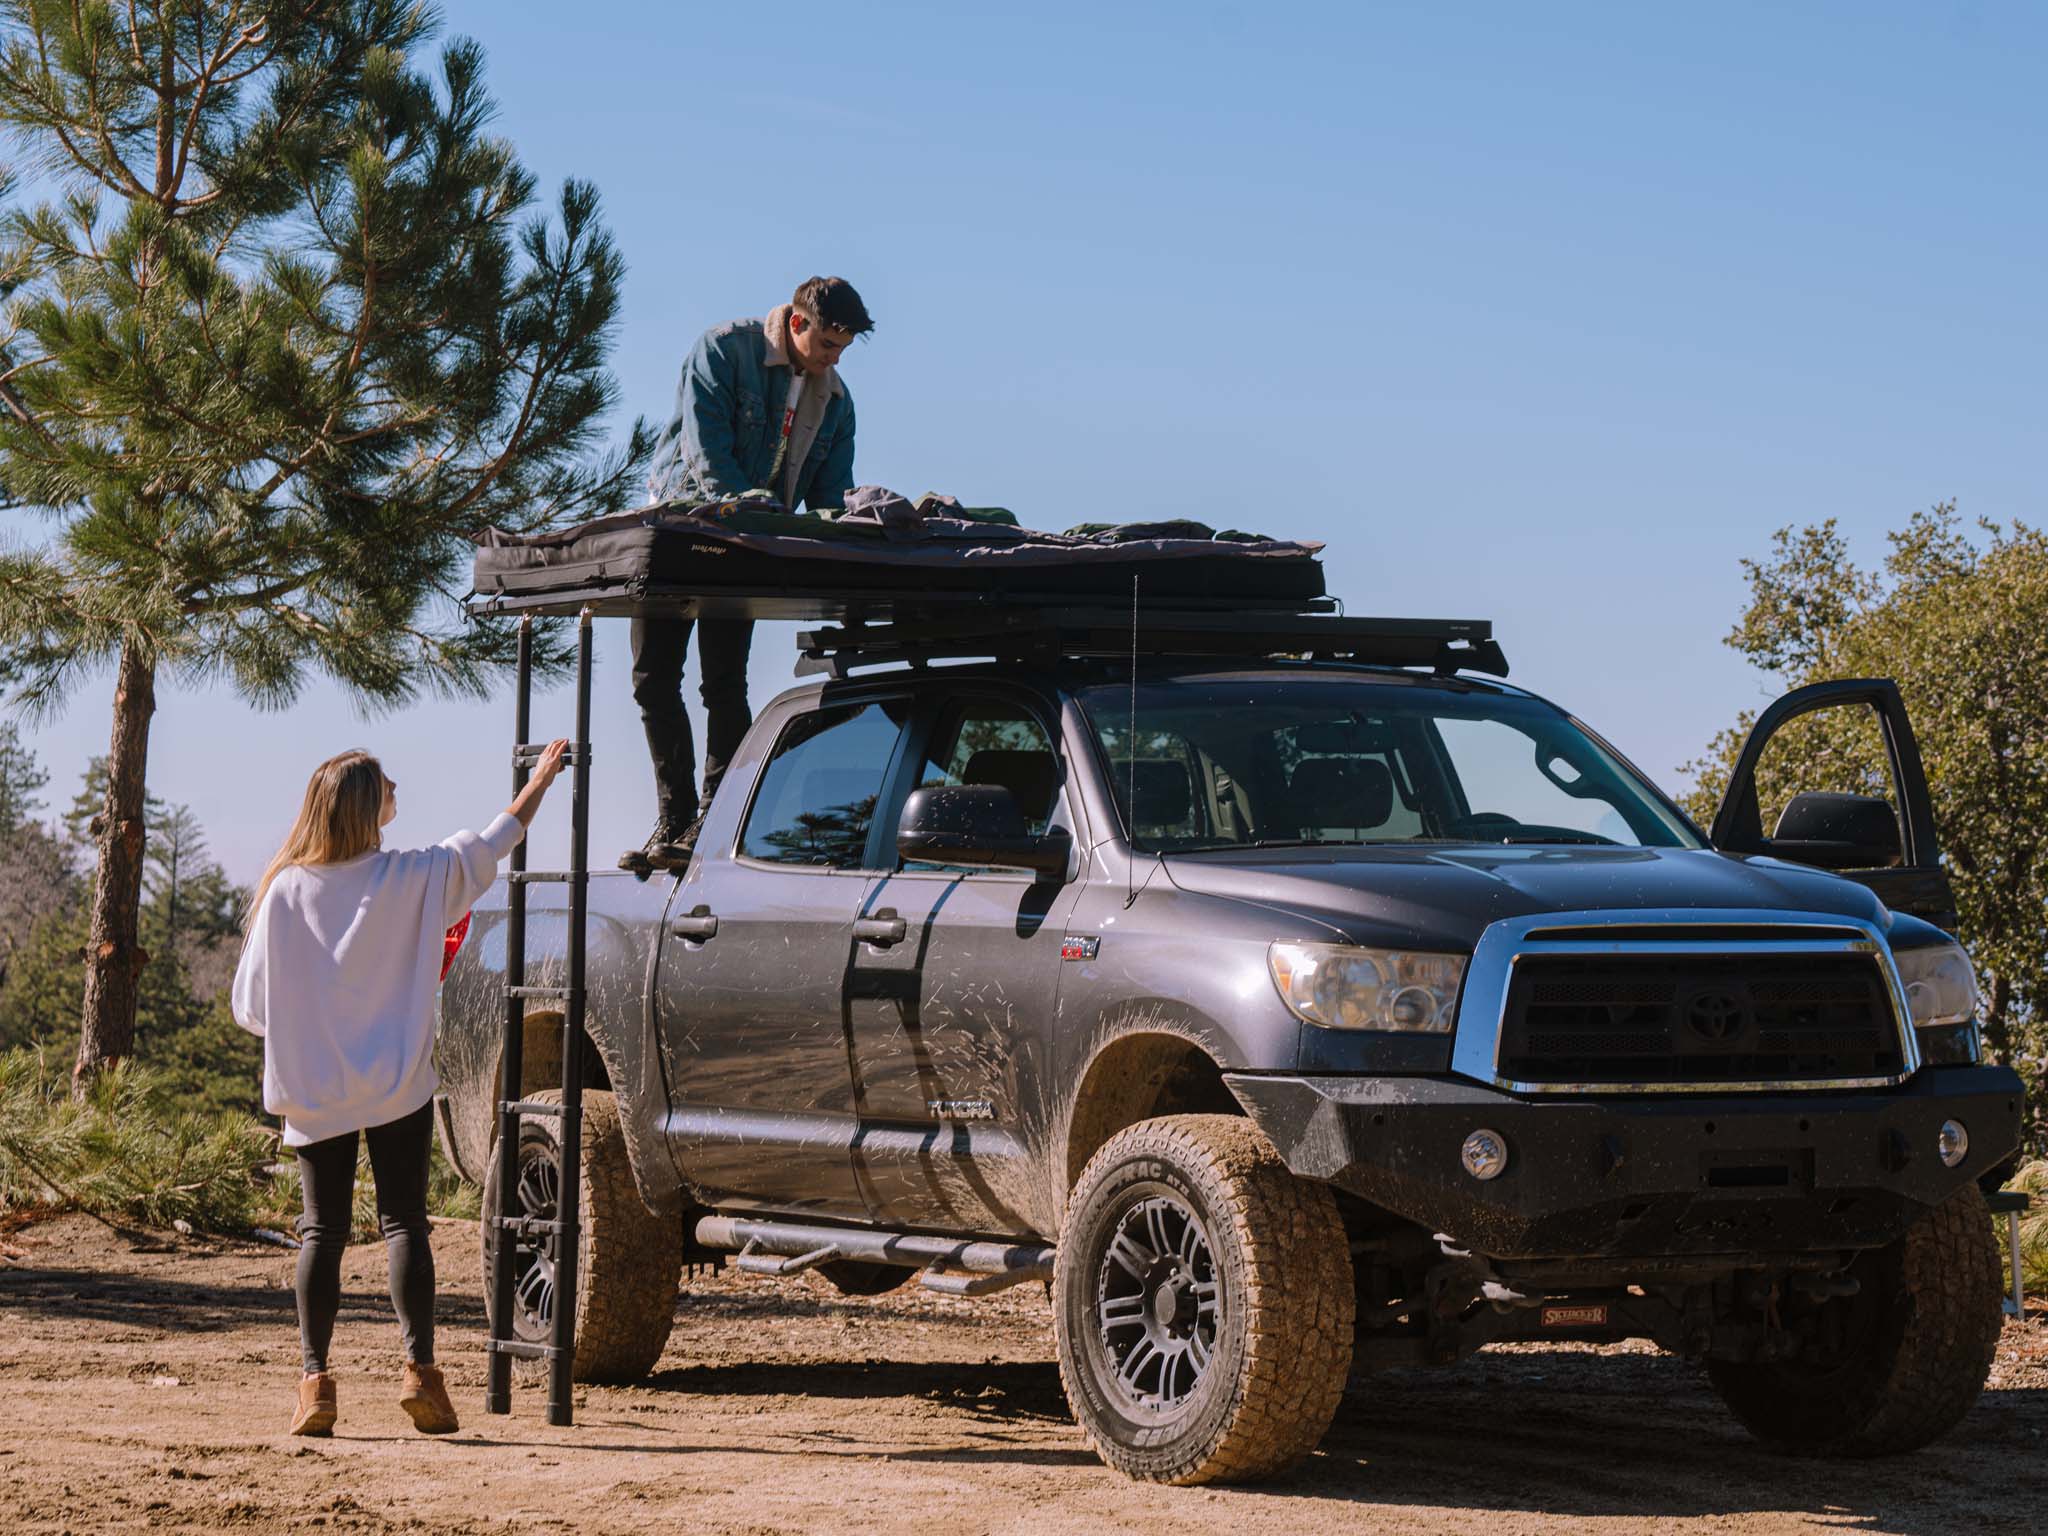
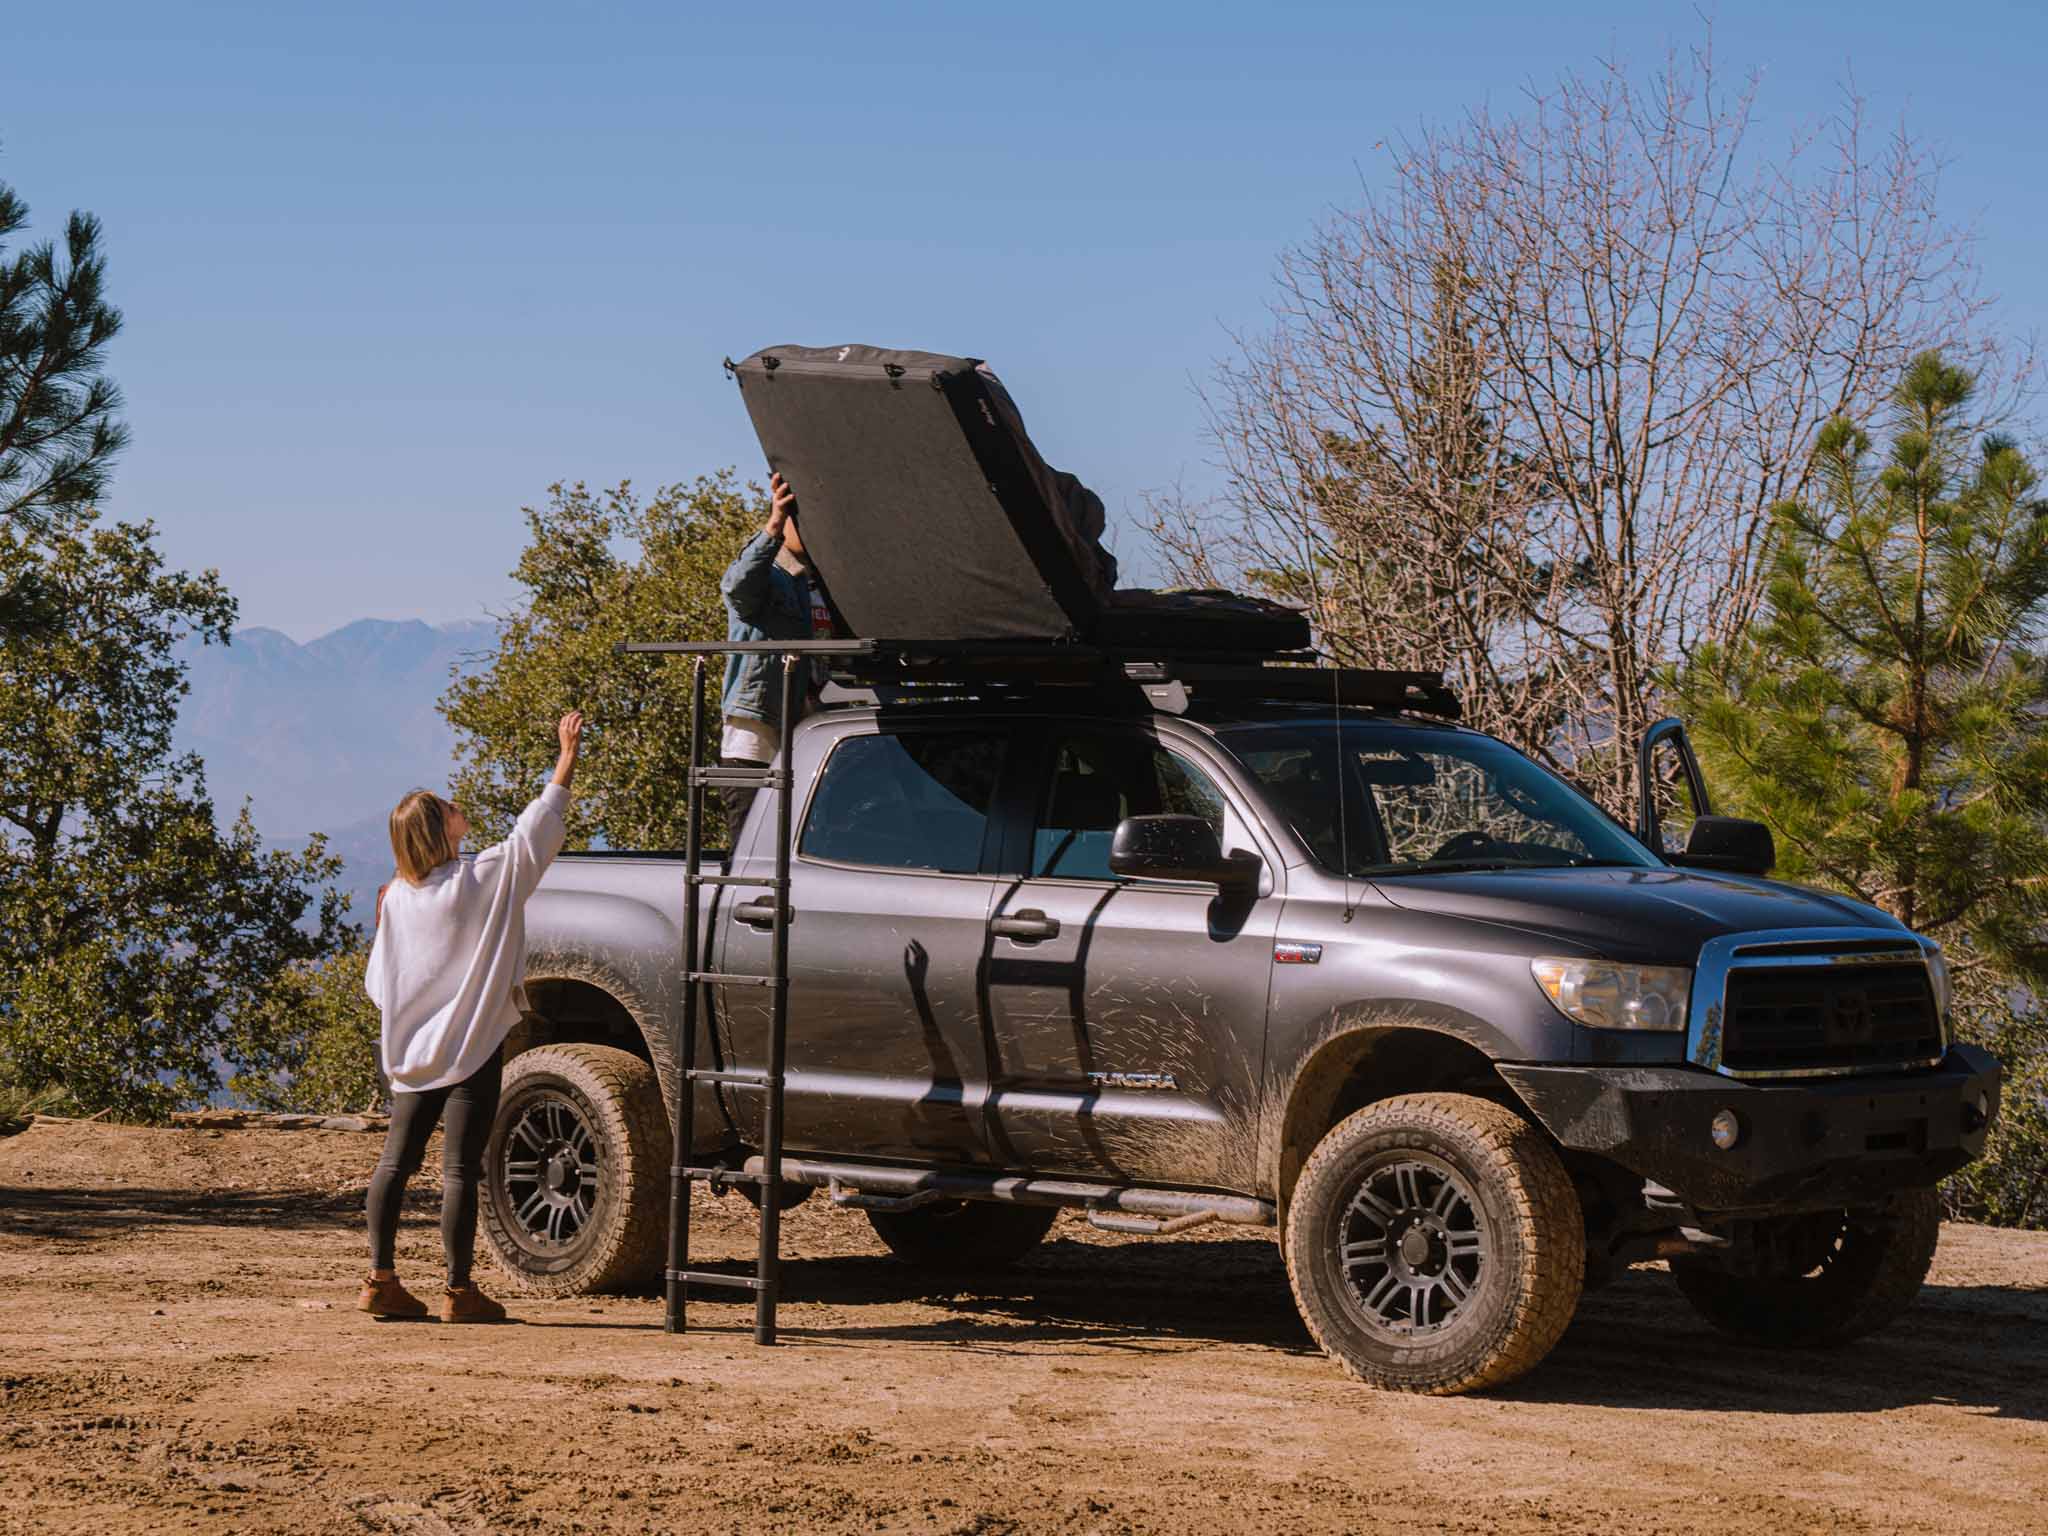

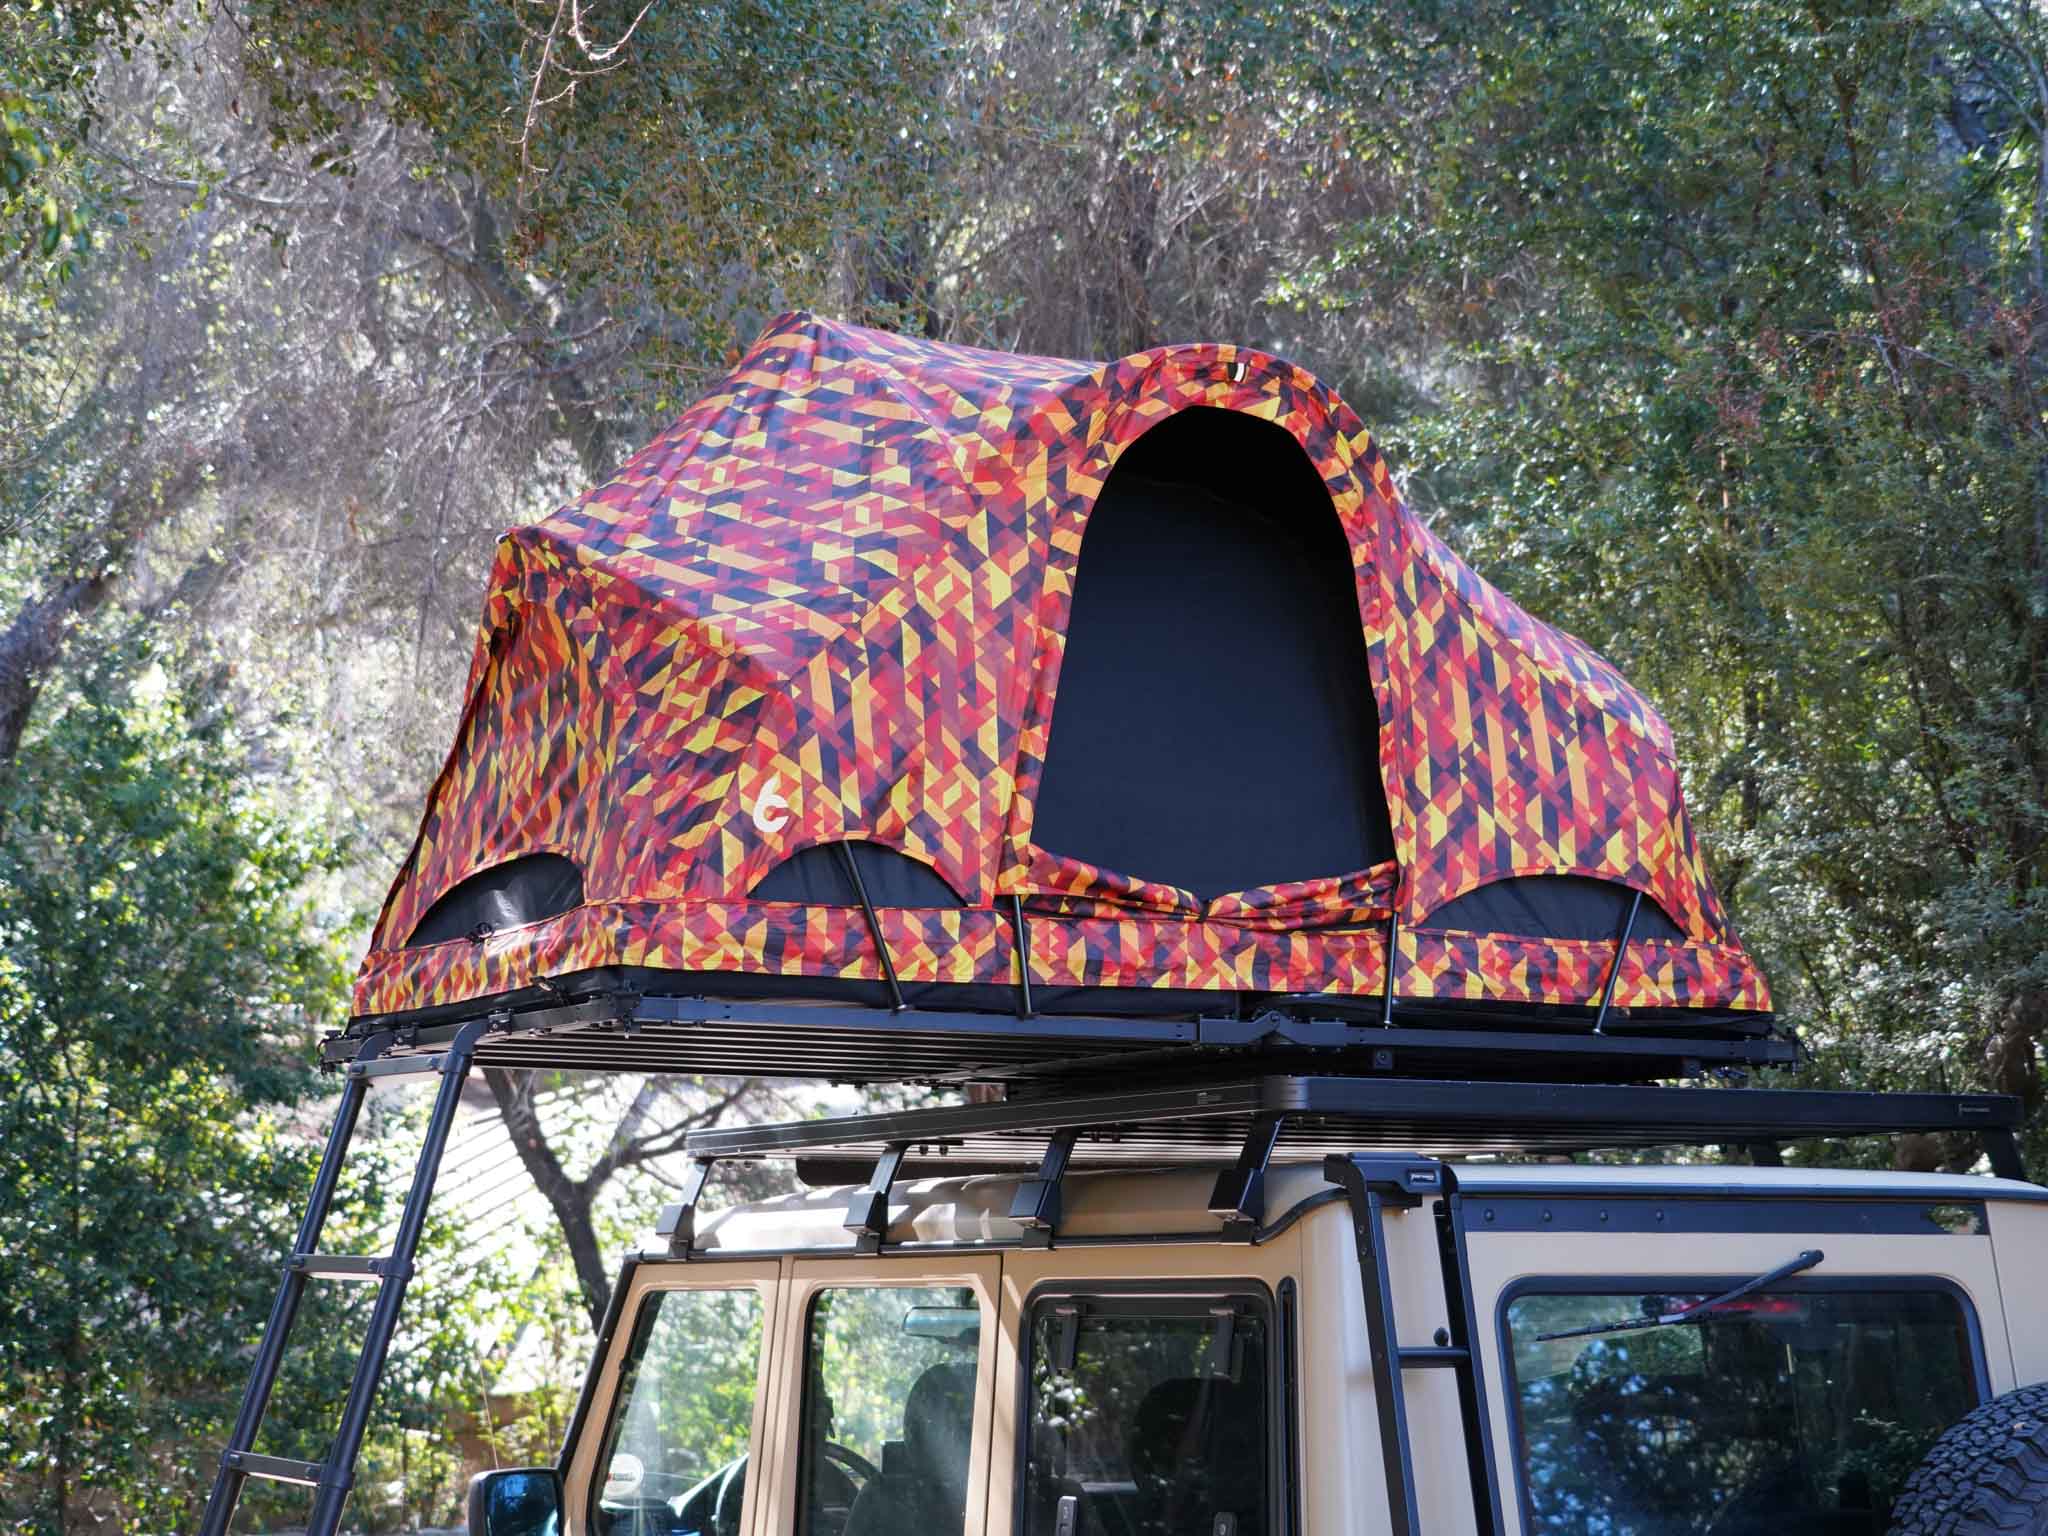
The Rev Roof Top Tent (ember color) includes a Rev Tent bundled with the Rev Platform X (and Ladder).
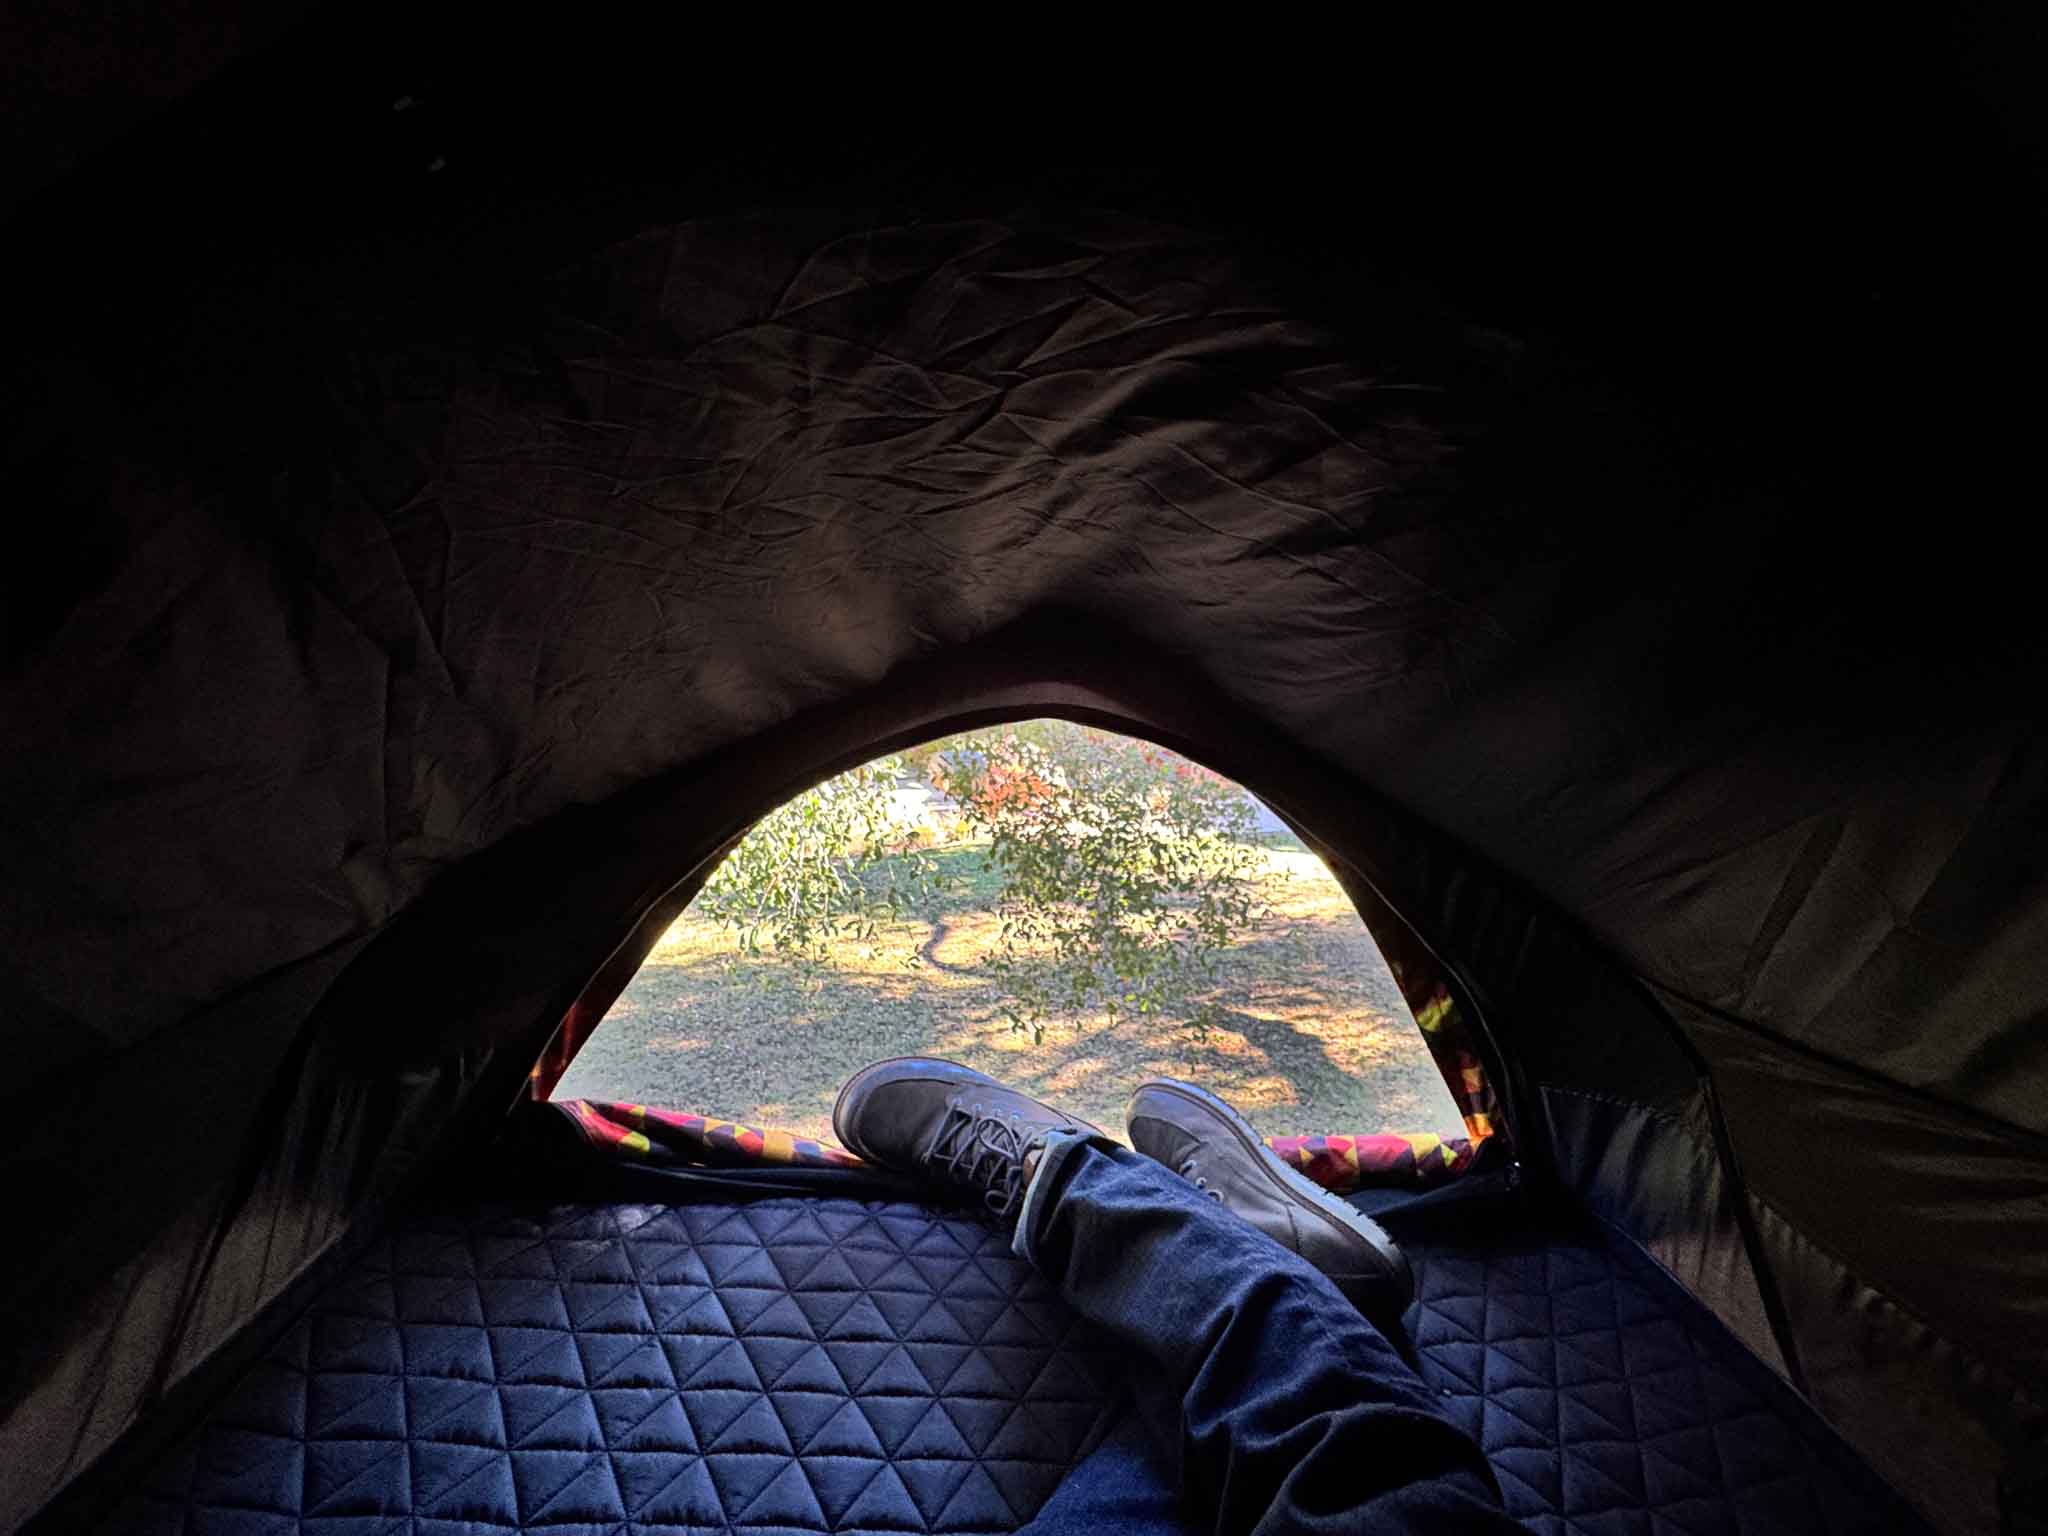
The black out fabric technology and thickest roof top tent mattress available all but guarantee a long, comfy slumber.
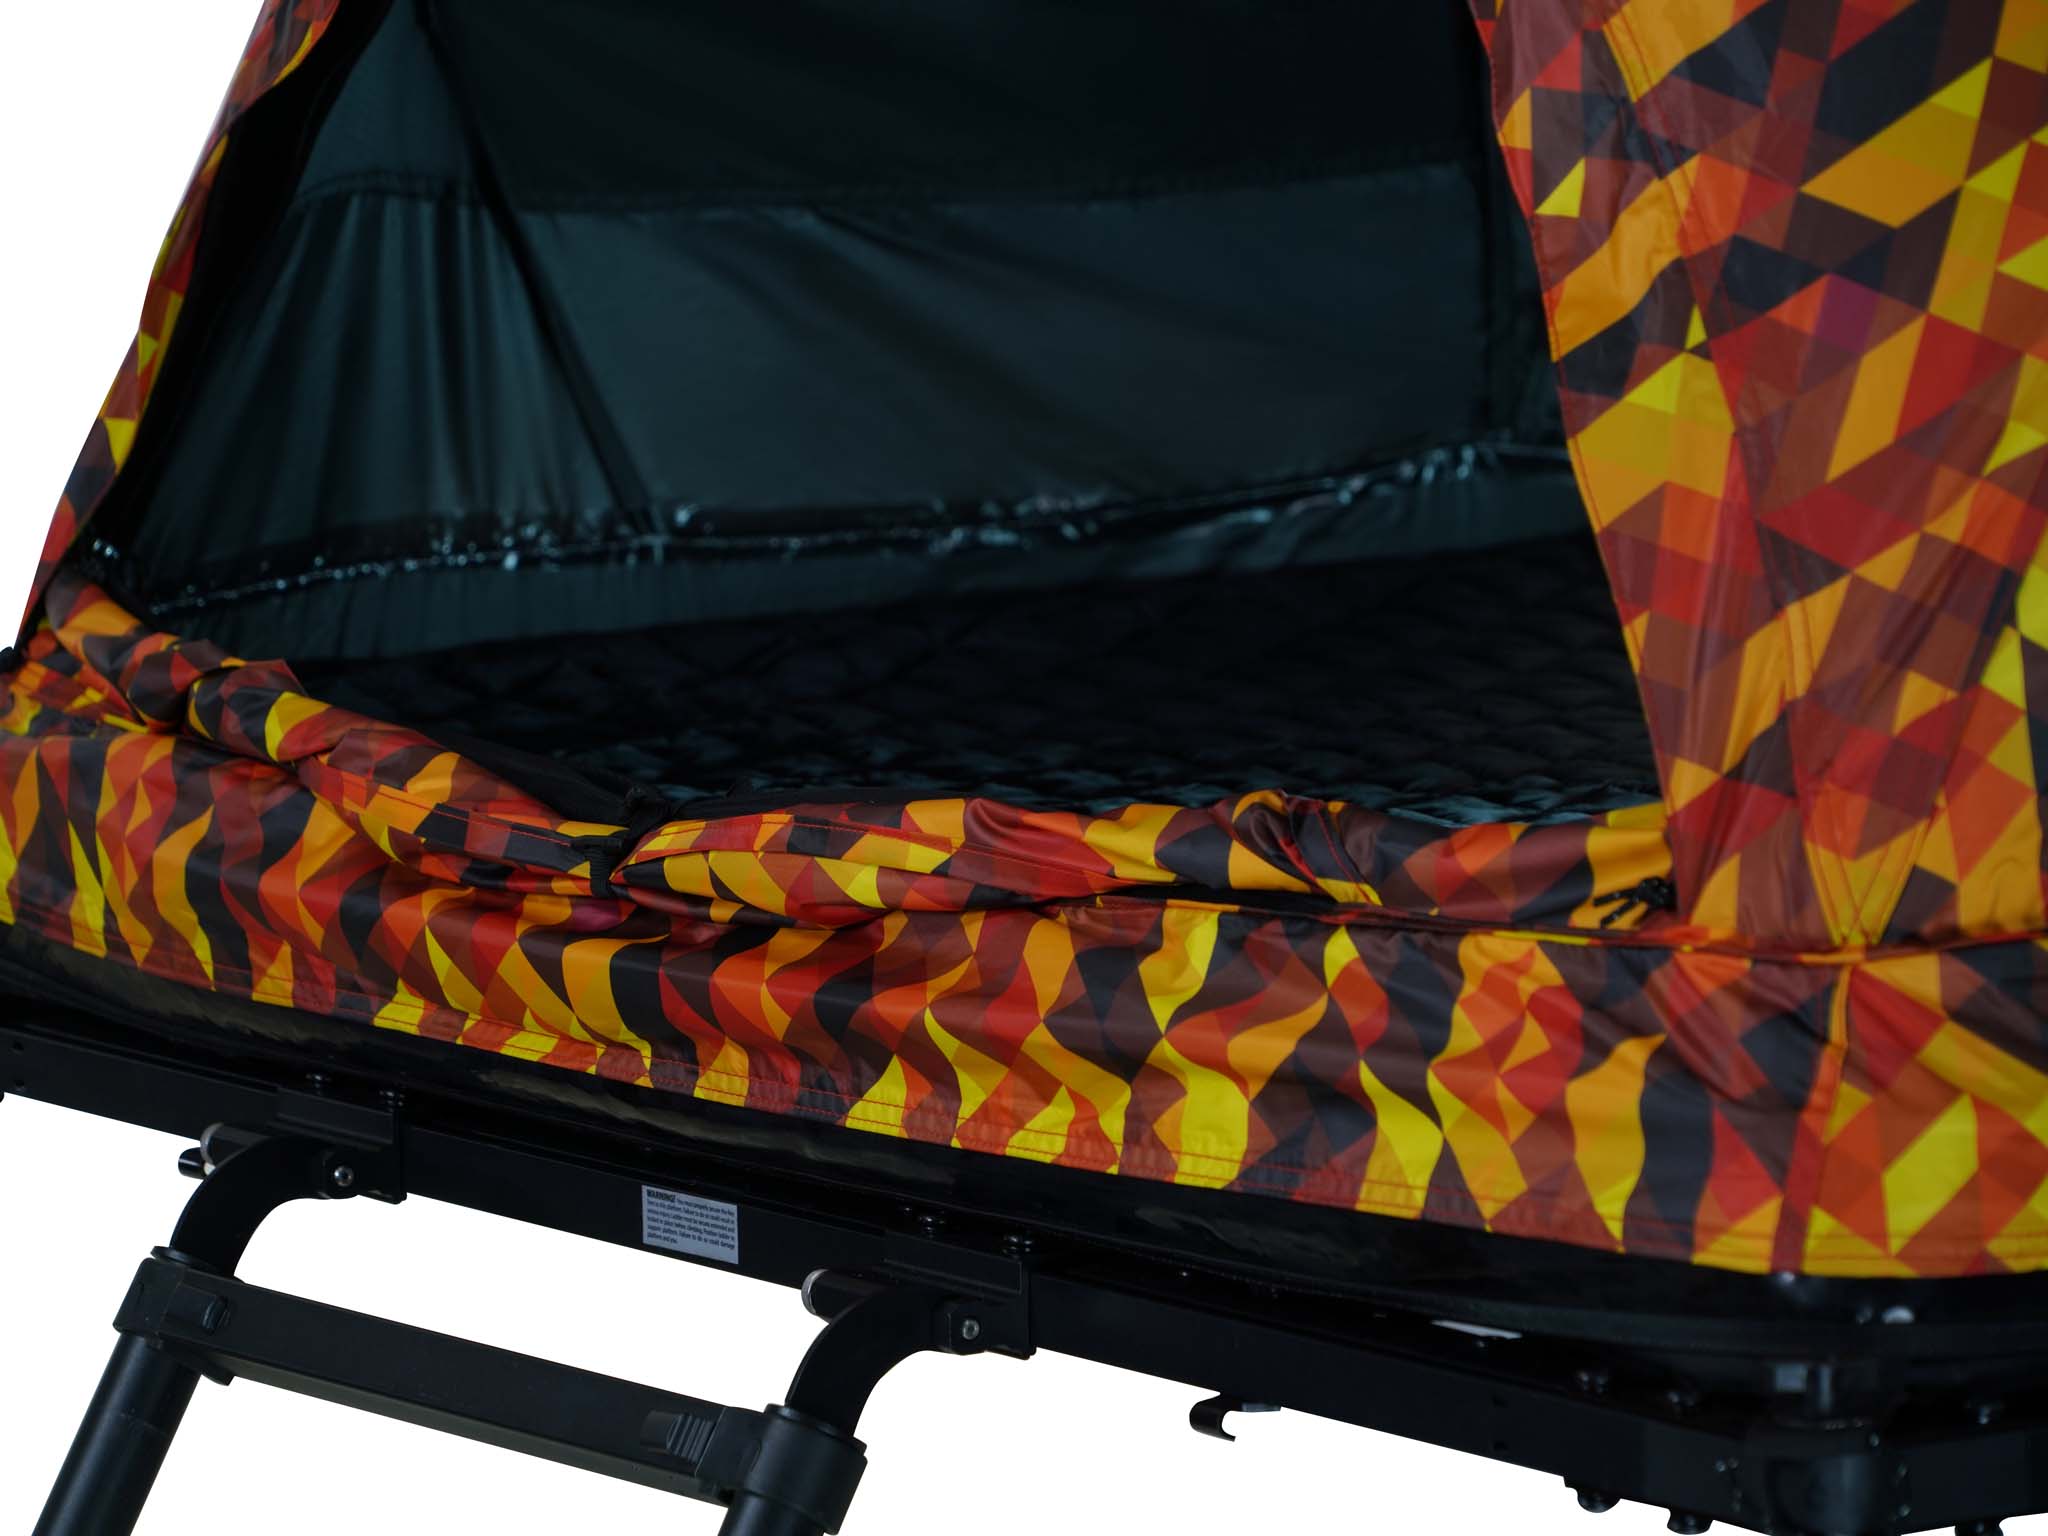
This limited edition burning ember patterned Rev Tent features advanced black-out coated fabric to keep the sunlight out and set the dreams free. With all daylight virtually absent inside the tent, the overall interior climate is slightly cooler during the day and warmer at night. Between the plush dual layer mattress and enhanced pitch black interior, the Rev Tent Ember is ideal for fussy sleepers.
 • Camp exactly where you want, anywhere, and enjoy the convenience of choosing roof top or ground camping.
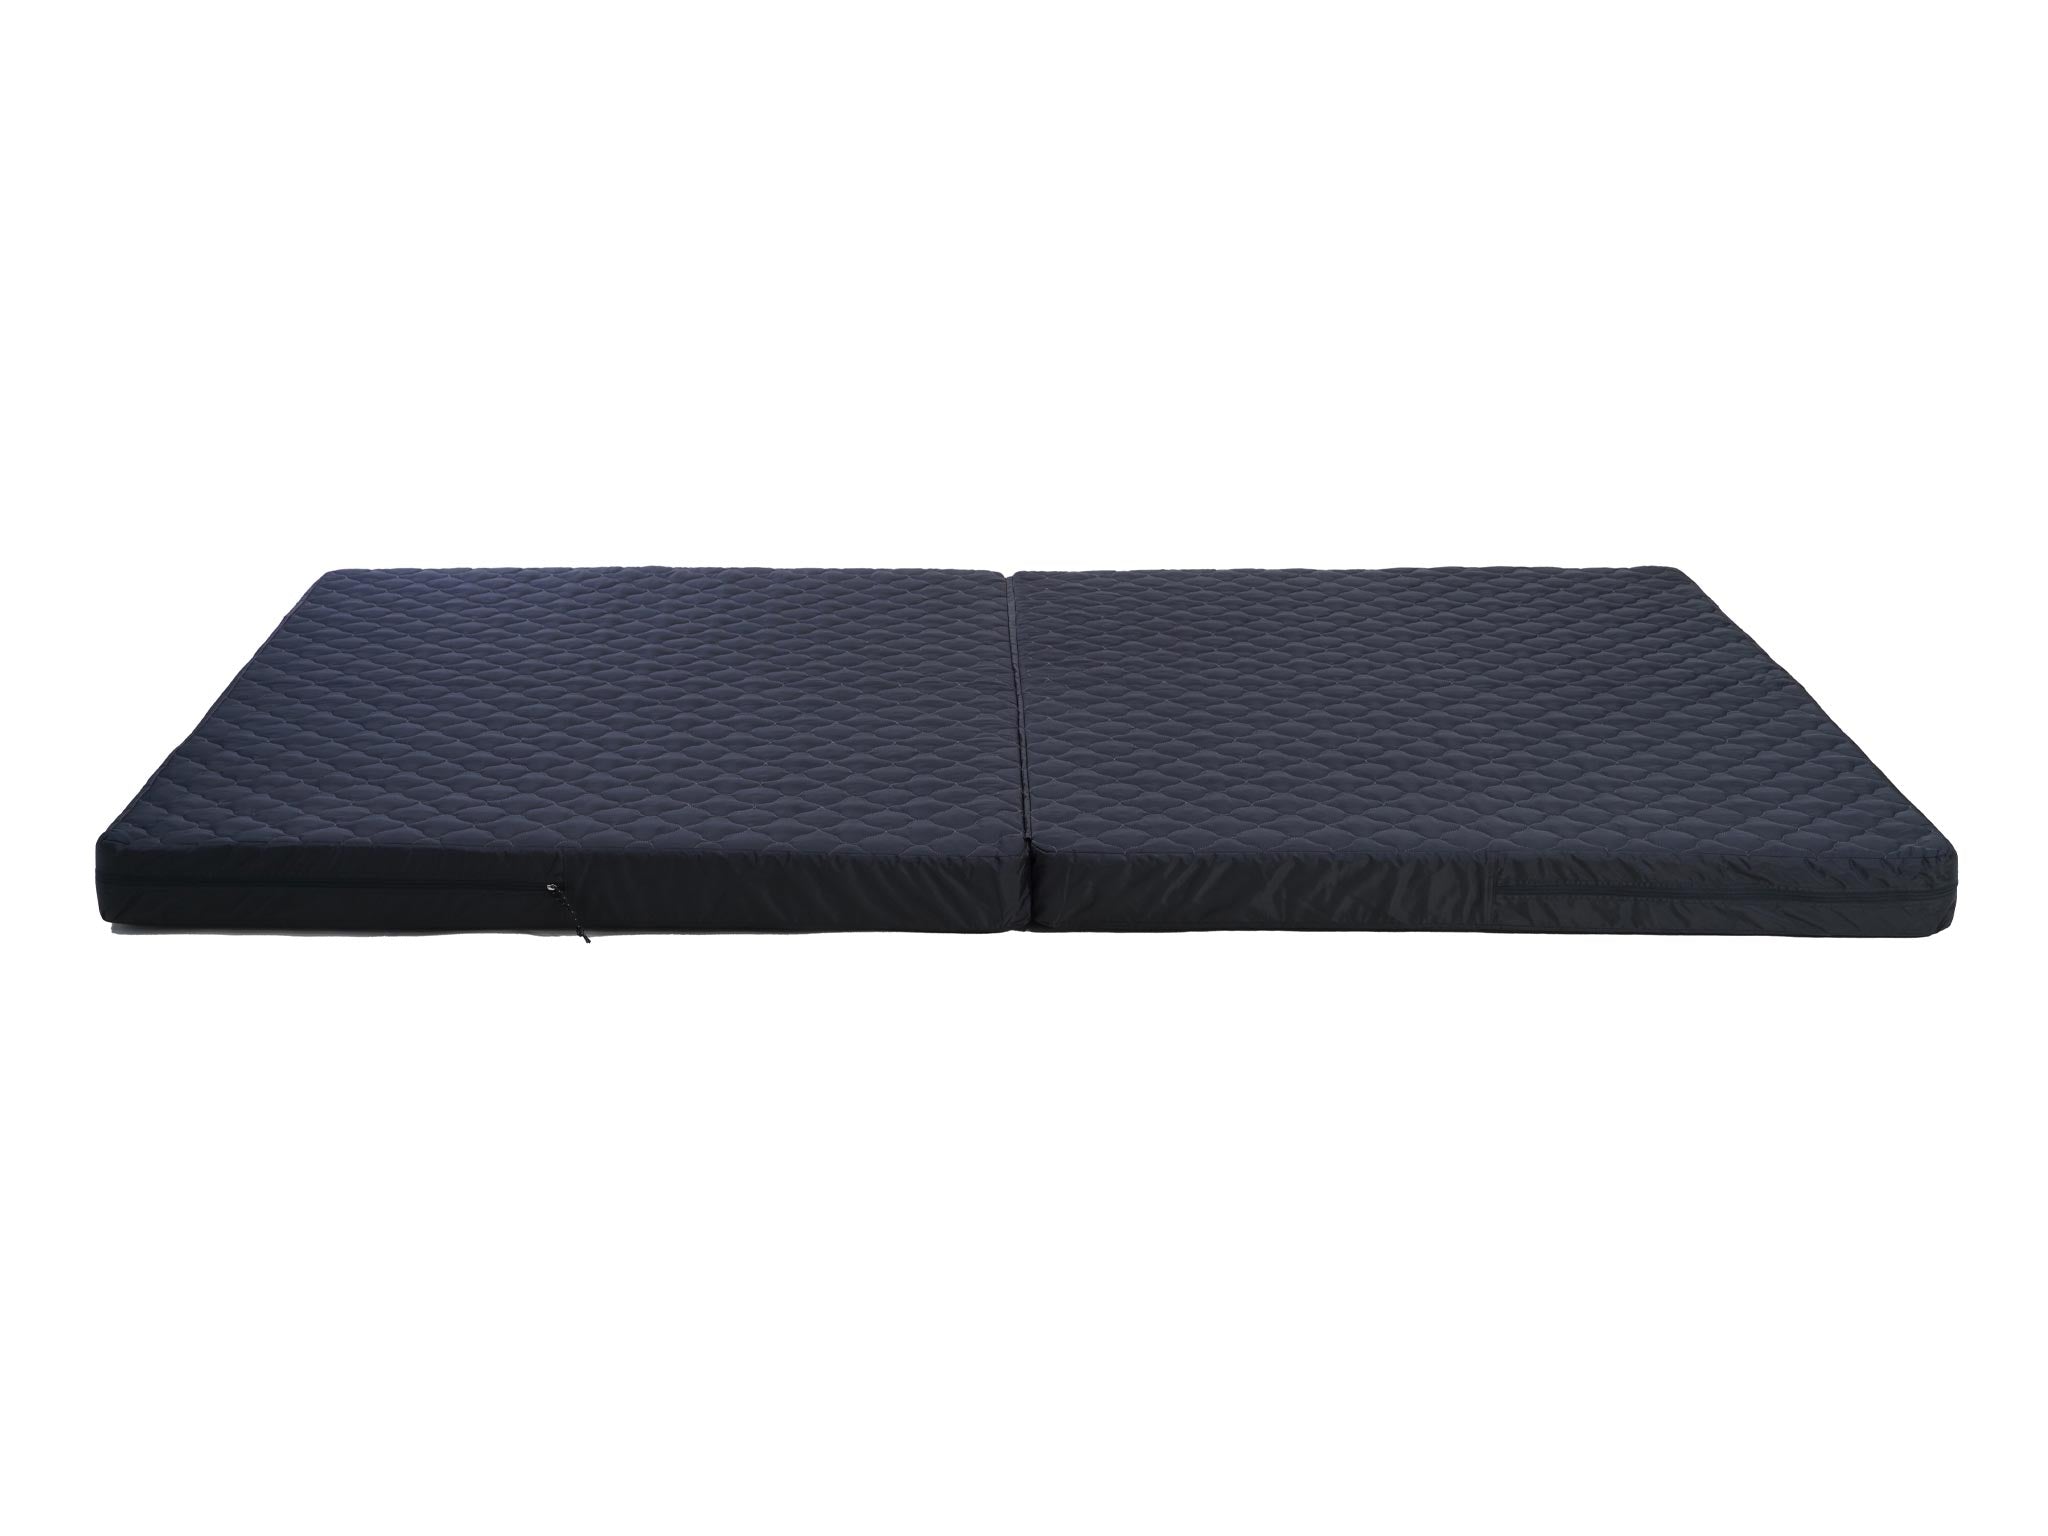
• Thickest mattress of any roof top tent.
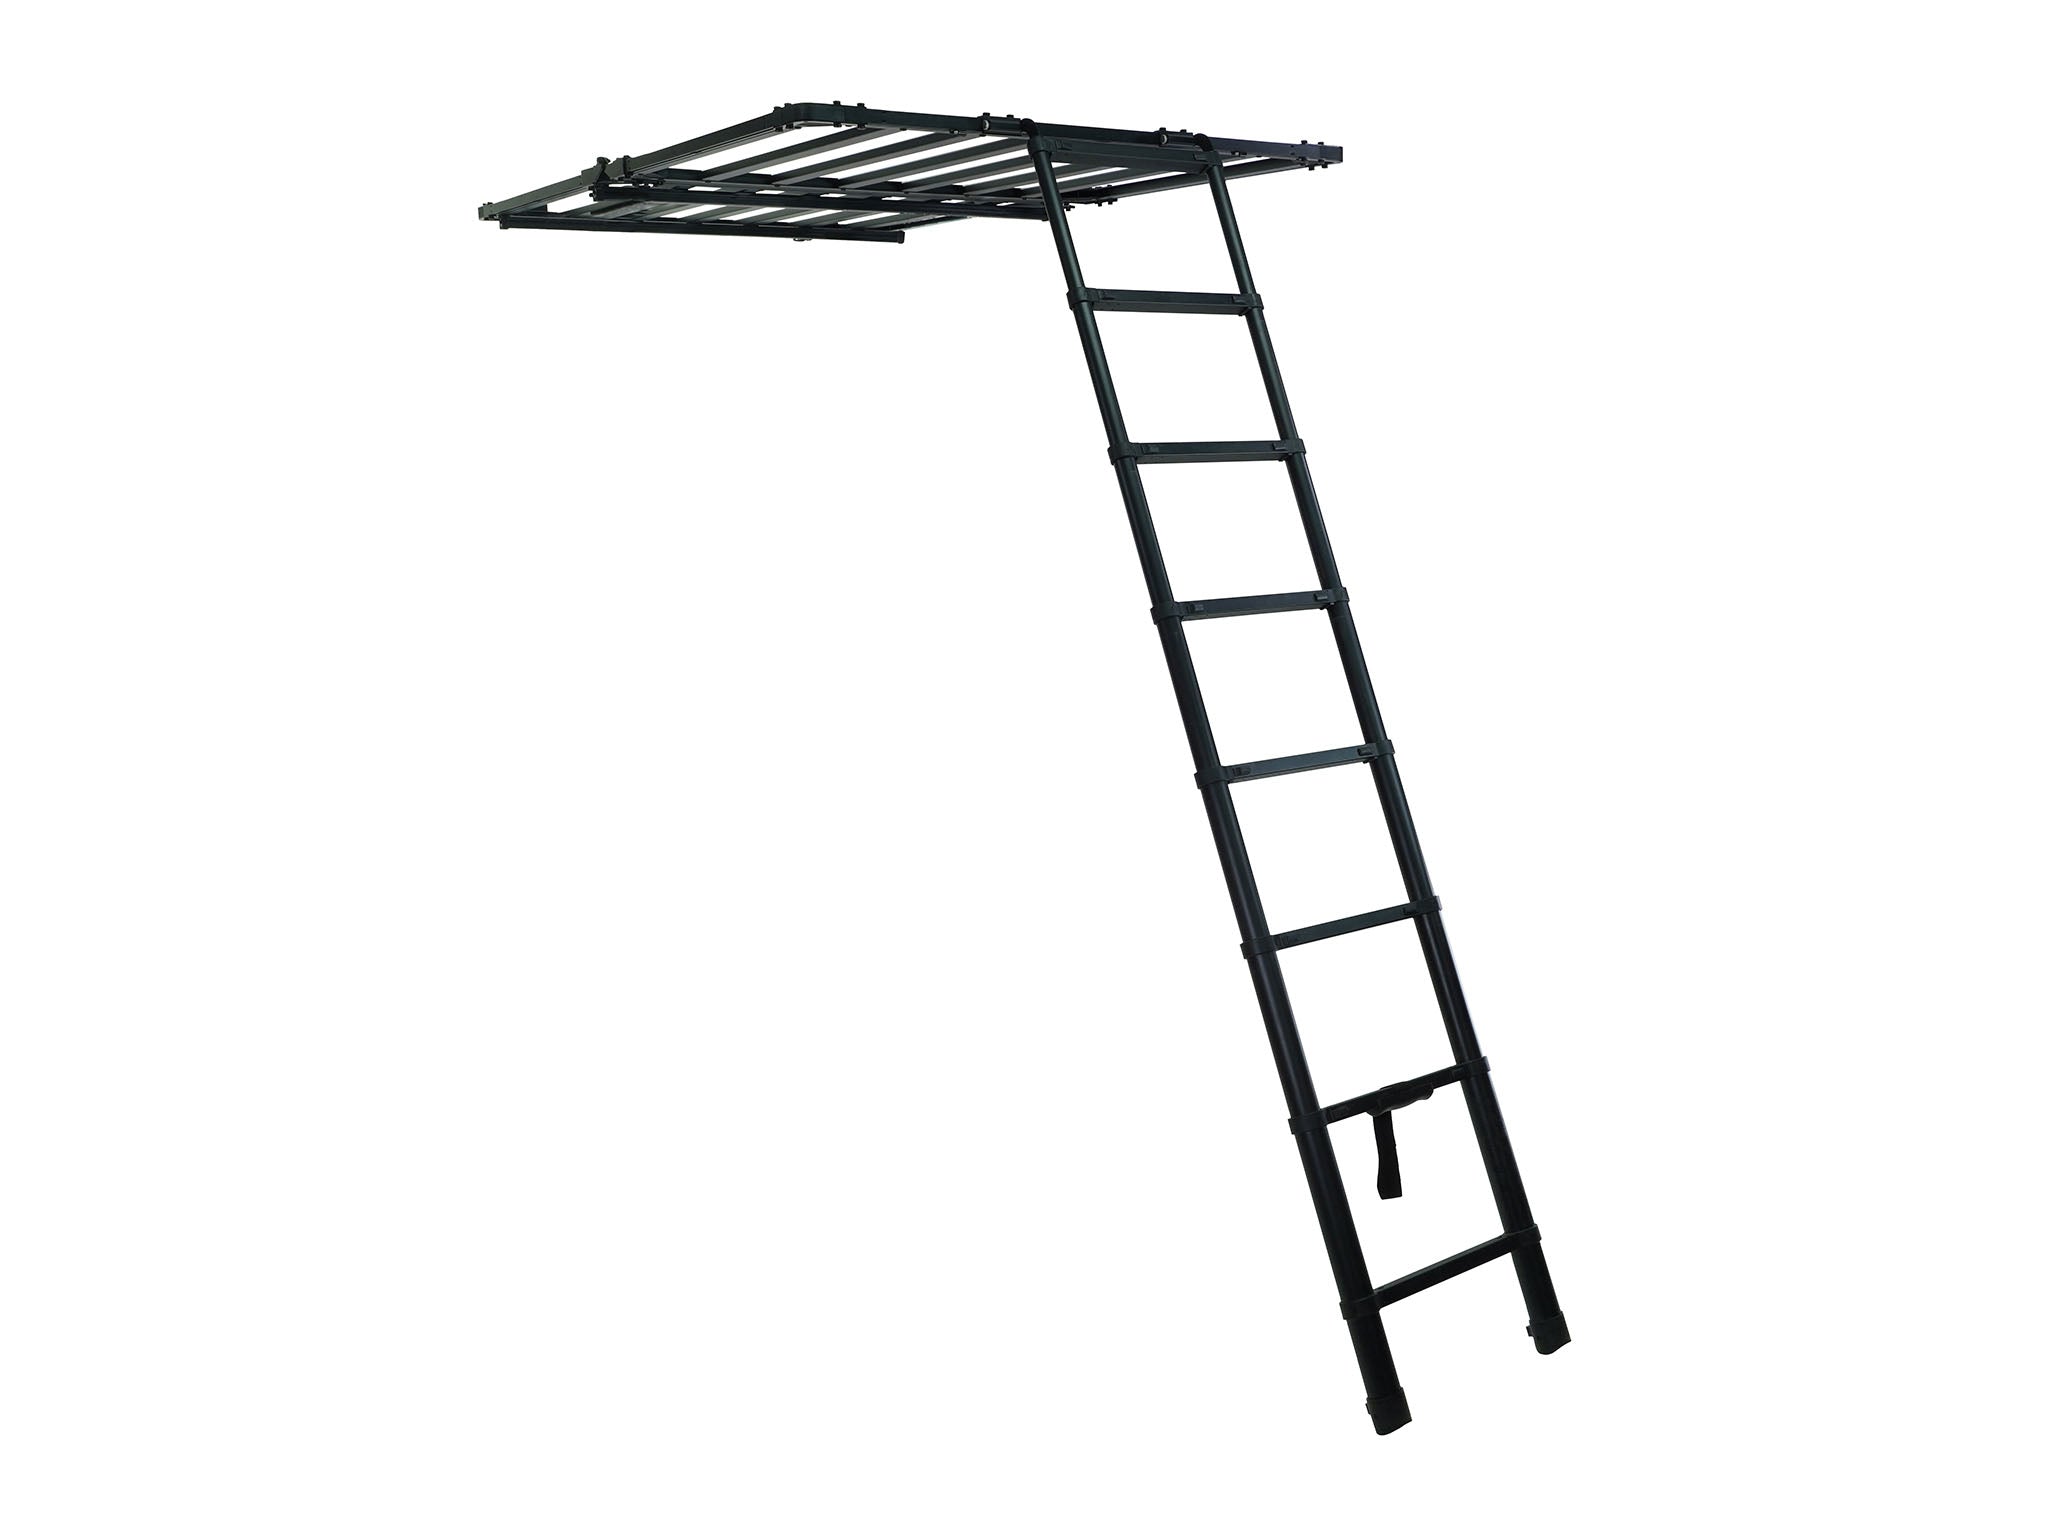
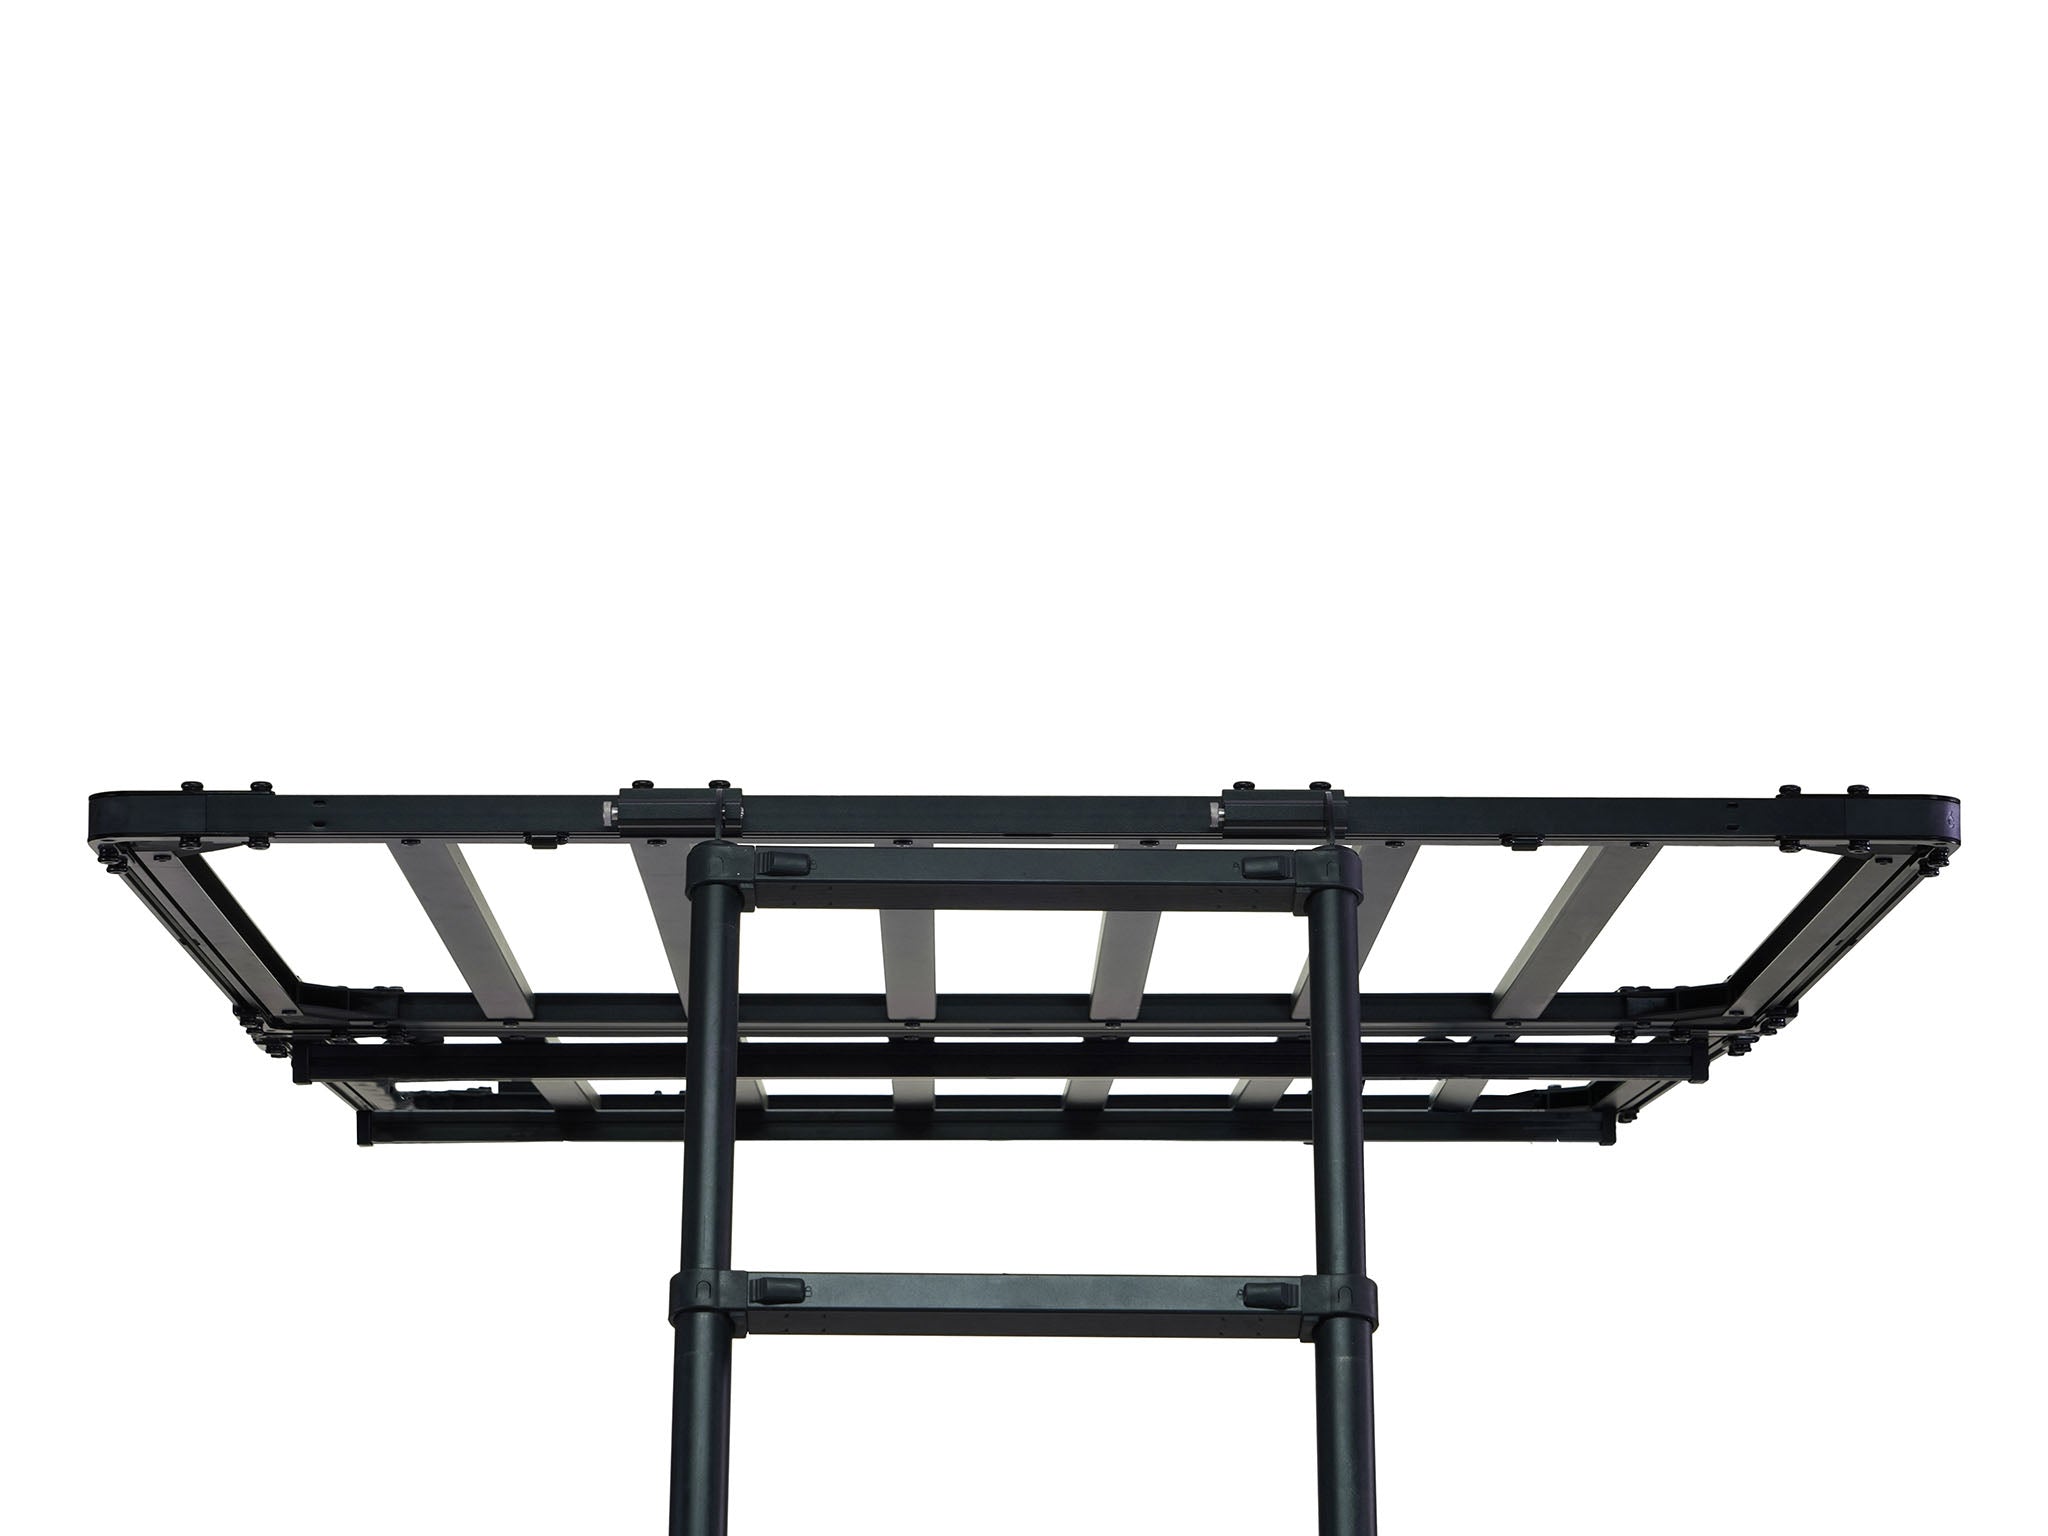
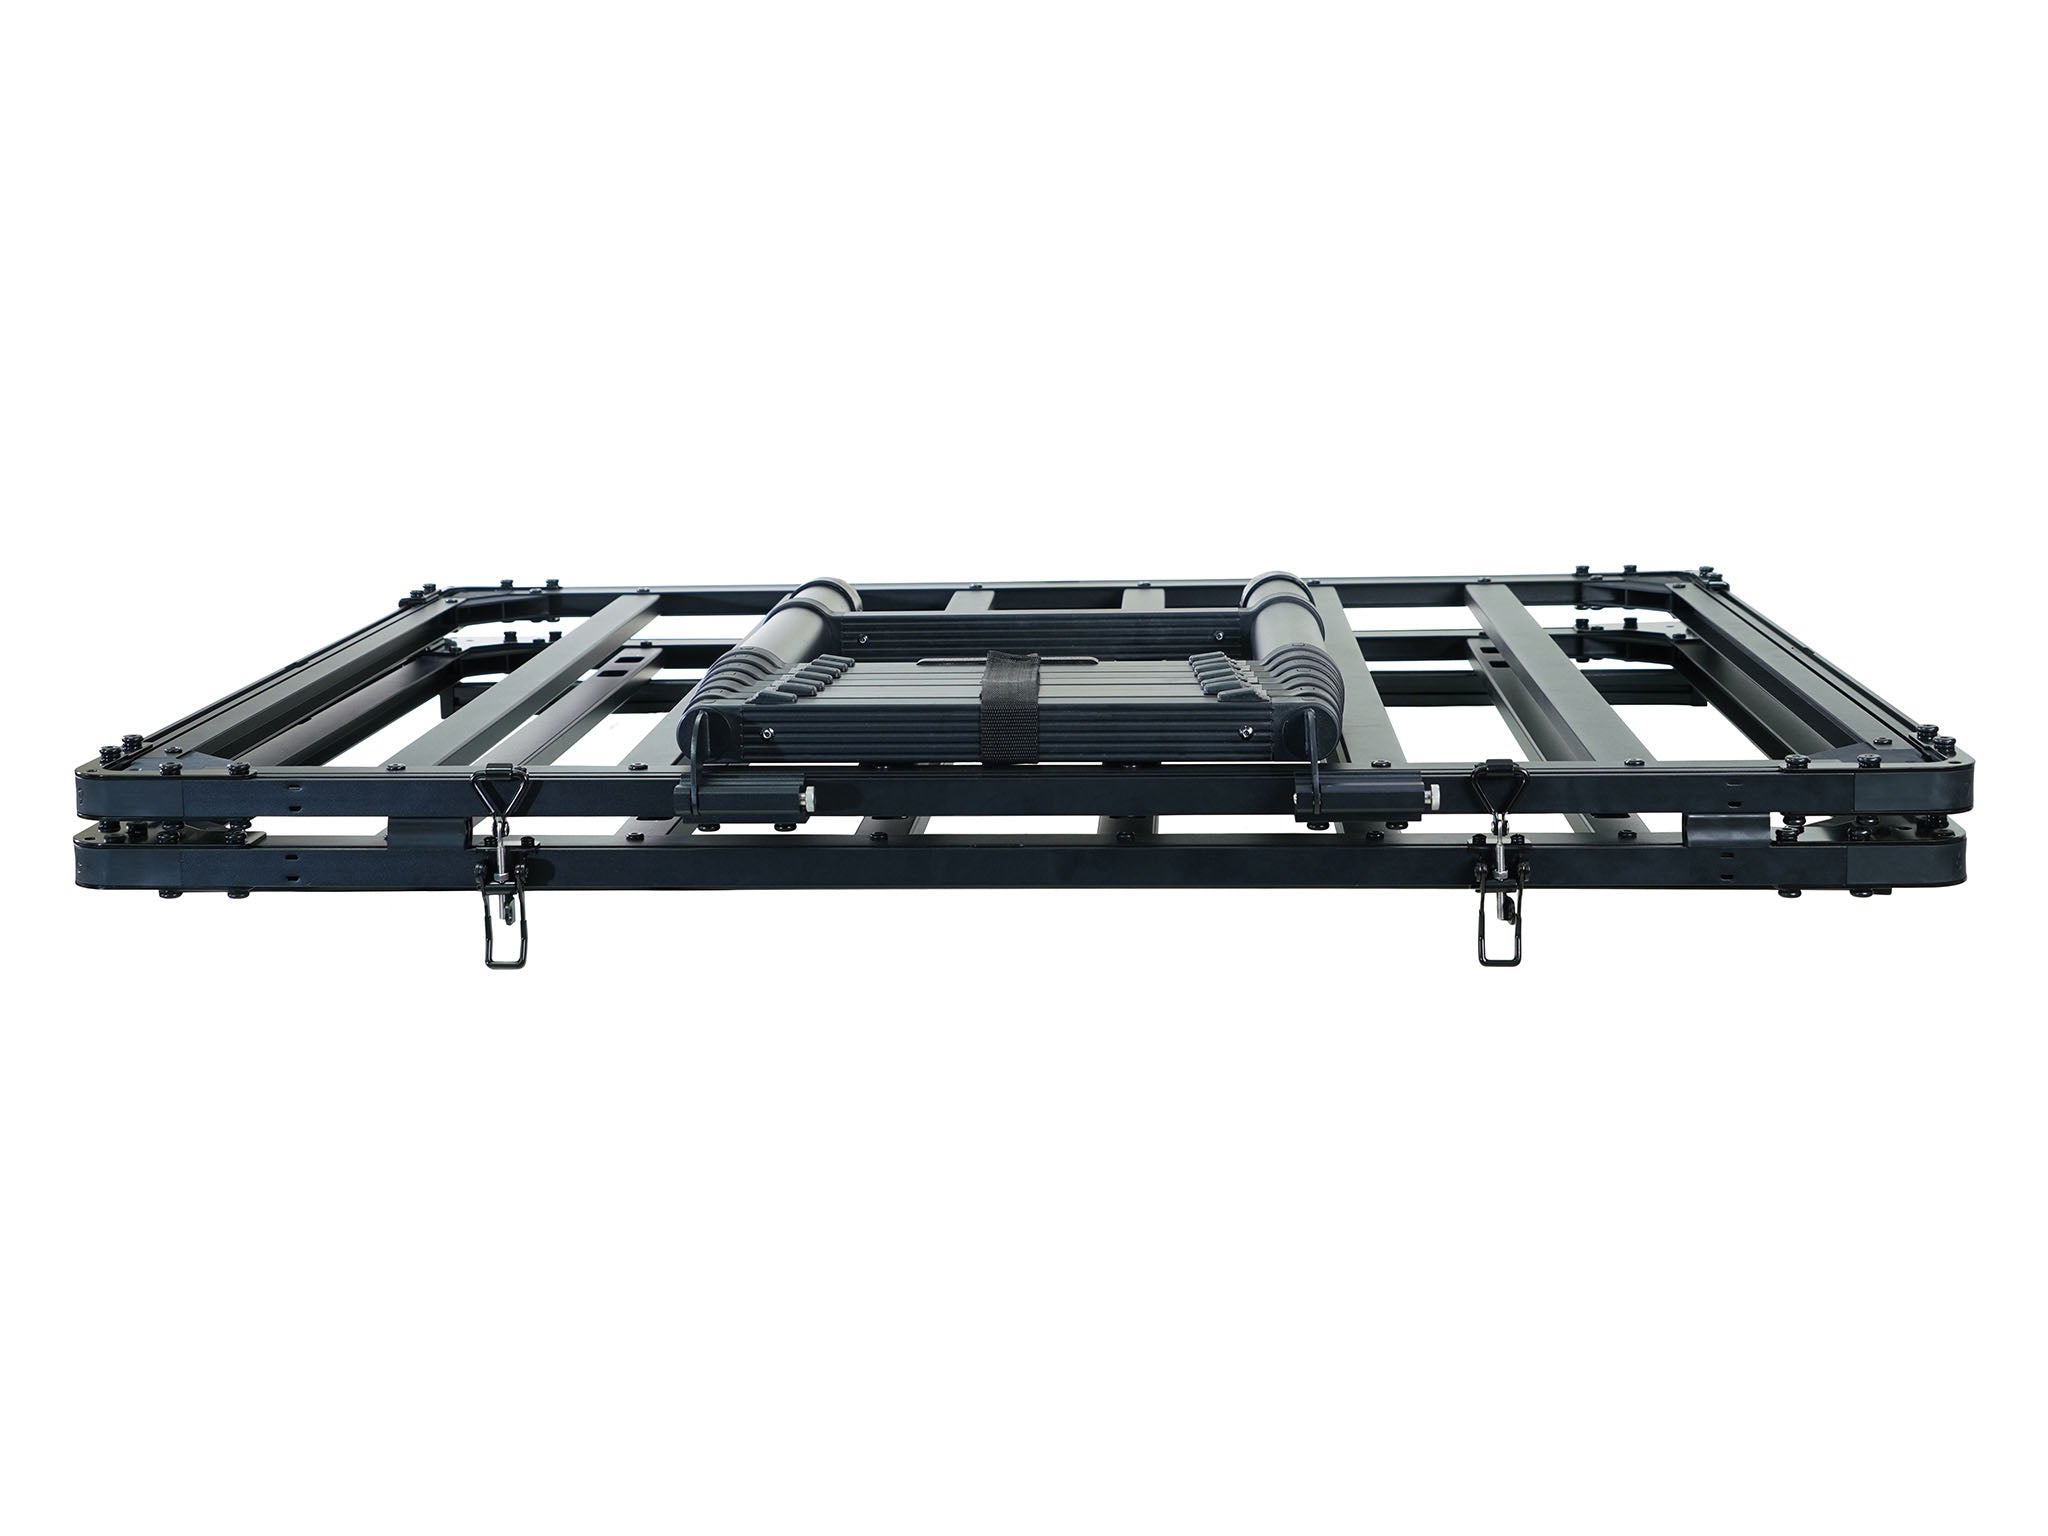
• 40 -70 lbs lighter (18 - 32 kgs) than similar sized roof top tents. At 88lbs / 38kgs (including ladder and mattress) the Rev RTT is the lightest in the world.
• Easily moved in 3 parts by 1 person on and off vehicles and in and out of storage areas
•Tent / Mattress weighs 25 lbs / 11.4 kgs
•Rev Platform weighs 52 lbs / 24 kgs
•Ladder weighs 11 lbs / 5 kgs
There is no need to carry a roof top tent full time on your daily driver. Just hang the Rev Tent on garage wall and only mount to vehicle when camping.
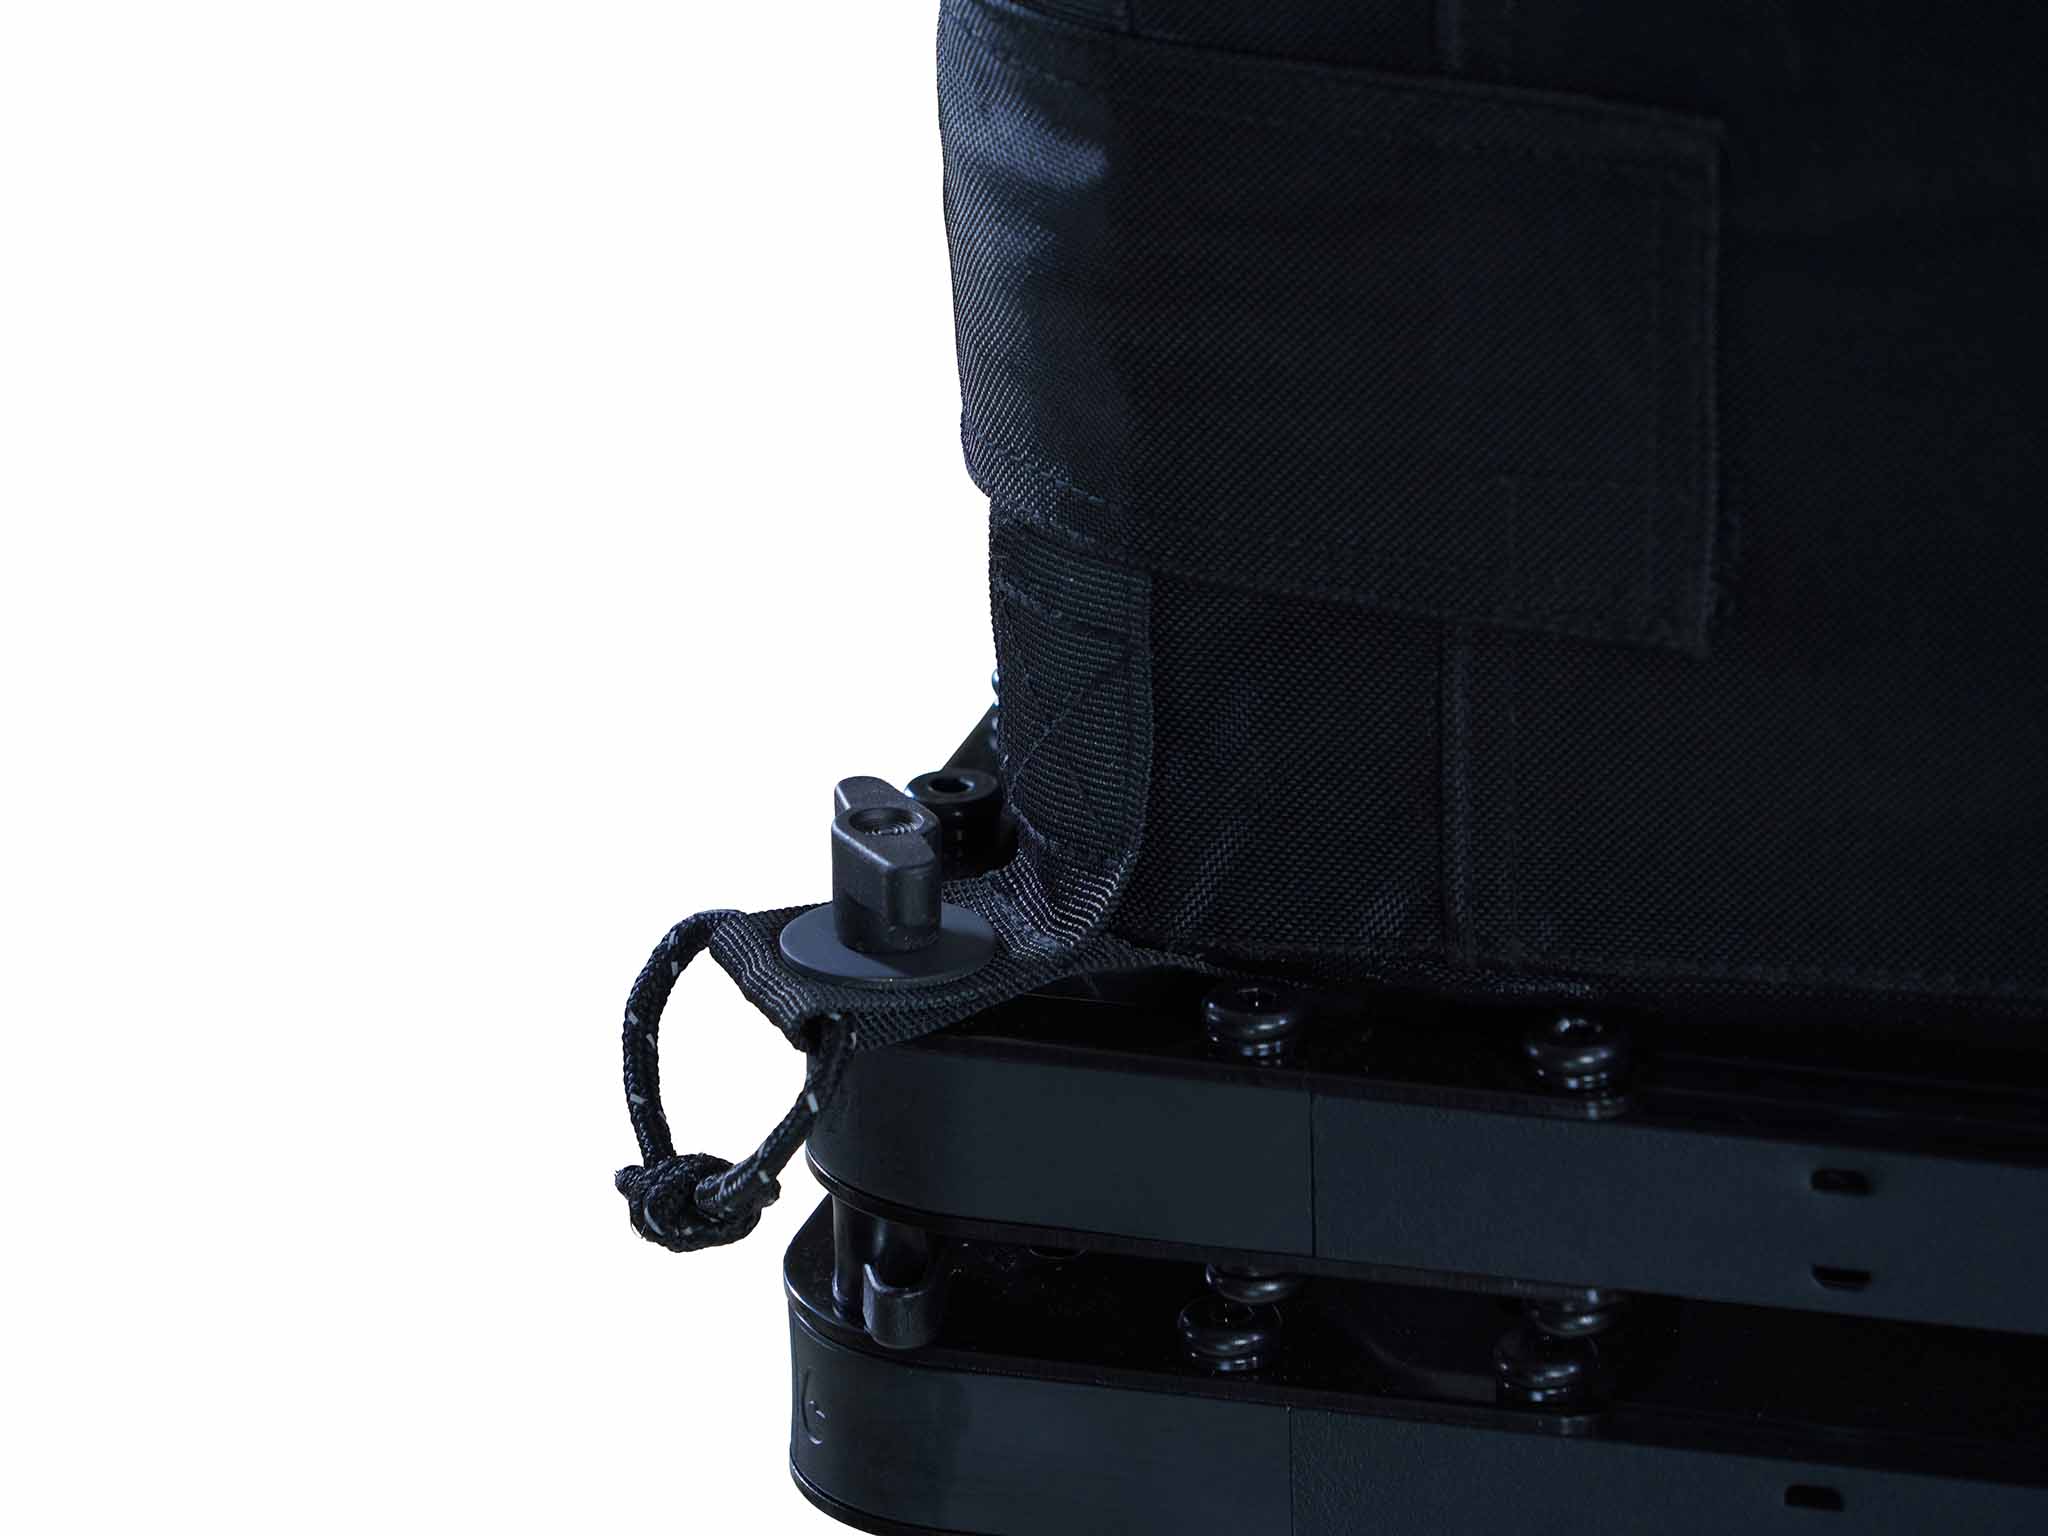
• The Rev Roof Top Tent supports up to 475 lbs / 215 kgs of human; human and dog; human, dog, camp gear; or any combination of the aforementioned.
 * Cross bars or a roof rack needed.
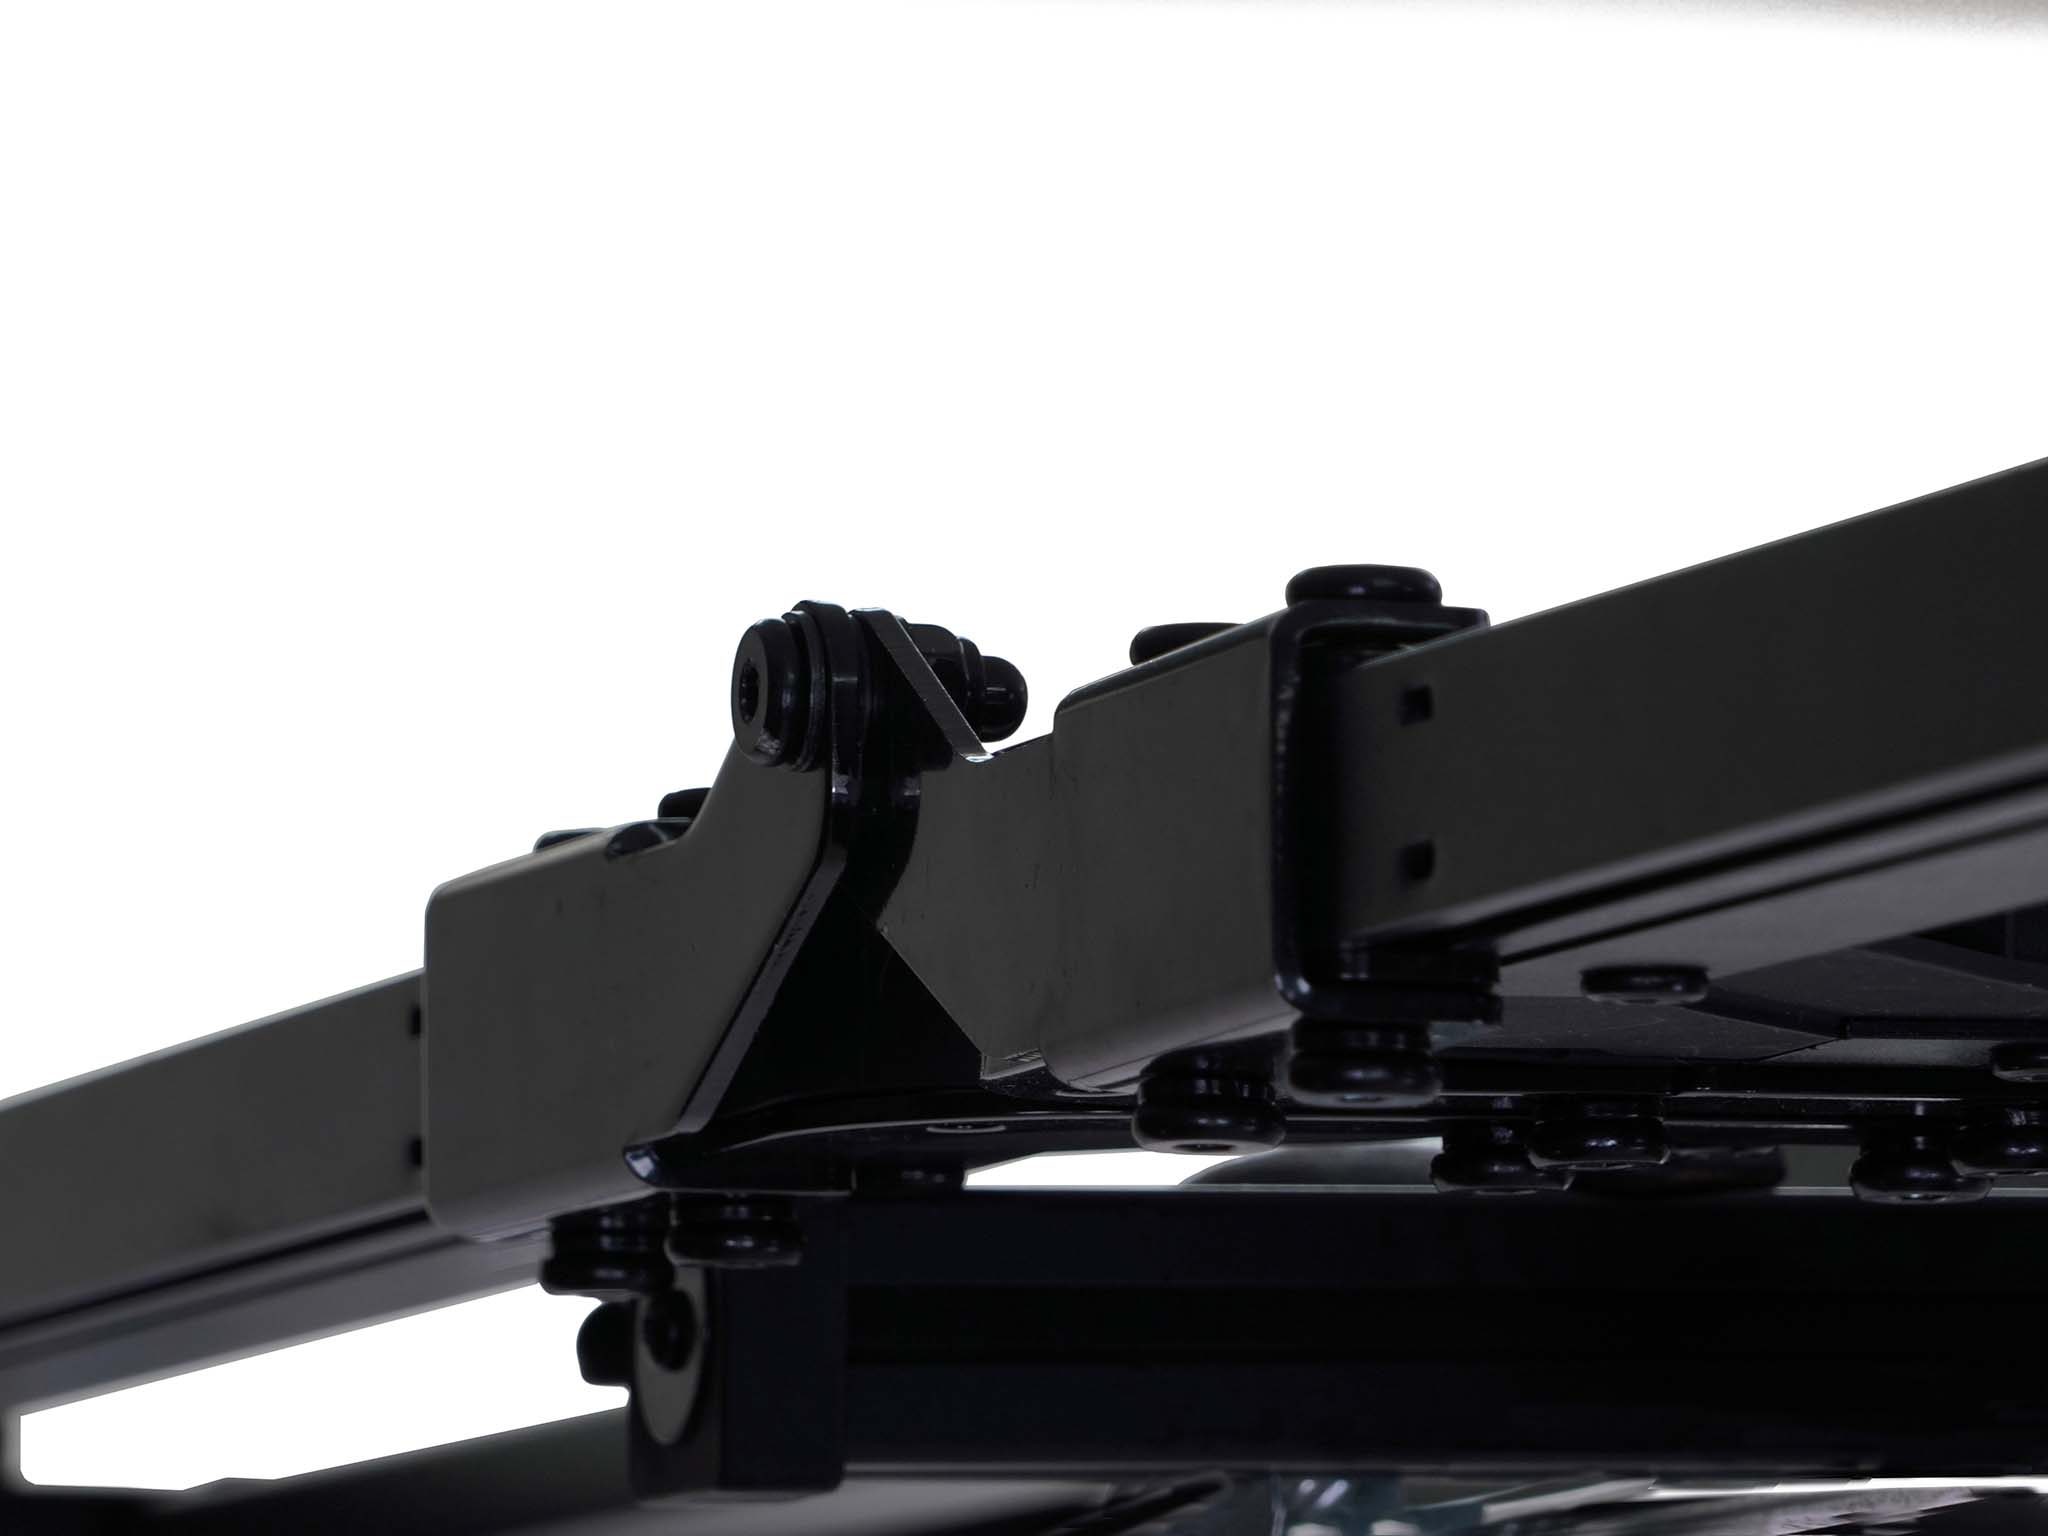
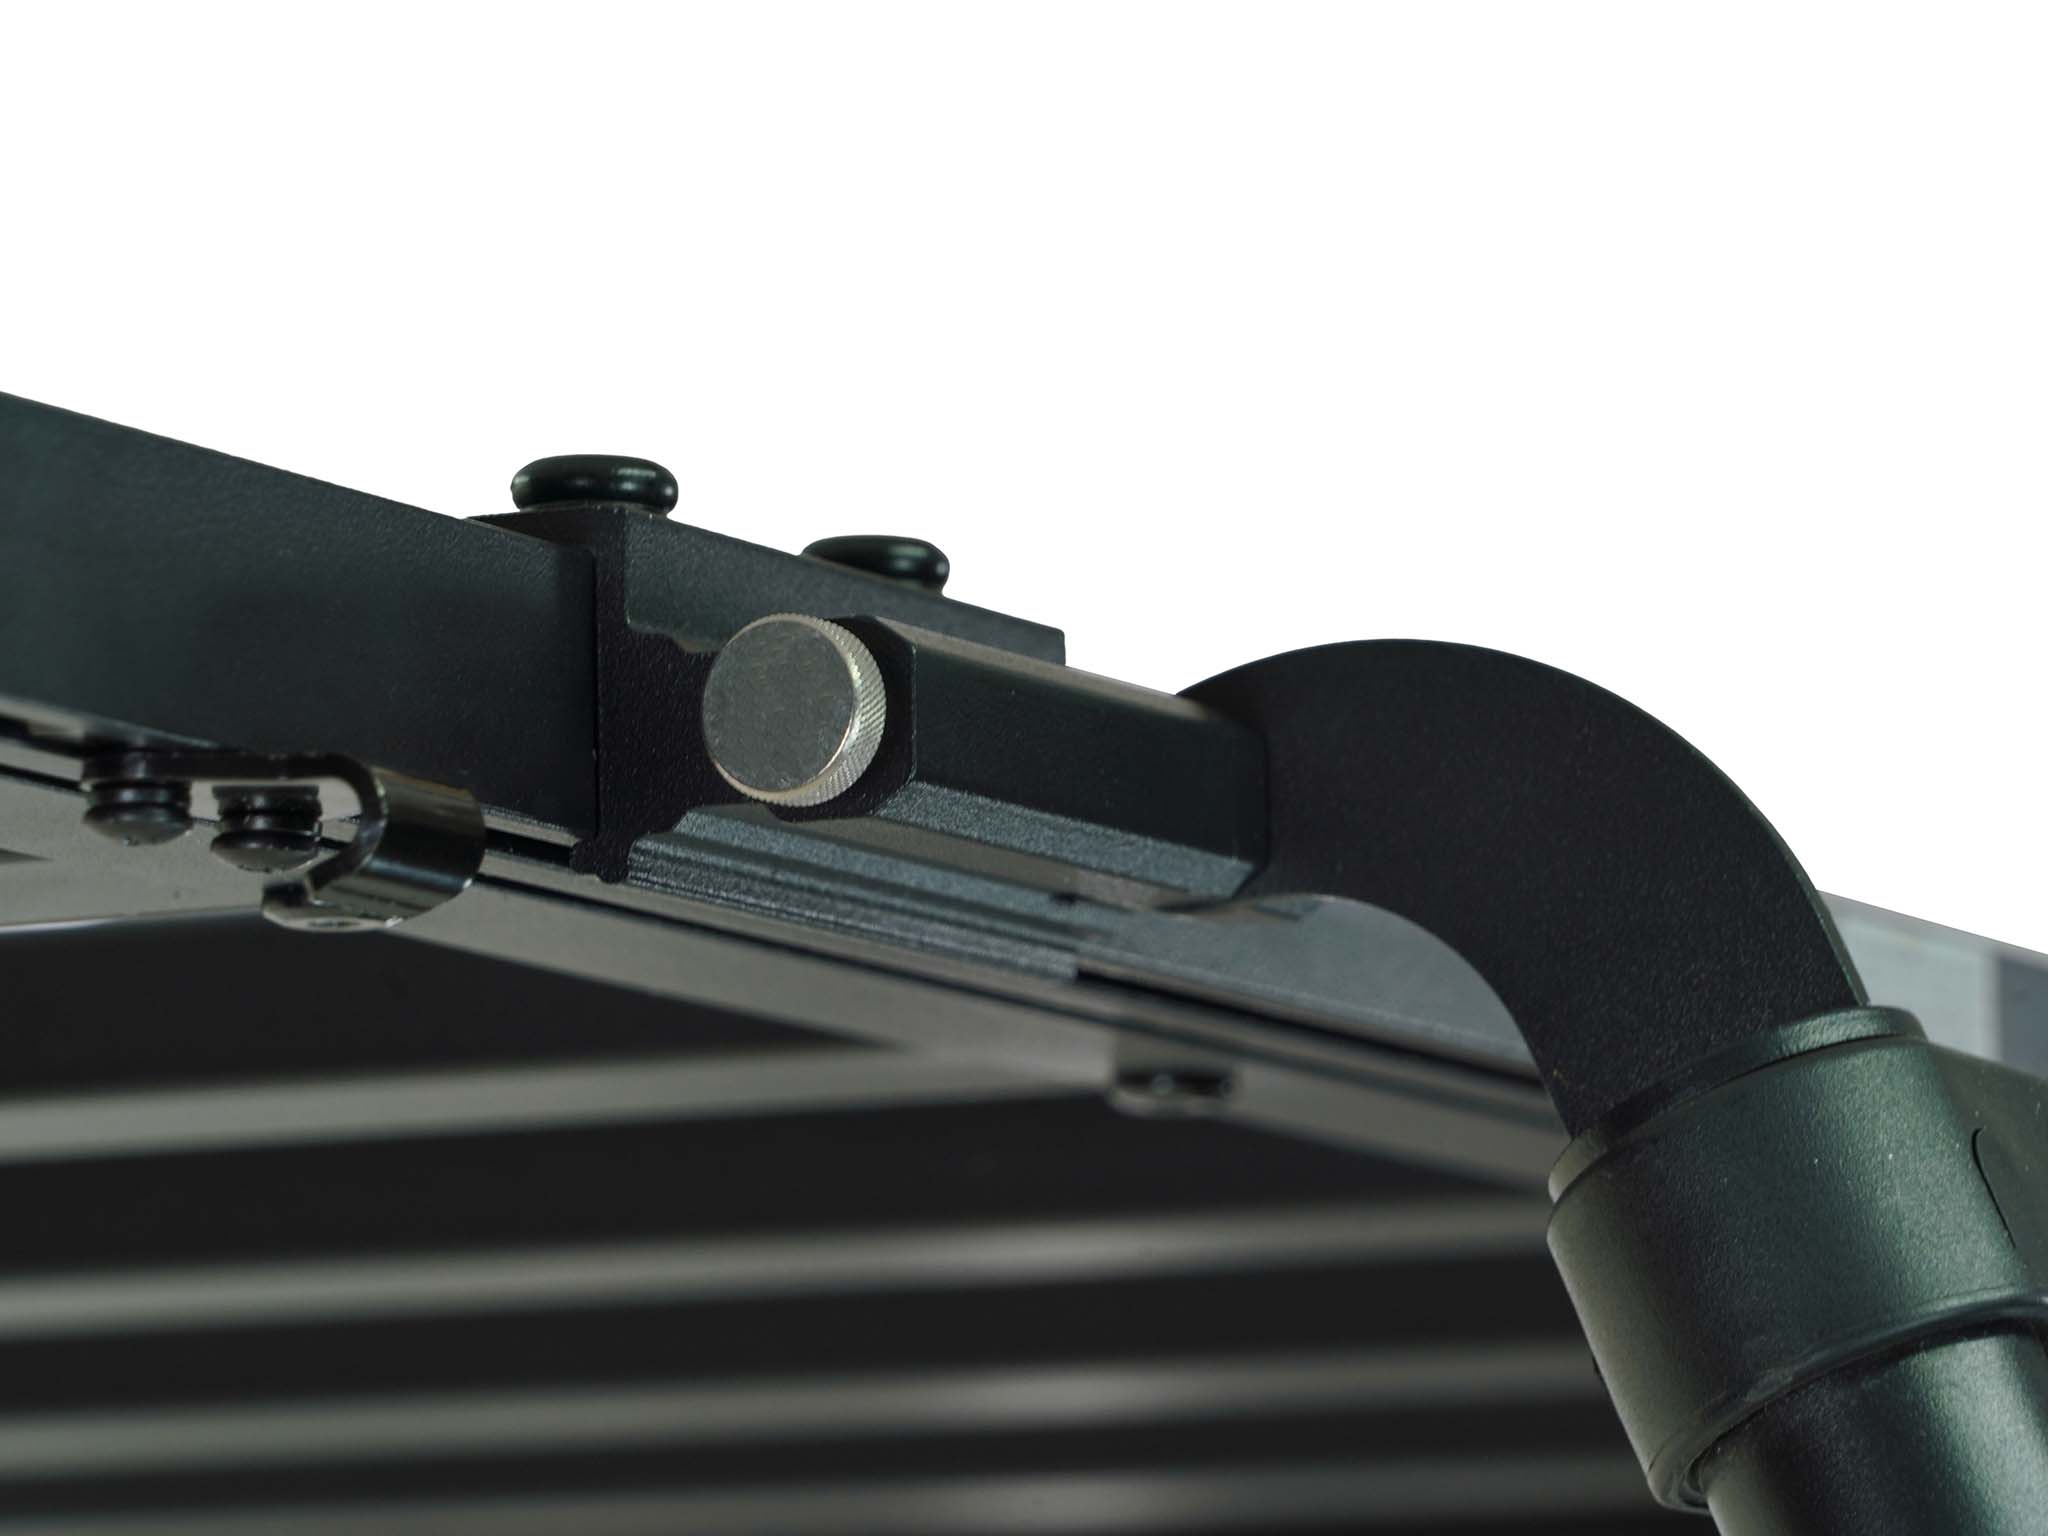
** The cross bars should be positioned no closer than 24" / 61 cm , and no wider than 40" / 102 cm. Recommended distance between the bars is 32".
***Vehicle roof and cross bar dynamic (driving) load carrying capacity must be at least 150 lbs / 68 kgs
Included mounting hardware fits all styles of cross bars and rack slats as long as they are no wider than 4” / 100mm and no taller than 1.5” / 38mm
If you are a beginner to vehicle roof top camping, please see our STARTER GUIDE.
 Use with the Rev Room Annex to create a private standing room for changing, showering, or restroom business.
Add Rev Shoe Storage bags to the Rev Rack Tent for additional storage for shoes, sundries, flashlight, keys, toiletries.
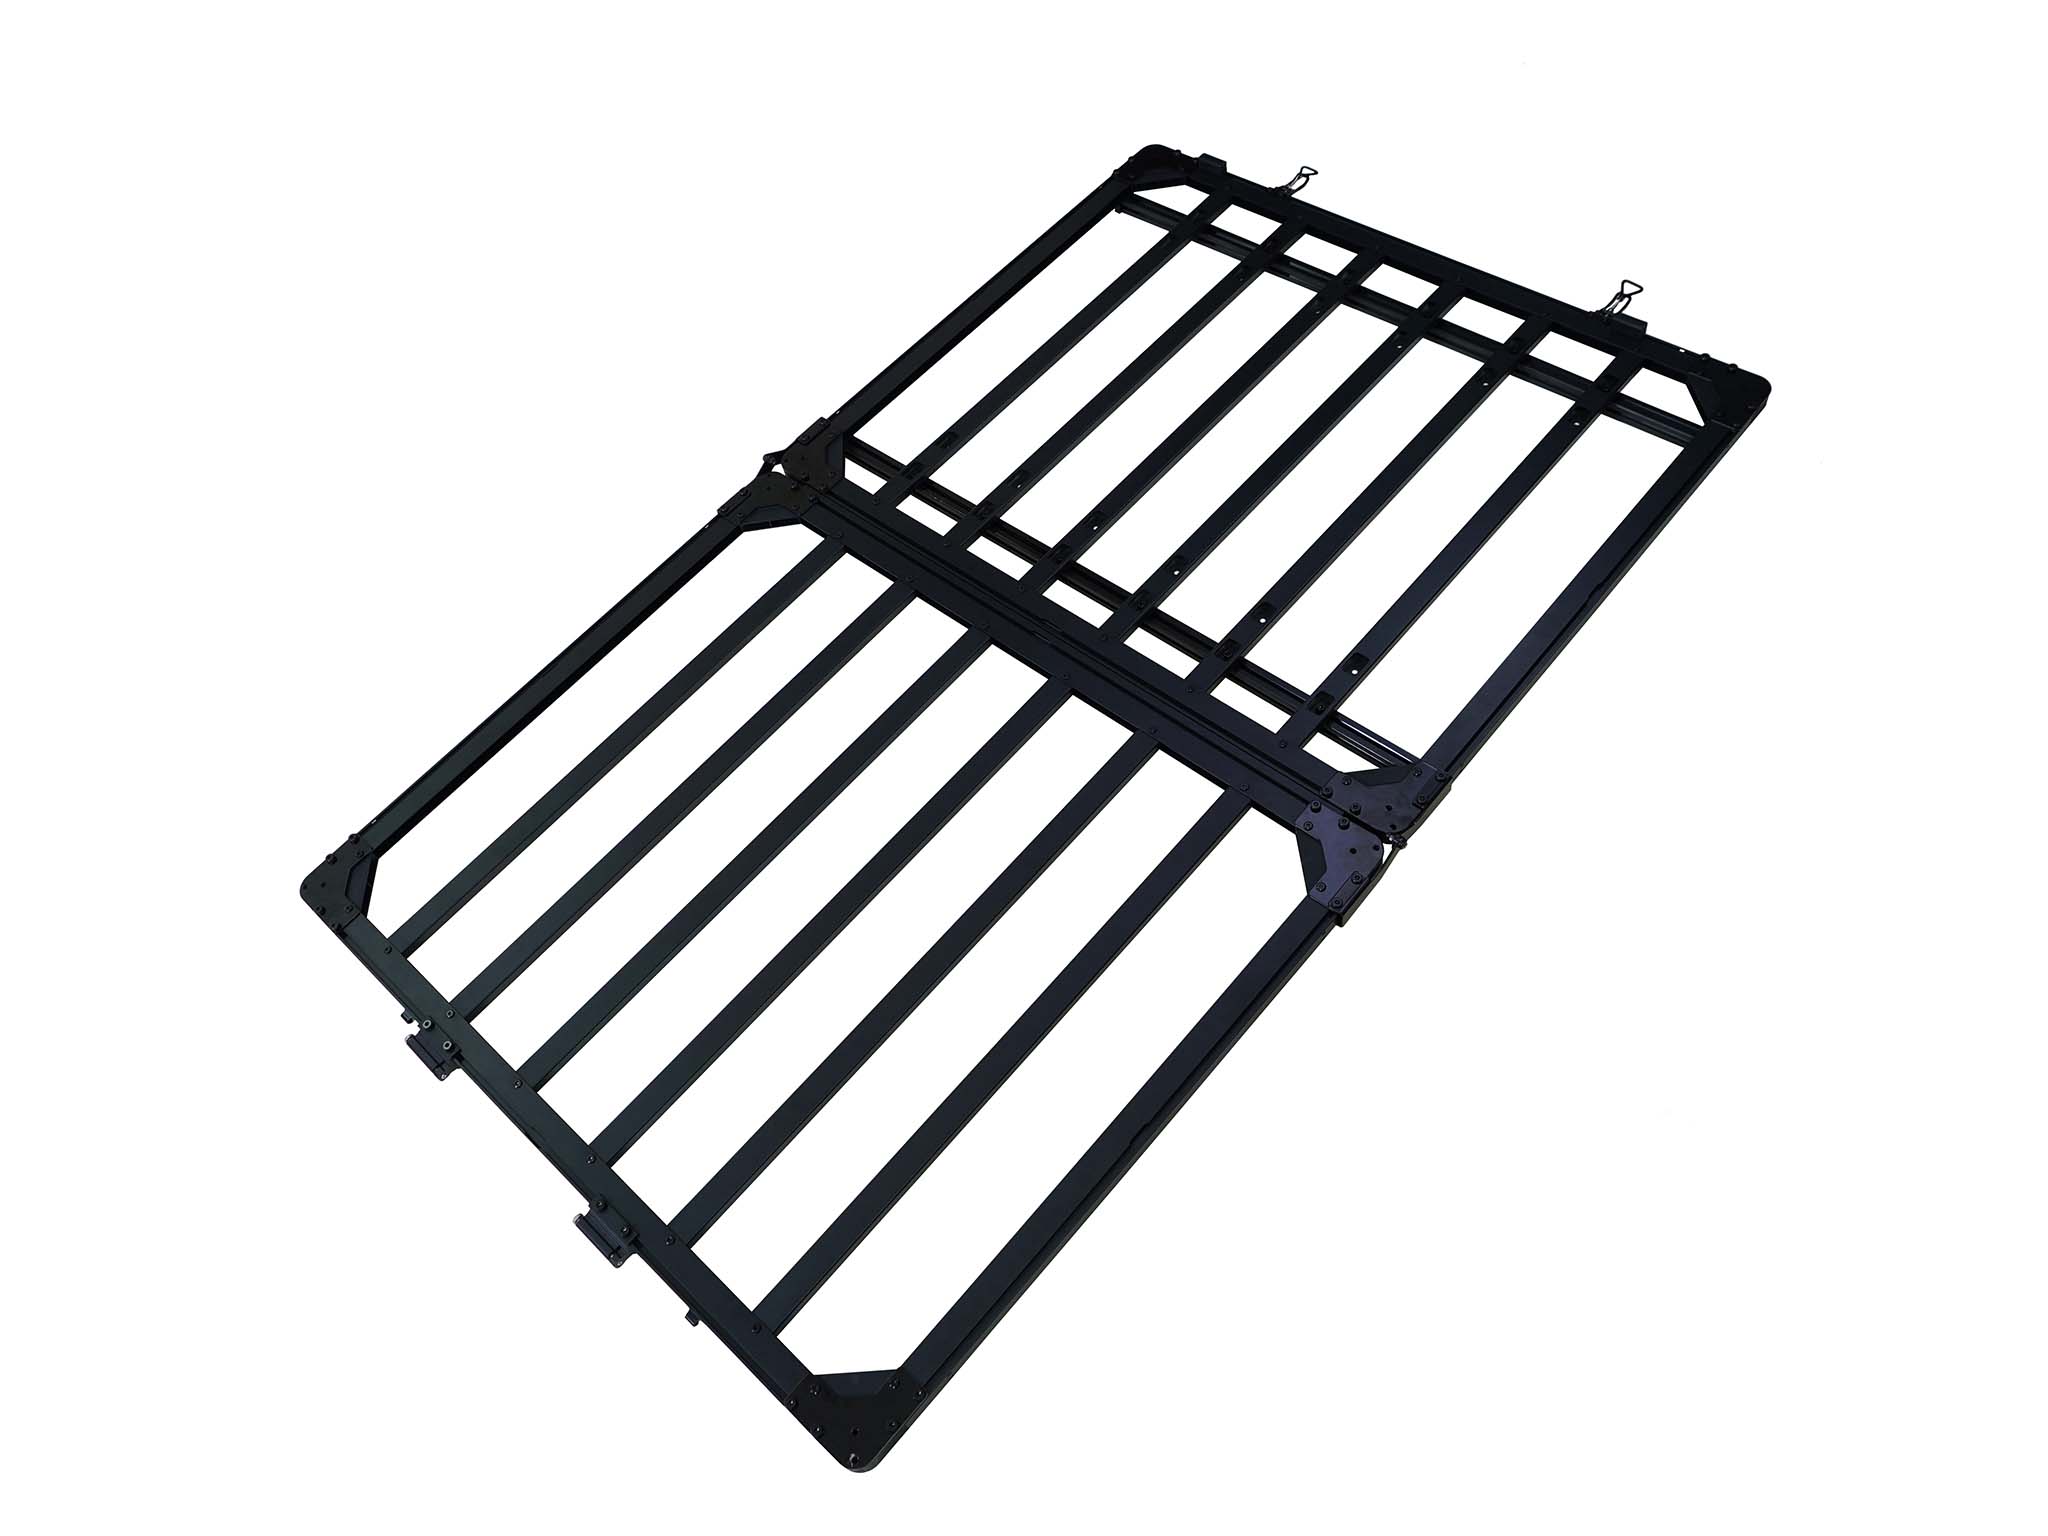
** NOTE: The REV PLATFORM X ships unassembled. This means the Rev Platform X needs to be assembled by you! All necessary tools are included. Any concerns about this? It's easy, but it does take time. If you can build Legos or Ikea furniture, this will be no problem!
The Rev Tent can be used for sleeping on top of ANY VEHICLE that is compatible with cross bars or a roof rack.
While the Rev Tent is extremely versatile and a new “hybrid” tent - it is not magic. The Rev Tent needs support when used for sleeping on top of a vehicle. It can either be supported by a C6 Outdoor Rev Platform X mounted to cross bars or a roof rack, or directly to another brand’s large enough platform style roof rack.
We supply the great camping gear, you provide the vehicle and the system (cross bars or roof rack) that our gear mounts to.
Fastening anything to the outside of your vehicle is not for the faint hearted. With a little bit of homework, some specialized gear, and a bit of mechanical sense, anyone can safely mount a Rev Tent on top of their vehicle for sleeping.
OEM (OE) Acronym for Original Equipment Manufacturer. This is a car accessory from the factory / original vehicle manufacturer. In the case of roof top carrying – usually refers to the source of the cross bars or roof rails. For example, a Ford Bronco may come with Ford branded roof rails when you buy the vehicle off the lot.
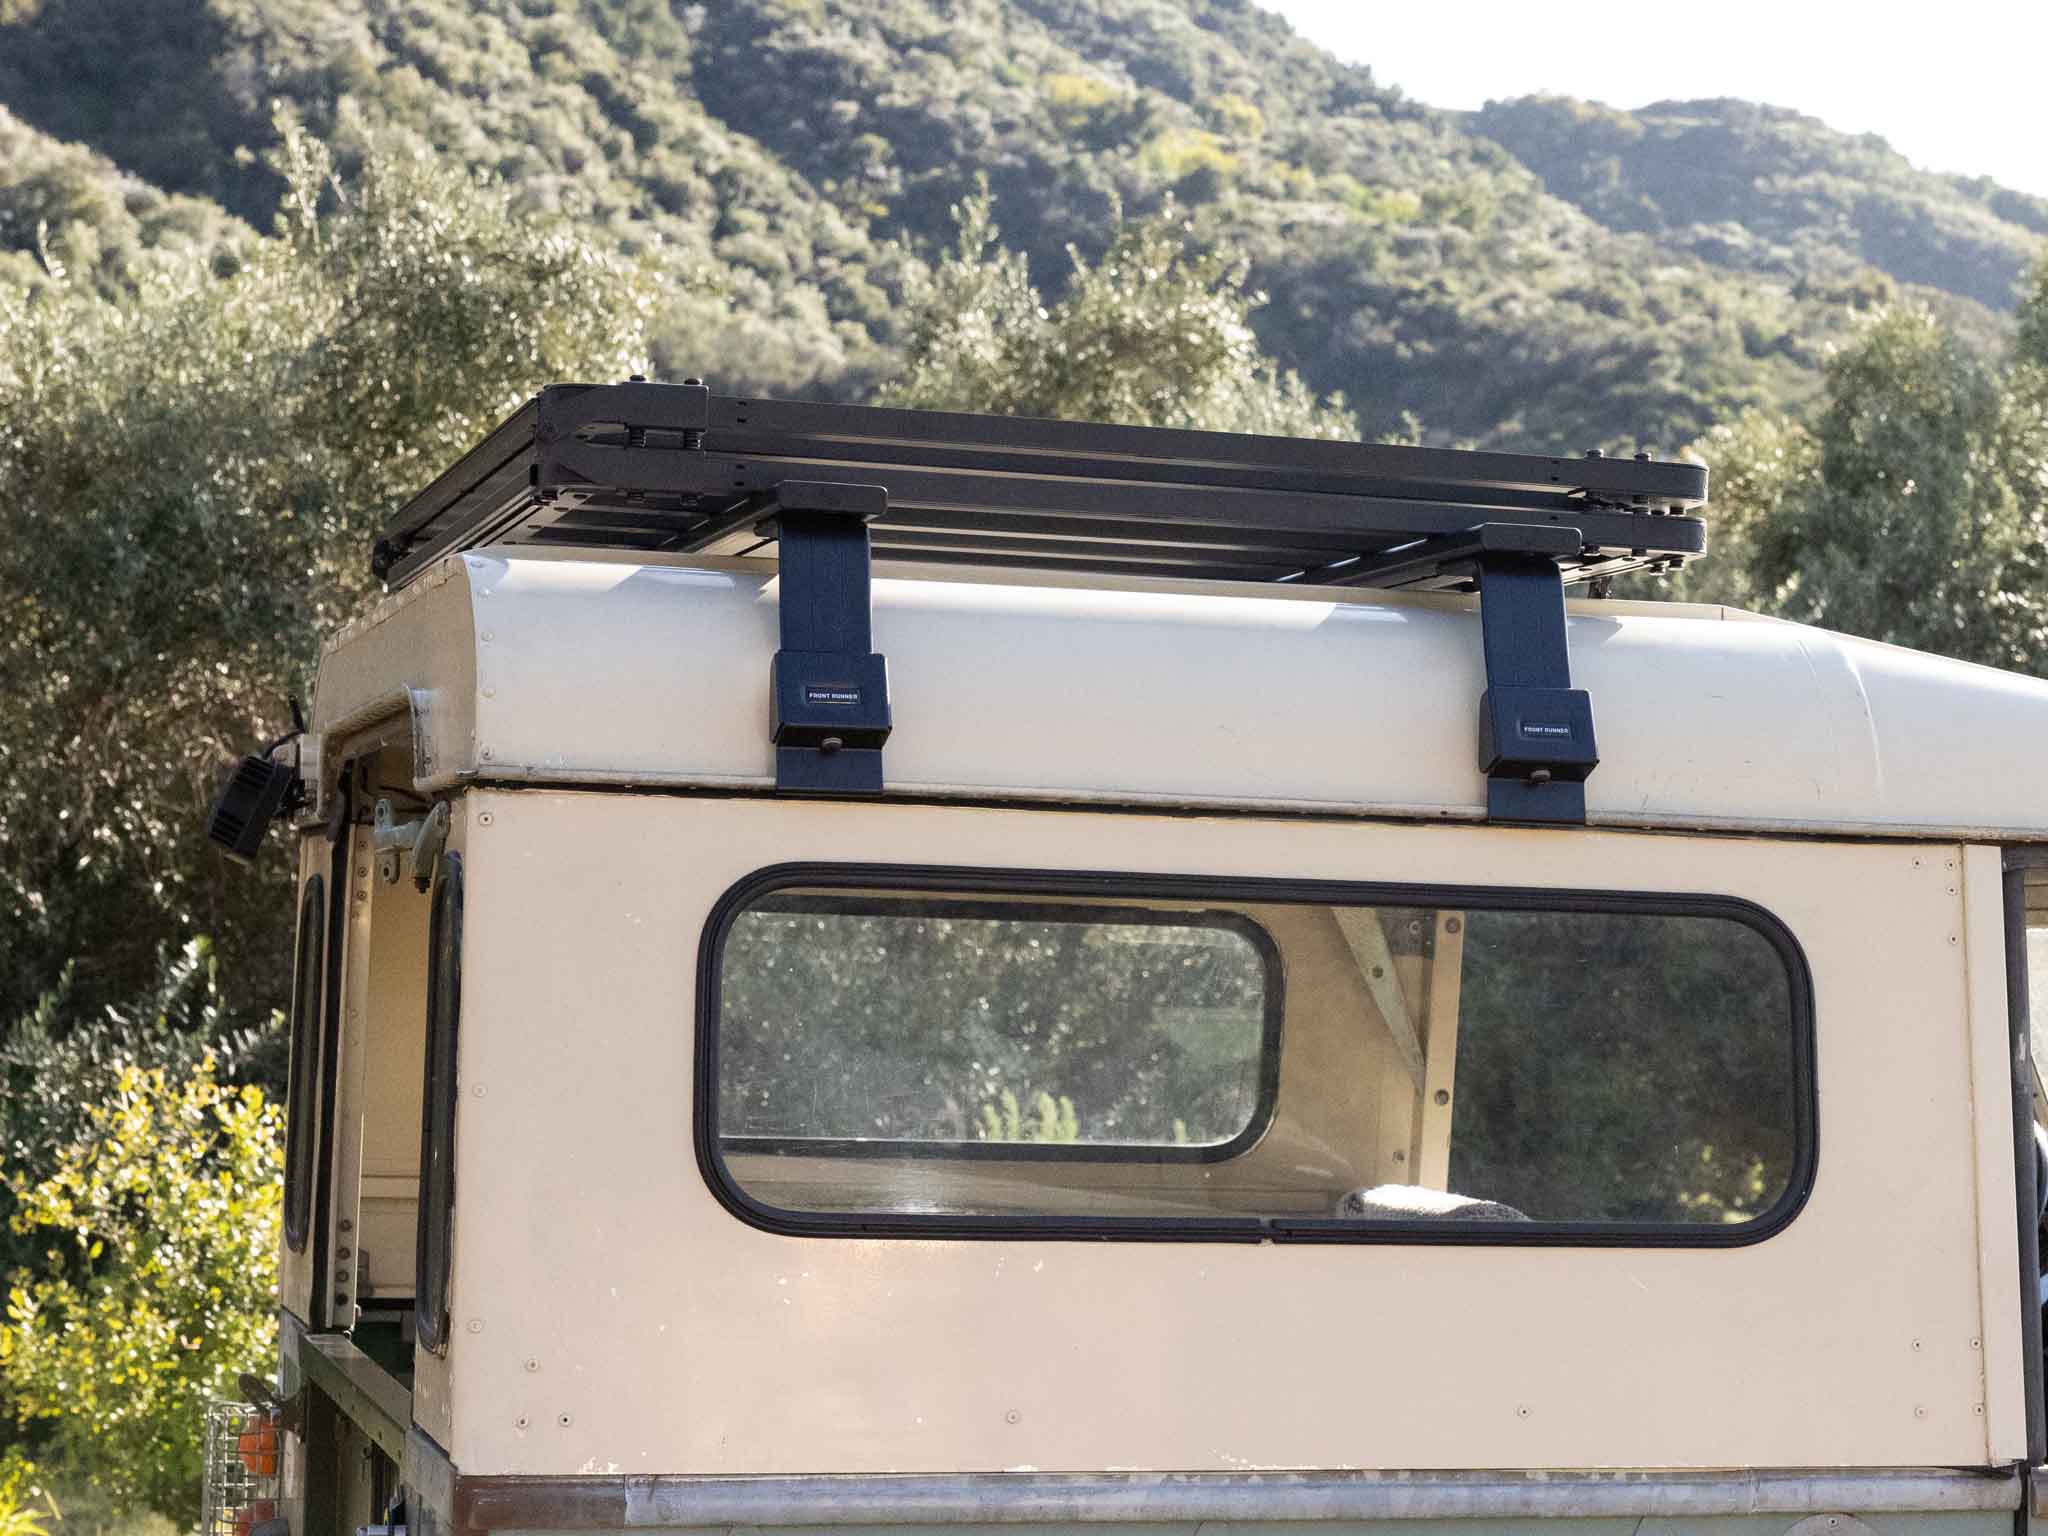
AFTERMARKET: Car accessory made by a manufacturer different than the vehicle manufacturer. For example, Front Runner makes “aftermarket” roof racks and cross bars for Toyota SUVs and Trucks.
ROOF RAILS: These are the supports that run front to back on the rooftop edge of vehicles. Some are decorative, others are functional and used to hold cross bars. They are usually OEM, but also available from aftermarket brands made stronger to support cross bars and roof racks to carry heavier gear.


FLUSH RAILS are lower and may have indents on the side to accommodate clamping style cross bars.

ROOF RAIL TRACK is flush with the roof has a channel for mounting accessories.
CROSS BARS: Sometimes called load bars, these supports (usually 2 bars) run SIDE TO SIDE on the roof of a vehicle. They can be either OEM or aftermarket. They can be round, oval, square or rectangular and attach to either roof rails, a fixed mounting point on independent feet, legs, or towers, or on feet clipped in the door frame.

ROOF RACK: A group of supports, usually called slats, with an outer perimeter to hold the slats together. Roof Racks can be platform style (flat) or basket shaped with raised sides. While the basket style is classic and notably used on on stagecoaches, that particular look is losing favor to the newer platform style.
The basket style raised sides usually interfere with mounting roof top tents. The Platform style is preferred.


BED RACK: an accessory mounting system over the bed of a pick-up truck. Can be comprised of cross bars, a roof rack or a extrusion style cage.


WEIGHT CAPACITY
OEM cross bars are often not strong enough to carry a roof top tent. While the Rev Roof Top Tent is the lightest system available, some cross bars offered by dealers are really just for show. Please check the vehicle manufacturer recommended weight limits. In order to make an informed decision about whether or not your OEM cross bars are strong enough, look up your vehicle online in the forums and see if other people have mounted roof top tents on the OEM bars and read about their experiences. While we can advise, you will need to make the final educated decision.
If using aftermarket cross bars (by brands like Yakima, Thule, Rhino, etc.), you will want to confirm the weight limitations of both the bars AND what you are mounting the bars to. Are you using aftermarket risers or feet / clamps? Or you attaching the cross bars to OEM raised roof rails? For example, if mounting to an OEM roof rail, what is the load carrying capacity of the roof rail? You may also need an aftermarket roof rail or swap out the OEM roof rail for track. Again, it is helpful to do a quick online search and see what people have done before you with your specific vehicle and learn from their experience. Roof Top Tents are so popular, it’s likely that every make and model of car has had someone try to attach a roof top tent to it!
Your roof and cross bar set up should follow these guidelines:
DYNAMIC RATING: At least 150 lbs / 68kgs
STATIC RATING: Weight of Rev Roof Top Tent system (76lbs / 35kgs) + the weight of the people in the Rev Tent.
NOTE: The Rev Platform X itself can hold up to 450lbs / 204kgs inside the tent.
** Dynamic weight rating refers to the weight the rack or bar system can hold while the vehicle is moving. Static weight rating refers to a stationary vehicle, ie when camping.
SIZE & SHAPE OF CROSS BARS
Oval, square and rectangular shaped bars can be used with the included clamping hardware as long as the dimensions are no wider than 10cm / 4” and no taller than 4cm / 1.5”.

If you have wider or taller bars, please contact us and we can help you make a plan to mount the Rev Platform X. For example, there are aftermarket tent brackets from BillieBar, Front Runner and other rack brands that are compatible with the Rev Roof Top Tent Platform x.
SPACING OF CROSS BARS


If you go the route of sleeping in a Rev Tent on an appropriately sized Roof Rack, securing the roof rack to your vehicle is on you. Check with the roof rack manufacturer and follow their recommendations for size and mounting approach.
ROOF RACK SIZE
C6 Outdoor offers 3 different style mounting systems to mount the Rev tent to different brand and style Roof Racks. Just choose the included mounting kit when adding the Rev Rack Tent to your cart.
If you have a smaller roof rack, you can mount the Rev Tent for transport, but to sleep on the roof rack you will need the Rev Roof Top Tent X and mount the included Rev Platform X to the roof rack.
You may also be able to use existing slots or holes in your slats and bolt the Rev Platform directly to your bars.
If rack slats are larger than dimensions listed above for the cross bars, or if the lip of the rack is raised, like on a Front Runner /Dometic Slimline II roof rack, you may need additional mounting hardware. Please refer to the manufacturer of your roof rack for the recommended way to mount a roof top tent.
A raised perimeter basket style roof rack may interfere.

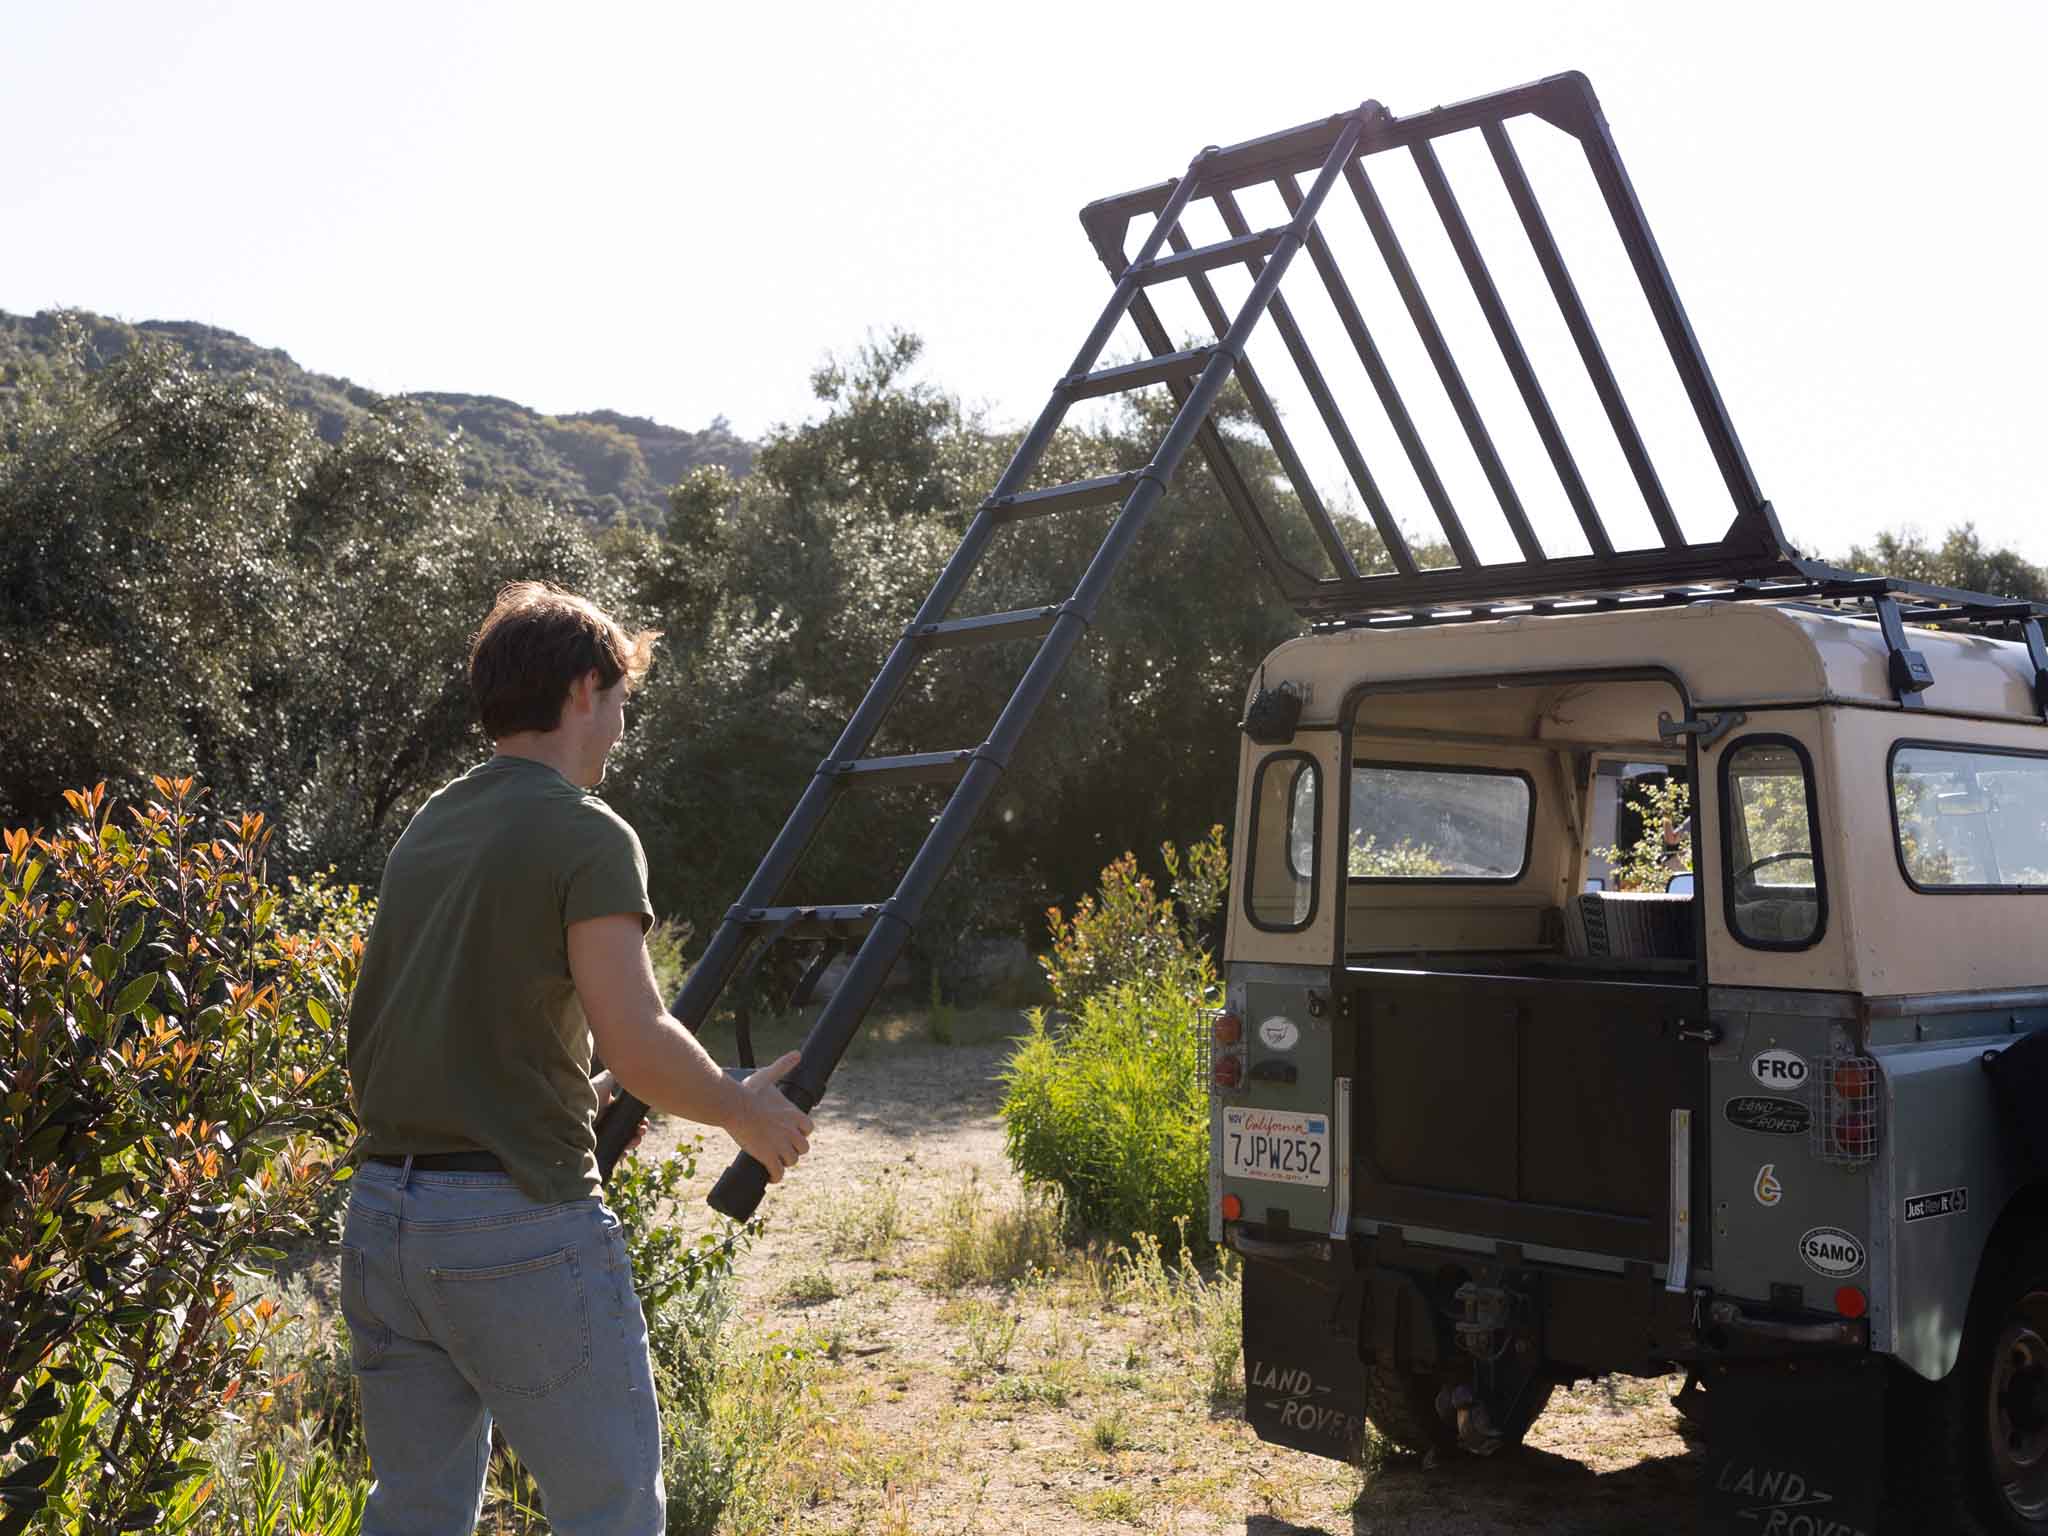
Ladder
The Rev Ladder is Sold Separately. If you have a way to climb up your vehicle - a rear mounted ladder, a rear swing mounted tire, up over the hood, etc - you don’t need a ladder for your Rev Rack Tent.
** NOTE: The REV PLATFORM X ships unassembled. This means the Rev Platform X needs to be assembled by you! All necessary tools are included. Any concerns about this? It's easy, but it does take time. If you can build Legos or Ikea furniture, this will be no problem!
REV PLATFORM XASSEMBLY INSTRUCTIONS
SKU: 6PK3BK3
Hi! This was written for you. Yes, you. Please read.
Don’t be a hero and muscle ahead blindly. You
must read all the instructions (including the
WARNINGS!) Take each step in order. It’s quicker
in the long run and you won’t have to double back
to fix mistakes.
If any of the small parts go missing (we won’t
blame you if you don’t blame us!) note that there
is a packet of spares.
ESTIMATED ASSEMBLY TIME: 2 hours
1 v1231019
WARNINGS
Failure to follow instructions could result in injury
and even death. Attaching gear to your vehicle
must be taken very seriously. Any questions or
concerns about assembly or installation please
contact support@C6outdoor.com
When transporting the Rev Platform you MUST
latch the platform closed and you MUST secure all
4 corners of the Rev Tent using the supplied hard-
ware.
When securing the Rev Tent and Rev Platform to a
vehicle for transport - check all connections and
straps often. Failure to properly secure the Rev
Tent, Platform and Ladder to a vehicle could
result in damage to the gear and bodily harm.
Please check with your vehicle manufacturer for
specified loading capacity of your roof and carry-
ing system. Not all factory roof carrying systems
or aftermarket cross bars can safely accommo-
date the Rev Roof Top Tent (Rev Tent & Rev Plat-
form). The Rev Roof Top Tent system weighs
@87lbs / 40kg.
When using the Rev Platform for camping with
the Rev Tent – the Rev Ladder must be secure, ex-
tended and locked in place before climbing. Posi-
tion ladder to fully support platform. Failure to do
so could damage the platform and you.
2 v1231019
GET READY
• Put on the C6 Outdoor wristband.
3 v1231019
GET ORGANIZED
SUMMARY Getting prepped properly now will
save you time and energy later.
• Prepare work area.
You will need a flat, clean work surface at least 7'x 5'
/ 213cm x 152cm. A clean floor will do!
• Remove top ladder box and parts box.
• Remove the tool packet from the parts box.
Included tools
1 13mm ratcheting wrench
2 4mm hex keys
1 5mm hex key
1 6 mm hex key
1 phillips head screwdriver
You may also need a rubber mallet or hammer
with a small towel.
• Set out all the hardware packets. Do not dump
out the contents! Leave the parts in the bag to keep
organized.
We have included spares for emergencies.
4 v1231019
LAY OUT EXTRUSIONS
SUMMARY There is a top side and bottom side
to each piece of extruded aluminum. For this
layout, we're putting the bottom of the platform
facing up. Make sure the real life pieces you are
laying out look like the pieces in the drawing
below. Make it match. This is fun! Like laying out
the bones of a Halloween skeleton decoration.
Center
Profiles
Outer
Profiles
Track
Slats
Standard
Slats
Corner
Profiles
5 v1231019
• Identify and place the center profiles.
The center profiles “lock” together. 2 channel
slots face up, 1 channel slot faces down.
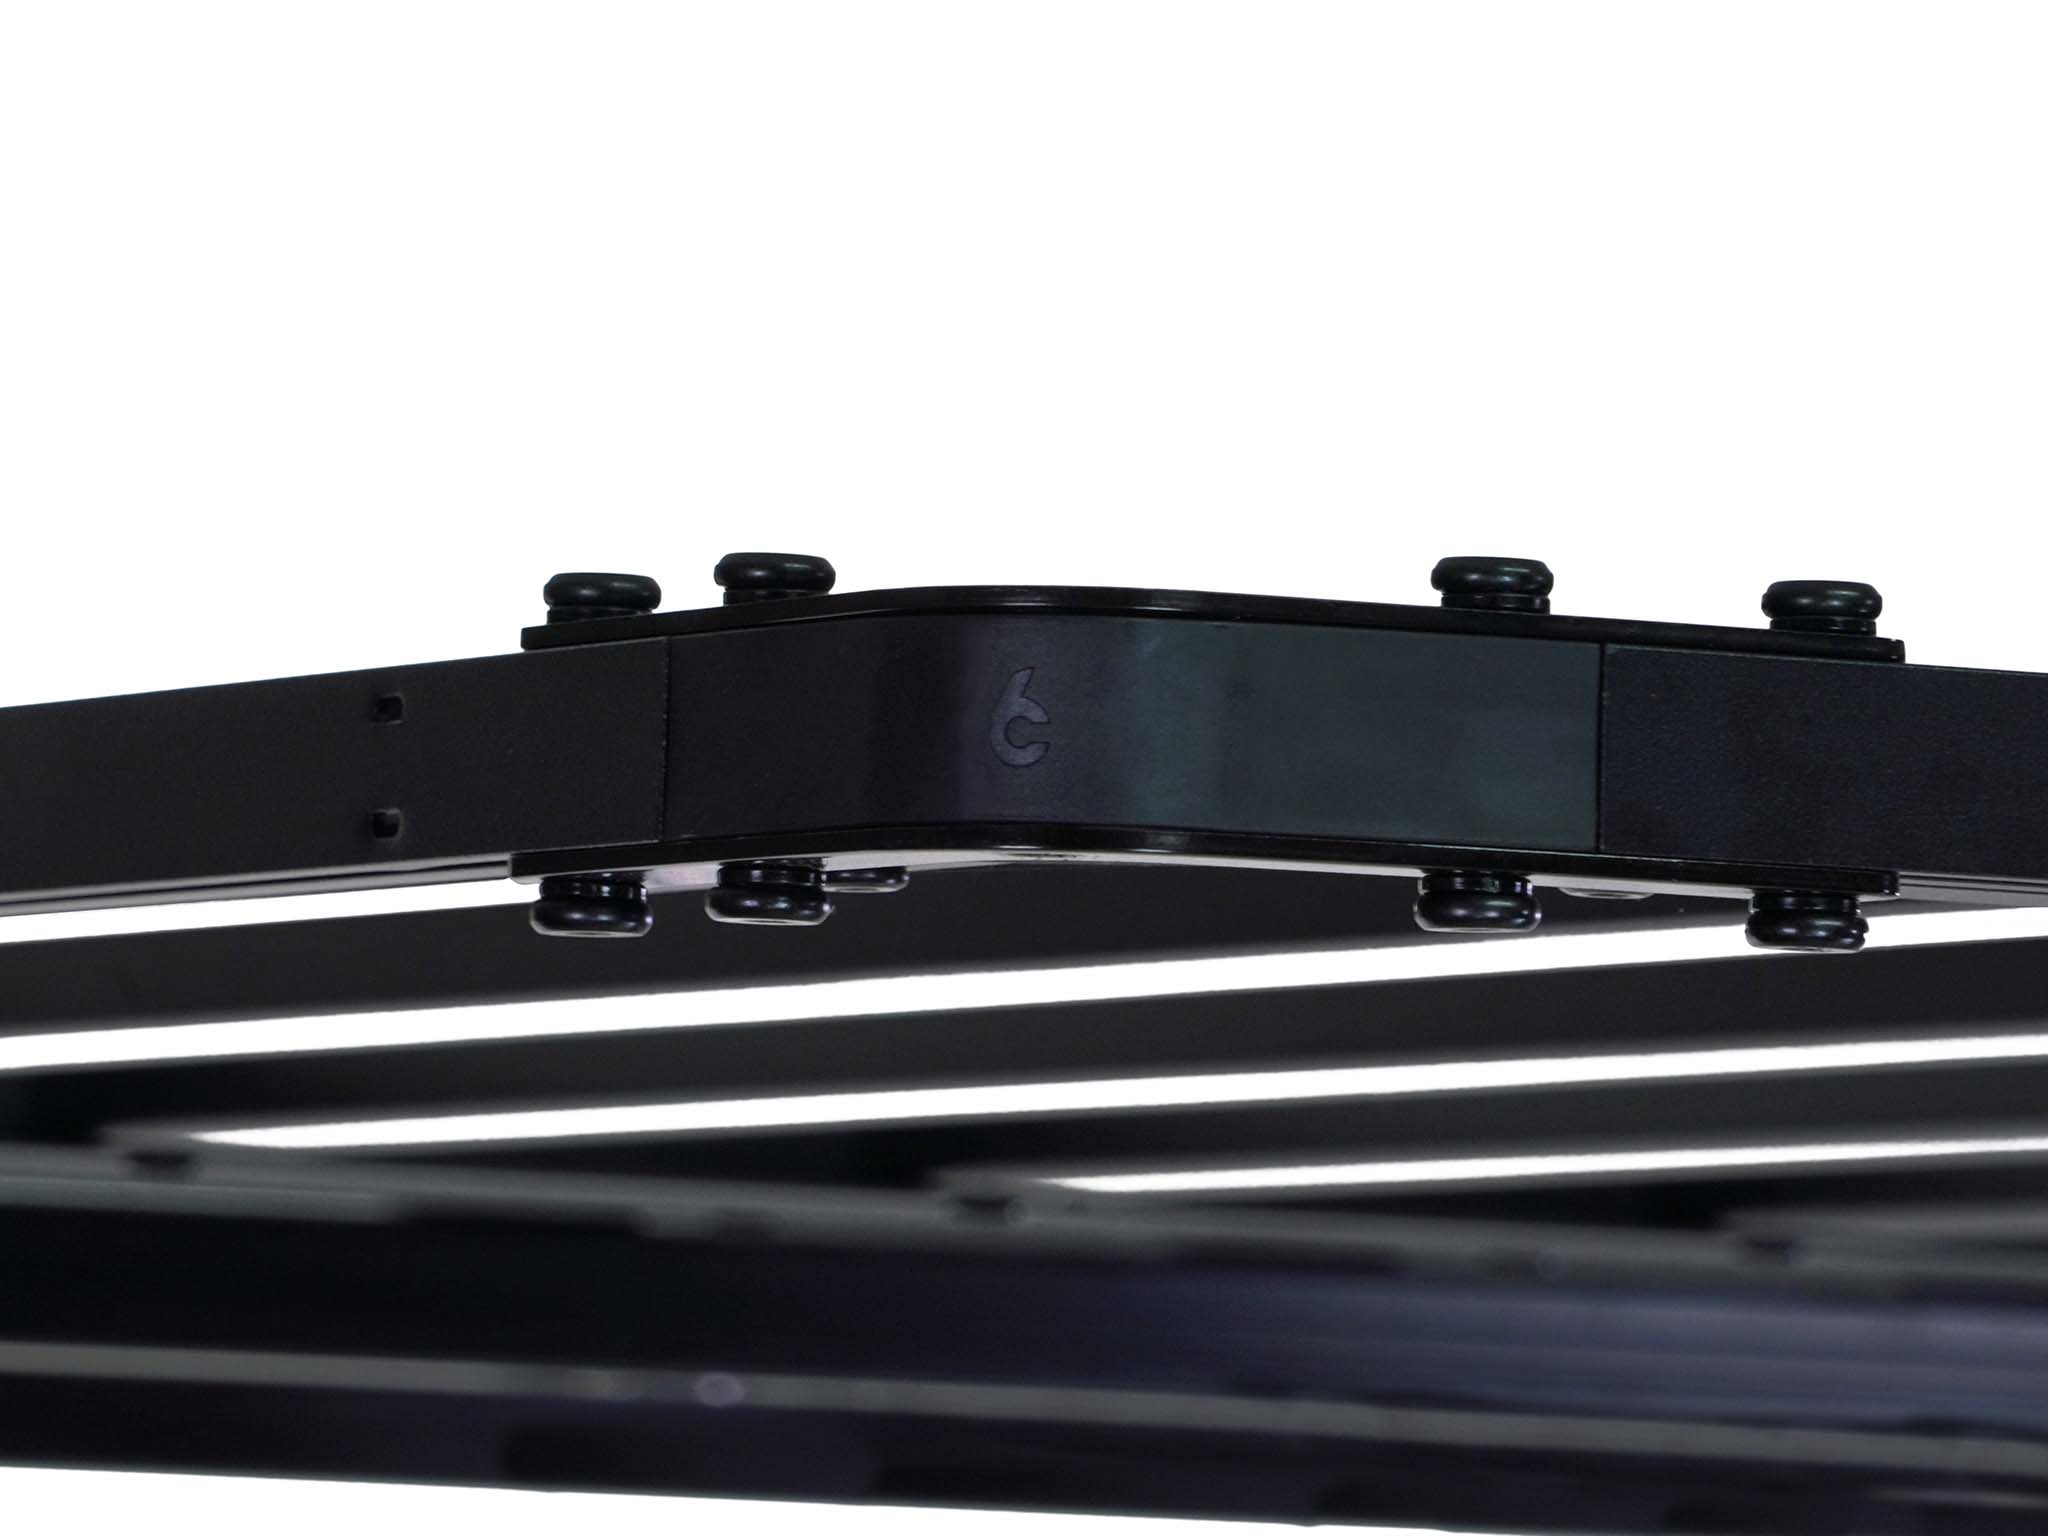
• Place corner profiles.
The C6 logo should be
upside down.
• Identify and place the
outer profiles.
2 channel slots face up, 1
channel slot faces down.
The shorter extrusions
are the sides; Longer ex-
trusions are the ends.
Refer to illustration!
6 v2240105
The “male” or “female” center profile can
go on either platform half.
• Identify and place the track slats.
These are the slat extrusions that have multiple
holes and cut outs. (These extra holes will be used
in a later step to attach the bottom square tracks.)
The cut outs face down, holes face up.
• Identify and place the standard slats.
• Set aside these 2 square tracks. We’ll get to
them later.
Good job! *All* you have to do now is bolt the
Rev Platform together and add the hardware!
All the standard slats go on one side of the
platform, the track slats on the other.
7 v1231019
ASSEMBLE 4 OUTER CORNERS
& BOTTOM BRACKETS
SUMMARY The slider nuts go in the outer profile
channels, spring/ball facing down (packet A). Line
the nuts up with the holes on the narrow metal
corner bottom bracket. Use the bolts (packet B)
with the spring washers (packet C) to secure the
corner metal bottom brackets to the corners.
8 v1231019
• Push corner piece
in to outer profiles.
• Insert 2 slider nuts
(packet A) into channel
and line up position of
nuts.
Ball spring faces bottom of channel. Note
direction/placement of nut holes.
9 v1231019
• Use the bolts (packet B) and
spring washers (packet C) to
secure the narrow corner
bracket to the platform outer
corners.
Line up the slider nuts as exact as possible
before you place the corner bracket. If you have to
adjust the slider nut position after you’ve bolted
the bracket down, use an hex key to push the
problem slider nut into position.
• Secure all 4 bolts with
half turn only. Do not
over tighten! You’ll do a
final tightening pass
later. Leave them tight
enough not to fall out,
and loose enough that
you can make minor ad-
justments later…
x4
10 v1231019
• Now it’s time to assemble the other 3 outer cor-
ners.
Repeat these steps. Again, only work on the outer
corners! And don’t forget to leave all bolts slightly
loose. You will need a little bit of wiggle room to
make adjustments in a later step.
11 v3240321
Take your time to line up the holes and
threads as exact as possible. If you have to
put too much effort in to tightening you may
strip the threads. If this happens, back off a bit,
re-align and try again. Don’t muscle through.
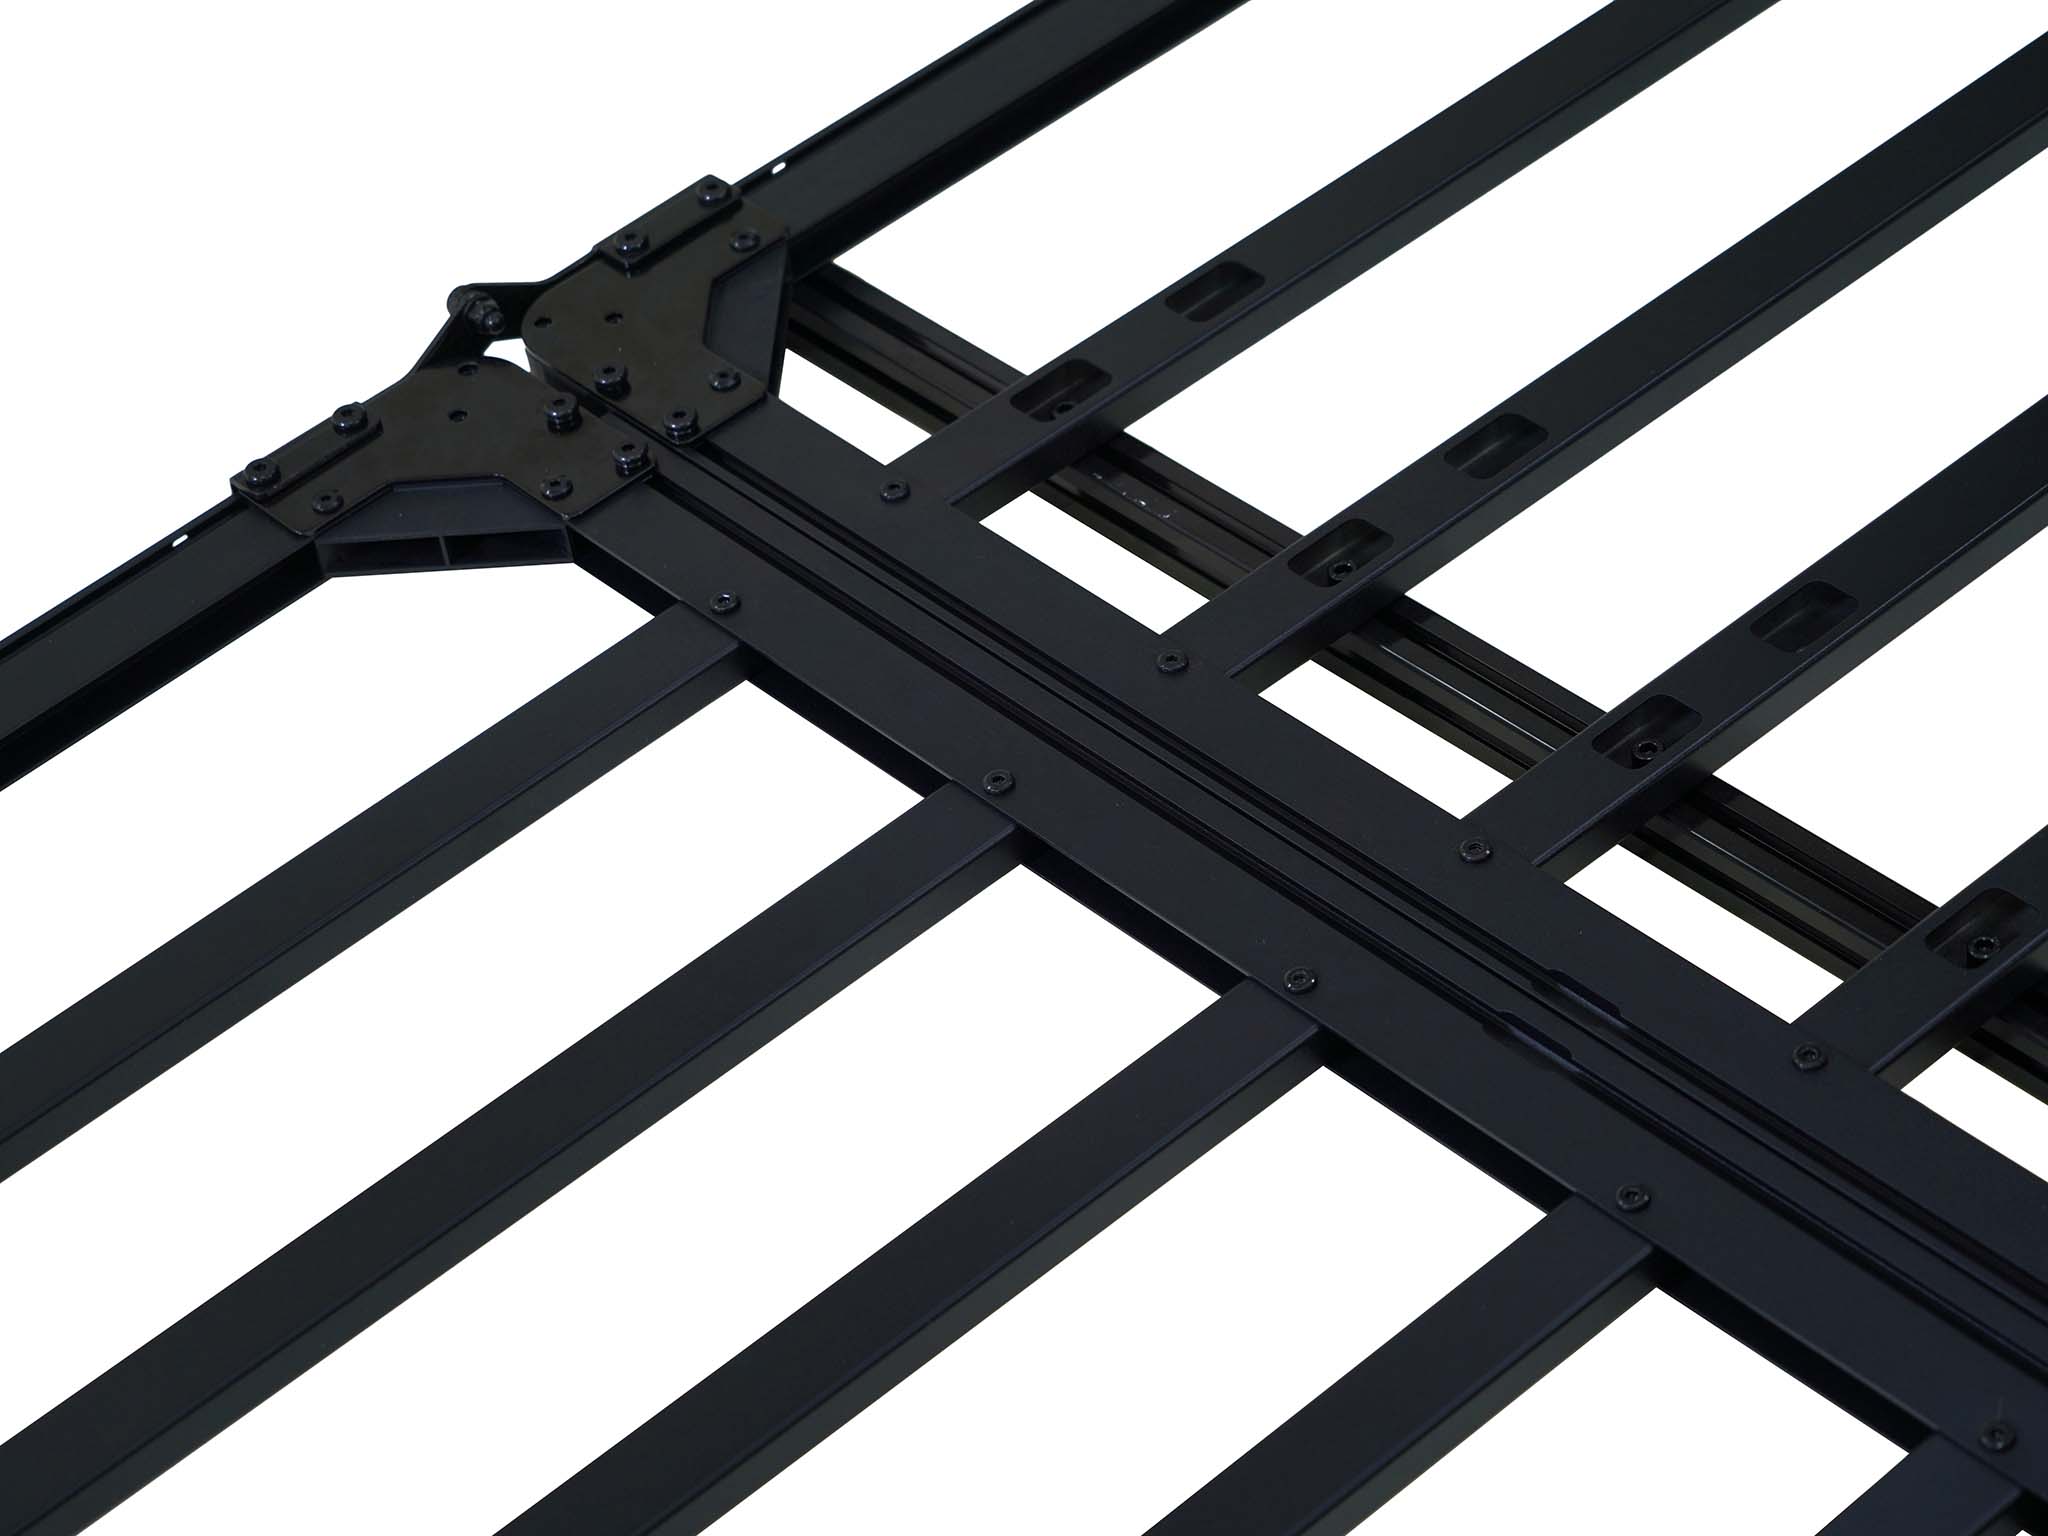
ASSEMBLE CENTER CORNERS,
BOTTOM BRACKETS & HINGES
SUMMARY These center corners have the hinge
plates bolted to them. So you will be using
slightly longer bolts to secure the hinge plates
correctly on the outer facing profiles (packet D).
Other than adding the hinges to the outer pro-
files and using the different length bolts, the
steps are similar to assembling the outer cor-
ners.
12 v2260429
• On the center profiles,
secure narrow metal
corner bracket with the
shorter bolts (packet B)
and spring washers
(packet C).
• Insert 2 slider nuts (packet A) in each profile
channel. Match nut direction to image above.
13 v1231019
• Push plastic corner piece in to outer profile
and center profile.
• Identify and pair up the correct hinges.
Do not over
tighten! Keep a
wee bit loose.
You'll do a final
tightening pass
later.
There are 2 style hinges. 1 is a bit wider. 1 is
narrower.
• On the outer
profiles, use
the longer
bolts (packet
D) and spring
washers (pack-
et C) to secure
the hinge plate
on top of the
narrow corner
bracket. POINTING DOWN
14 v1231019
Pair a narrow hinge with a wide hinge. Place
a wide hinge and narrow hinge on one platform
half. On the 2nd platform half, place the wide
hinge opposite the narrow hinge on the 1st plat-
form half.
Don't get ahead of yourself. Do not bolt the
hinges together yet. We will attach the platforms
to each other at a later step!
15 v2231126
• Complete this step and fasten hinges and
brackets for the remaining 3 center corners.
Standard Slats
INSTALL PLATFORM SLATS
SUMMARY Use the sleeve nuts and bolts (packet
E ) to fasten the slats to the outer and center pro-
files. The track slats have 6 holes. These track slats
are for attaching the tracks that will be used to
secure the Rev Platform to your cross bars or roof
rack. These track mounting slats all go on one
platform half. The standard slats with 2 holes are
grouped together on the other platform half.
Track Slats
16 v1231019
• Install track slats. These track slats have 6
holes in them. These are all grouped together
on one side of the platform.
The holes must face up, the cut out openings
face down.
Use the sleeve nuts and bolts (packet E) to
attach the slats to the center and outer profiles.
Use 2 hex keys to tighten. Do not overtighten.
17 v1231019
Angle the slats to fit them in. You may have to
stand the Rev Platform halves on their sides to
properly seat and line up the holes
• Install standard slats. The standard slats have
2 holes in them. These are all grouped together
on one side of the platform.
Remember to only slightly tighten. You will do a
full hardcore tightening pass soon. Promise!
• Once all slats are bolted in, turn each platform
half over. You are now looking at the TOP SIDE
of the Rev Platform.
Getting there!
18 v1231019
ASSEMBLE OUTER CORNERS
& TOP BRACKETS
SUMMARY With the platform halves turned over,
you are now looking at the top of the platform.
It’s time to install the top brackets on all the
OUTER corners using the shorter bolts (packet B),
spring washers (packet C) and slider nuts (packet
A). Each top bracket also uses 2 sleeve nuts and
bolts (packet E).
A friendly
reminder: the
outer corners are
ones that do not
have hinges!
19 v1231019
• Insert 2 slider nuts
(packet A) in each
corner channel. Line
up the slider nuts
with the holes in the
brackets.
• Gather the top brack-
ets. You’ll be using the
same mounting points
as with the narrower
bottom brackets from
the earlier step.
If the slider nuts don't line up perfectly, you
can always nudge them into better position with
a hex key.
• Screw in the shorter
bolts (packet B) with
spring washers (packet
C) in the 4 positions.
Half turn only! We’ll
do the full tighten at a
later step.
x4
20 v1231019
• There are 2 additional
connection points. Use
the same sleeve nut and
bolt used to secure the
slats (Packet E).
These holes may not be perfectly aligned.
This is the reason you haven't fully tightened every
corner yet. If you need to carefully and forcefully
adjust the corners and profiles to get the sleeve
nut to drop in - do it! No one's judging. If you have
a rubber mallet or a hammer with a soft cloth to
protect the platform, you may need to lightly tap
on the outer profiles to adjust.
Do not fully tighten. We'll get to that step. Promise!
• Repeat this step and fasten the top corner
brackets to the the additional 3 outer corners.
21 v1231019
ASSEMBLE CENTER CORNERS,
TOP BRACKETS & HINGES
SUMMARY It's time to attach the corner top
brackets to the center corners. The shorter bolts
(packet B) and spring washers (packet C) are
used to secure the corner top brackets to the
center profiles. The longer bolts (packet D) and
spring washers (packet C) are used on the outer
profile hinge side. And just like the outer top cor-
ners, there are 2 sleeve nuts and bolts that are
used to secure the profiles to the brackets (pack-
et E).
22 v1231019
• Insert in the slider nuts (packet A). 2 per channel.
You can drop them in using the channel slot in the
corners or the channel slot in the profiles.
To adjust the slider nuts to line up exactly
with the bracket and hinge holes you can get in
there and do some fine tuning with a hex key.
OR
23 v1231019
• Place the corner top bracket in position - slide
underneath the hinge. On the center profile with
the holes and no hinge, secure using the shorter
bolts (packet B) with spring washers (packet C).
• To secure
the bracket
and hinge to
the platform,
use the longer
bolts (packet
D) with the
spring wash-
ers (packet C).
• And finally,
use the same
sleeve nuts
and bolts for
the final 2
connections
(Packet E).
Do not fully tighten! You need a bit of relief to
line up the holes in this next step.
If the sleeve nuts don’t drop in, you may
need to adjust the angle of the profiles.
24 v1231019
• Now install the corner top brackets to the re-
maining 3 center corners.
Shew. The corner top and bottom brackets are
assembled. The slats are in place. Look at how
far you’ve come!
STOP. TAKE A BREAK. BREATHE.
You are way more than halfway done.
Preview of what's to come: You still have to tight-
en the bolts, add the tracks, add the hardware for
the ladder and install the latches to lock the plat-
form closed.
Grab a snack. Pet your dog. These instructions can
wait.
25 v1231019
THE MOST IMPORTANT STEP
EVER!
SUMMARY Tighten all the corner bolts and slat
bolts on both sides of each platform tray. Use
the hex keys and lean in to it. Get them TIGHT!
• Remember where you start. Do one side at a
time. Move clockwise.
• Be sure to use both hex keys on all the slats and
top corner brackets.
• Once you have gone all the way around each
side of each tray - go around again. Make sure you
didn't miss any. This is the most annoying yet im-
portant step you will ever do in your life! Really.
WARNING
Regularly check nut and bolt connections. Re-
tighten if needed.
26 v1231019
ADD TRACKS TO BOTTOM OF
TRACK SLATS
SUMMARY Choose the position and bolt on the
tracks with the hardware in packet F.
27 v1231019
• Center the square tracks underneath the track
slats.
Depending on the length of your cross bars you
may choose to mount the cross bars in the inner
narrower position. If your cross bars or rack slats
are long enough, use the wider / outer position.
It's easier to access the mounting brackets when
the tracks are closer to the edges of the platform.
You may need to put a knee on the platform
to push it closer to the track. Put pressure on the
hex key as you turn to force that spring washer
down to allow the bolt to reach the threads in the
slider nut below.
• Adjust slider nuts (pre-installed on track) to
line up with the track slat holes.
28 v1231019
• Bolt together
using the hard-
ware in Packet F.
Follow placement
of spring washer
and standard
washer.
SLIDE IN STOPPERS
SUMMARY Slide the stoppers (Packet J) in the
outer profile channel of the bottom platform (the
platform half with the tracks). Position them at the
end of the first inside slat.
• Drop both stoppers
(packet J) in the center
channel slot and slide in
to position.
29 v1231019
BOLT TOGETHER HINGES
SUMMARY Use the hardware from packet G to
bolt the hinges together.
• Line up the
platforms. The
narrow hinge
should sit just
inside the wider
hinge. Position
bolt, washers,
nut as pictured.
Washers
• Using the sup-
plied m13
wrench and
larger hex key,
tighten.
30 v1231019
INSTALL LOCKS
SUMMARY Almost done! Packet H contains the
locks, small slider nuts and flat head screws and
small spring washers used to attach the 2 locks
and 2 latches to the top and bottom halves of the
platform.
31 v1231019
• In the same outer
profile channel as
the spacers, slide in
slider nuts from
Packet H. 2 on each
side. Note direction.
• Position lock latch and use 2 screws, 2 spring
washers from packet H to fasten the top of the
lock latch to the nut sliders using the included
screwdriver.
• Center the slider nuts between the slats.
32 v1231019
• Repeat this same step to attach the top of the
2nd lock latch near the other stopper.
• Turn the Rev Platform over and secure the
bottom of each lock latch. Use 1 slider nut, scew
and washer.
x2
• Flip the platform back over. Now you're going
to add the latch hooks to the other platform half.
Yeah. This sucks. But you’re almost done!
33 v1231019
• Use the latch hooks and hardware from packet H.
x2
• Insert 2 slider nuts
using the outer profile
bottom channel center
slot opening. Install latch
hook lined up with
bottom lock latch (be-
tween the 2 slats), hook
facing up.
34 v1231019
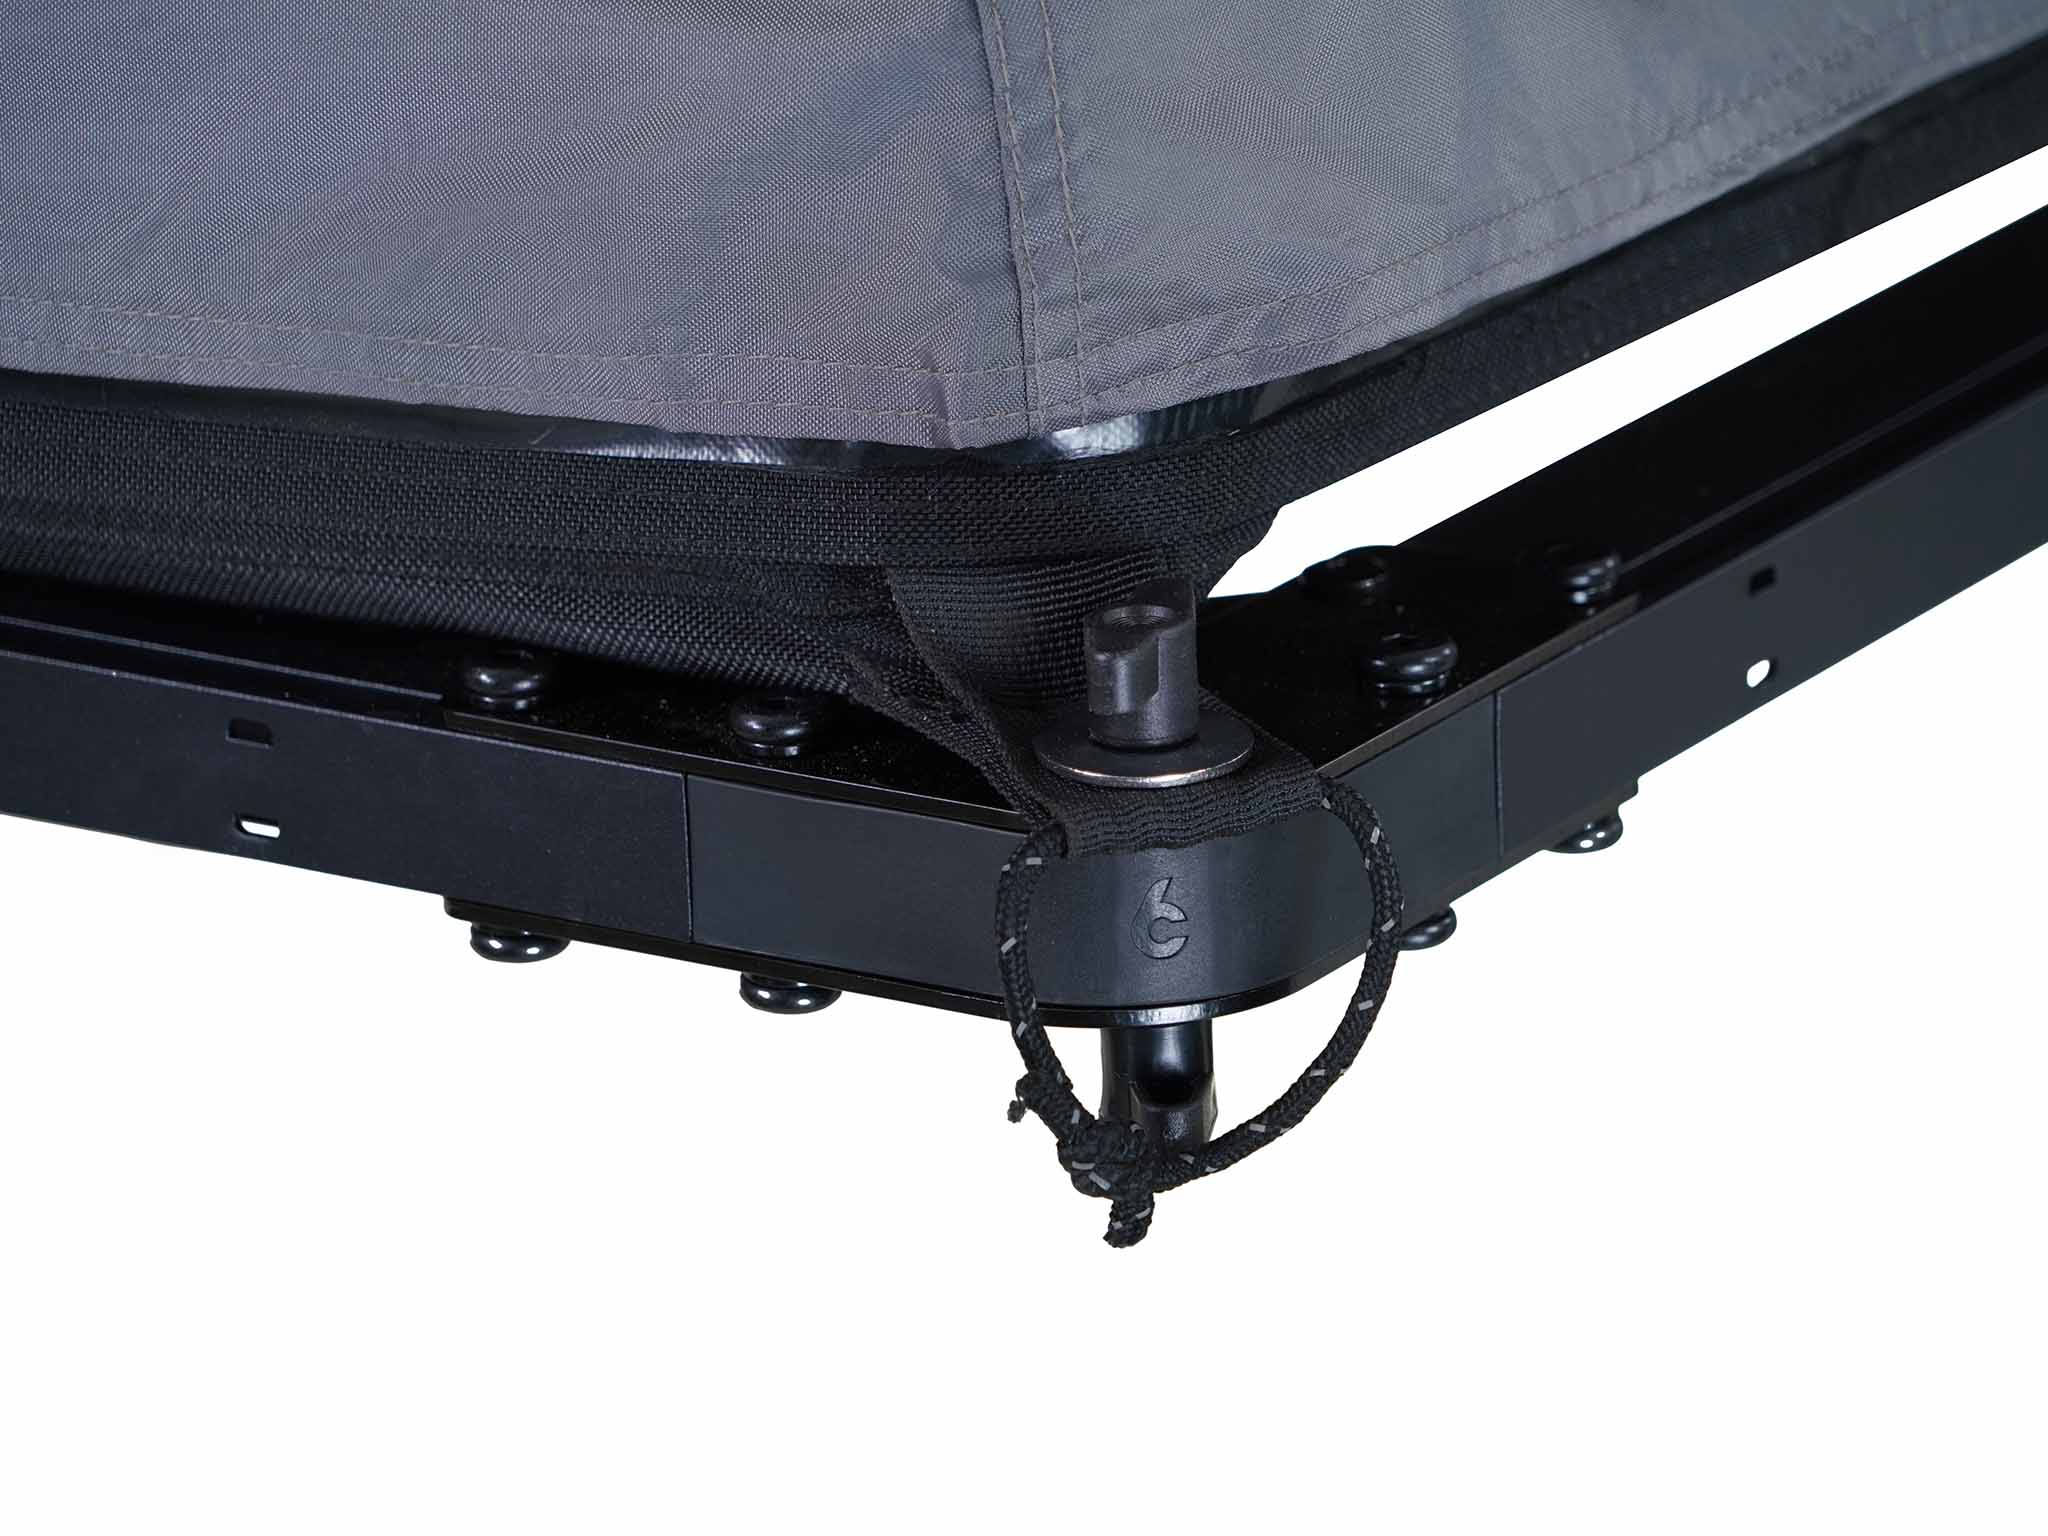
NEVER travel without first latching the Rev Platform
closed! Always quadruple check that the Rev Plat-
form is locked closed before moving the vehicle.
• Close and latch. Slide latch hooks into better
position if necessary and re-tighten. Twist stem
of latch lock to length. Use nut to lock stem
length. Make sure there's tension enough to
slightly squeeze the spacer. The latch shouldn't
be too difficult to close. but there should be ten-
sion enough to keep the latch firmly locked.
35 v1231019
INSTALL LADDER HINGE PINS
SUMMARY With the platform opened, mount the
quick-release ladder hinge pins (packet I) on the
top platform half.
BTW - this is the last step. F-Yeah!
• Open the platform. The ladder hinge pins will
be installed along the single channel on the top
of the open platform on the end of the platform
with the latch hooks (not on the end of the plat-
form with the latch locks).
36 v1231019
• You know the drill by now.
Insert 2 slider nuts from
packet A.
• To find the exact place-
ment of the ladder base,
we will use the ladder as
reference.
Take ladder and remove
the ladder hinge plates
from their bag, and lock
them in to the ladder.
• Take the ladder
base hardware
(packet I) and
bolts (packet D)
and spring wash-
ers (packet C)
and secure loose-
ly. Only a few
turns.
Click!
• Repeat for
the 2nd
ladder base.
37 v2240105
Center ladder along width of platform.
Slide ladder bases on platform to line up up
with the hinge plates on the ladder.
• With ladder centered and hinge pins of
the ladder bases lined up, tighten all 4
ladder base bolts.
38 v2241005
WOO HOO!
The platform is built. Jump up and touch the
sky. You did it!
Remove your C6 Outdoor Wristband. Put it in a
safe place. Let it serve as a reminder of your
perseverance and smarts. This is an accom-
plishment that should not be forgotten.
REV ROOF TOP TENT
INSTALL & USE INSTRUCTIONS
To mount the Rev Platform X to your vehicle
for camping with a Rev Tent, please see these
instructions :
Available to download at c6outdoor.com for
smart phones, tablets or to print.
39 v1231019
v1231019
WARNING
Refer to your specific vehicle manufacturer's rec-
ommendations for roof load rating. Refer to your
specific cross bar or roof rack manufacturer's rec-
ommendations for load ratings. C6 Outdoor
cannot be responsible for improper loading
beyond the vehicle manufacturer and cross bar
manufacturer's stated load capacity.
The Rev Roof Top Tent system weighs @87lbs /
40kg.
IT IS CRITICAL THAT ALL C6 OUTDOOR GEAR IS
PROPERLY AND SECURELY ATTACHED TO YOUR
VEHICLE. IMPROPER ATTACHMENT COULD
RESULT IN AN AUTOMOBILE ACCIDENT AND
COULD CAUSE SERIOUS BODILY INJURY OR
DEATH TO YOU OR TO OTHERS. YOU ARE RE-
SPONSIBLE FOR SECURING THE PLATFORM,
TENT & ACCESSORIES TO YOUR CAR, CHECKING
THE ATTACHMENTS PRIOR TO USE, AND PERIOD-
ICALLY INSPECTING THE PRODUCTS FOR AD-
JUSTMENT, WEAR, AND DAMAGE. IT IS RE-
QUIRED THAT YOU READ AND UNDERSTAND ALL
OF THE INSTRUCTIONS AND CAUTIONS SUP-
PLIED PRIOR TO INSTALLATION OR USE. IF YOU
DO NOT UNDERSTAND ALL OF THE INSTRUC-
TIONS AND CAUTIONS, OR IF YOU HAVE NO ME-
CHANICAL EXPERIENCE AND ARE NOT THOR-
OUGHLY COMFORTABLE WITH THE INSTALLA-
TION PROCEDURES, YOU SHOULD HAVE THE
PRODUCT INSTALLED BY A PROFESSIONAL IN-
STALLER SUCH AS A QUALIFIED GARAGE OR
AUTO BODY SHOP.
Choose options
The Rev Roof Top Tent (ember color) includes a Rev Tent bundled with the Rev Platform X (and Ladder).
The black out fabric technology and thickest roof top tent mattress available all but guarantee a long, comfy slumber.
This limited edition burning ember patterned Rev Tent features advanced black-out coated fabric to keep the sunlight out and set the dreams free. With all daylight virtually absent inside the tent, the overall interior climate is slightly cooler during the day and warmer at night. Between the plush dual layer mattress and enhanced pitch black interior, the Rev Tent Ember is ideal for fussy sleepers.
• Camp exactly where you want, anywhere, and enjoy the convenience of choosing roof top or ground camping.
• Thickest mattress of any roof top tent.
• 40 -70 lbs lighter (18 - 32 kgs) than similar sized roof top tents. At 88lbs / 38kgs (including ladder and mattress) the Rev RTT is the lightest in the world.
• Easily moved in 3 parts by 1 person on and off vehicles and in and out of storage areas
•Tent / Mattress weighs 25 lbs / 11.4 kgs
•Rev Platform weighs 52 lbs / 24 kgs
•Ladder weighs 11 lbs / 5 kgs
There is no need to carry a roof top tent full time on your daily driver. Just hang the Rev Tent on garage wall and only mount to vehicle when camping.
• The Rev Roof Top Tent supports up to 475 lbs / 215 kgs of human; human and dog; human, dog, camp gear; or any combination of the aforementioned.
* Cross bars or a roof rack needed.
** The cross bars should be positioned no closer than 24" / 61 cm , and no wider than 40" / 102 cm. Recommended distance between the bars is 32".
***Vehicle roof and cross bar dynamic (driving) load carrying capacity must be at least 150 lbs / 68 kgs
Included mounting hardware fits all styles of cross bars and rack slats as long as they are no wider than 4” / 100mm and no taller than 1.5” / 38mm
If you are a beginner to vehicle roof top camping, please see our STARTER GUIDE.
Use with the Rev Room Annex to create a private standing room for changing, showering, or restroom business.
Add Rev Shoe Storage bags to the Rev Rack Tent for additional storage for shoes, sundries, flashlight, keys, toiletries.
** NOTE: The REV PLATFORM X ships unassembled. This means the Rev Platform X needs to be assembled by you! All necessary tools are included. Any concerns about this? It's easy, but it does take time. If you can build Legos or Ikea furniture, this will be no problem!
The Rev Tent can be used for sleeping on top of ANY VEHICLE that is compatible with cross bars or a roof rack.
While the Rev Tent is extremely versatile and a new “hybrid” tent - it is not magic. The Rev Tent needs support when used for sleeping on top of a vehicle. It can either be supported by a C6 Outdoor Rev Platform X mounted to cross bars or a roof rack, or directly to another brand’s large enough platform style roof rack.
We supply the great camping gear, you provide the vehicle and the system (cross bars or roof rack) that our gear mounts to.
Fastening anything to the outside of your vehicle is not for the faint hearted. With a little bit of homework, some specialized gear, and a bit of mechanical sense, anyone can safely mount a Rev Tent on top of their vehicle for sleeping.
OEM (OE) Acronym for Original Equipment Manufacturer. This is a car accessory from the factory / original vehicle manufacturer. In the case of roof top carrying – usually refers to the source of the cross bars or roof rails. For example, a Ford Bronco may come with Ford branded roof rails when you buy the vehicle off the lot.
AFTERMARKET: Car accessory made by a manufacturer different than the vehicle manufacturer. For example, Front Runner makes “aftermarket” roof racks and cross bars for Toyota SUVs and Trucks.
ROOF RAILS: These are the supports that run front to back on the rooftop edge of vehicles. Some are decorative, others are functional and used to hold cross bars. They are usually OEM, but also available from aftermarket brands made stronger to support cross bars and roof racks to carry heavier gear.
FLUSH RAILS are lower and may have indents on the side to accommodate clamping style cross bars.
ROOF RAIL TRACK is flush with the roof has a channel for mounting accessories.
CROSS BARS: Sometimes called load bars, these supports (usually 2 bars) run SIDE TO SIDE on the roof of a vehicle. They can be either OEM or aftermarket. They can be round, oval, square or rectangular and attach to either roof rails, a fixed mounting point on independent feet, legs, or towers, or on feet clipped in the door frame.
ROOF RACK: A group of supports, usually called slats, with an outer perimeter to hold the slats together. Roof Racks can be platform style (flat) or basket shaped with raised sides. While the basket style is classic and notably used on on stagecoaches, that particular look is losing favor to the newer platform style.
The basket style raised sides usually interfere with mounting roof top tents. The Platform style is preferred.
BED RACK: an accessory mounting system over the bed of a pick-up truck. Can be comprised of cross bars, a roof rack or a extrusion style cage.
WEIGHT CAPACITY
OEM cross bars are often not strong enough to carry a roof top tent. While the Rev Roof Top Tent is the lightest system available, some cross bars offered by dealers are really just for show. Please check the vehicle manufacturer recommended weight limits. In order to make an informed decision about whether or not your OEM cross bars are strong enough, look up your vehicle online in the forums and see if other people have mounted roof top tents on the OEM bars and read about their experiences. While we can advise, you will need to make the final educated decision.
If using aftermarket cross bars (by brands like Yakima, Thule, Rhino, etc.), you will want to confirm the weight limitations of both the bars AND what you are mounting the bars to. Are you using aftermarket risers or feet / clamps? Or you attaching the cross bars to OEM raised roof rails? For example, if mounting to an OEM roof rail, what is the load carrying capacity of the roof rail? You may also need an aftermarket roof rail or swap out the OEM roof rail for track. Again, it is helpful to do a quick online search and see what people have done before you with your specific vehicle and learn from their experience. Roof Top Tents are so popular, it’s likely that every make and model of car has had someone try to attach a roof top tent to it!
Your roof and cross bar set up should follow these guidelines:
DYNAMIC RATING: At least 150 lbs / 68kgs
STATIC RATING: Weight of Rev Roof Top Tent system (76lbs / 35kgs) + the weight of the people in the Rev Tent.
NOTE: The Rev Platform X itself can hold up to 450lbs / 204kgs inside the tent.
** Dynamic weight rating refers to the weight the rack or bar system can hold while the vehicle is moving. Static weight rating refers to a stationary vehicle, ie when camping.
SIZE & SHAPE OF CROSS BARS
Oval, square and rectangular shaped bars can be used with the included clamping hardware as long as the dimensions are no wider than 10cm / 4” and no taller than 4cm / 1.5”.
If you have wider or taller bars, please contact us and we can help you make a plan to mount the Rev Platform X. For example, there are aftermarket tent brackets from BillieBar, Front Runner and other rack brands that are compatible with the Rev Roof Top Tent Platform x.
SPACING OF CROSS BARS
If you go the route of sleeping in a Rev Tent on an appropriately sized Roof Rack, securing the roof rack to your vehicle is on you. Check with the roof rack manufacturer and follow their recommendations for size and mounting approach.
ROOF RACK SIZEC6 Outdoor offers 3 different style mounting systems to mount the Rev tent to different brand and style Roof Racks. Just choose the included mounting kit when adding the Rev Rack Tent to your cart.
If you have a smaller roof rack, you can mount the Rev Tent for transport, but to sleep on the roof rack you will need the Rev Roof Top Tent X and mount the included Rev Platform X to the roof rack.
You may also be able to use existing slots or holes in your slats and bolt the Rev Platform directly to your bars.
If rack slats are larger than dimensions listed above for the cross bars, or if the lip of the rack is raised, like on a Front Runner /Dometic Slimline II roof rack, you may need additional mounting hardware. Please refer to the manufacturer of your roof rack for the recommended way to mount a roof top tent.
A raised perimeter basket style roof rack may interfere.
Ladder
The Rev Ladder is Sold Separately. If you have a way to climb up your vehicle - a rear mounted ladder, a rear swing mounted tire, up over the hood, etc - you don’t need a ladder for your Rev Rack Tent.
** NOTE: The REV PLATFORM X ships unassembled. This means the Rev Platform X needs to be assembled by you! All necessary tools are included. Any concerns about this? It's easy, but it does take time. If you can build Legos or Ikea furniture, this will be no problem!
REV PLATFORM XASSEMBLY INSTRUCTIONS
SKU: 6PK3BK3
Hi! This was written for you. Yes, you. Please read.
Don’t be a hero and muscle ahead blindly. You
must read all the instructions (including the
WARNINGS!) Take each step in order. It’s quicker
in the long run and you won’t have to double back
to fix mistakes.
If any of the small parts go missing (we won’t
blame you if you don’t blame us!) note that there
is a packet of spares.
ESTIMATED ASSEMBLY TIME: 2 hours
1 v1231019
WARNINGS
Failure to follow instructions could result in injury
and even death. Attaching gear to your vehicle
must be taken very seriously. Any questions or
concerns about assembly or installation please
contact support@C6outdoor.com
When transporting the Rev Platform you MUST
latch the platform closed and you MUST secure all
4 corners of the Rev Tent using the supplied hard-
ware.
When securing the Rev Tent and Rev Platform to a
vehicle for transport - check all connections and
straps often. Failure to properly secure the Rev
Tent, Platform and Ladder to a vehicle could
result in damage to the gear and bodily harm.
Please check with your vehicle manufacturer for
specified loading capacity of your roof and carry-
ing system. Not all factory roof carrying systems
or aftermarket cross bars can safely accommo-
date the Rev Roof Top Tent (Rev Tent & Rev Plat-
form). The Rev Roof Top Tent system weighs
@87lbs / 40kg.
When using the Rev Platform for camping with
the Rev Tent – the Rev Ladder must be secure, ex-
tended and locked in place before climbing. Posi-
tion ladder to fully support platform. Failure to do
so could damage the platform and you.
2 v1231019
GET READY
• Put on the C6 Outdoor wristband.
3 v1231019
GET ORGANIZED
SUMMARY Getting prepped properly now will
save you time and energy later.
• Prepare work area.
You will need a flat, clean work surface at least 7'x 5'
/ 213cm x 152cm. A clean floor will do!
• Remove top ladder box and parts box.
• Remove the tool packet from the parts box.
Included tools
1 13mm ratcheting wrench
2 4mm hex keys
1 5mm hex key
1 6 mm hex key
1 phillips head screwdriver
You may also need a rubber mallet or hammer
with a small towel.
• Set out all the hardware packets. Do not dump
out the contents! Leave the parts in the bag to keep
organized.
We have included spares for emergencies.
4 v1231019
LAY OUT EXTRUSIONS
SUMMARY There is a top side and bottom side
to each piece of extruded aluminum. For this
layout, we're putting the bottom of the platform
facing up. Make sure the real life pieces you are
laying out look like the pieces in the drawing
below. Make it match. This is fun! Like laying out
the bones of a Halloween skeleton decoration.
Center
Profiles
Outer
Profiles
Track
Slats
Standard
Slats
Corner
Profiles
5 v1231019
• Identify and place the center profiles.
The center profiles “lock” together. 2 channel
slots face up, 1 channel slot faces down.
• Place corner profiles.
The C6 logo should be
upside down.
• Identify and place the
outer profiles.
2 channel slots face up, 1
channel slot faces down.
The shorter extrusions
are the sides; Longer ex-
trusions are the ends.
Refer to illustration!
6 v2240105
The “male” or “female” center profile can
go on either platform half.
• Identify and place the track slats.
These are the slat extrusions that have multiple
holes and cut outs. (These extra holes will be used
in a later step to attach the bottom square tracks.)
The cut outs face down, holes face up.
• Identify and place the standard slats.
• Set aside these 2 square tracks. We’ll get to
them later.
Good job! *All* you have to do now is bolt the
Rev Platform together and add the hardware!
All the standard slats go on one side of the
platform, the track slats on the other.
7 v1231019
ASSEMBLE 4 OUTER CORNERS
& BOTTOM BRACKETS
SUMMARY The slider nuts go in the outer profile
channels, spring/ball facing down (packet A). Line
the nuts up with the holes on the narrow metal
corner bottom bracket. Use the bolts (packet B)
with the spring washers (packet C) to secure the
corner metal bottom brackets to the corners.
8 v1231019
• Push corner piece
in to outer profiles.
• Insert 2 slider nuts
(packet A) into channel
and line up position of
nuts.
Ball spring faces bottom of channel. Note
direction/placement of nut holes.
9 v1231019
• Use the bolts (packet B) and
spring washers (packet C) to
secure the narrow corner
bracket to the platform outer
corners.
Line up the slider nuts as exact as possible
before you place the corner bracket. If you have to
adjust the slider nut position after you’ve bolted
the bracket down, use an hex key to push the
problem slider nut into position.
• Secure all 4 bolts with
half turn only. Do not
over tighten! You’ll do a
final tightening pass
later. Leave them tight
enough not to fall out,
and loose enough that
you can make minor ad-
justments later…
x4
10 v1231019
• Now it’s time to assemble the other 3 outer cor-
ners.
Repeat these steps. Again, only work on the outer
corners! And don’t forget to leave all bolts slightly
loose. You will need a little bit of wiggle room to
make adjustments in a later step.
11 v3240321
Take your time to line up the holes and
threads as exact as possible. If you have to
put too much effort in to tightening you may
strip the threads. If this happens, back off a bit,
re-align and try again. Don’t muscle through.
ASSEMBLE CENTER CORNERS,
BOTTOM BRACKETS & HINGES
SUMMARY These center corners have the hinge
plates bolted to them. So you will be using
slightly longer bolts to secure the hinge plates
correctly on the outer facing profiles (packet D).
Other than adding the hinges to the outer pro-
files and using the different length bolts, the
steps are similar to assembling the outer cor-
ners.
12 v2260429
• On the center profiles,
secure narrow metal
corner bracket with the
shorter bolts (packet B)
and spring washers
(packet C).
• Insert 2 slider nuts (packet A) in each profile
channel. Match nut direction to image above.
13 v1231019
• Push plastic corner piece in to outer profile
and center profile.
• Identify and pair up the correct hinges.
Do not over
tighten! Keep a
wee bit loose.
You'll do a final
tightening pass
later.
There are 2 style hinges. 1 is a bit wider. 1 is
narrower.
• On the outer
profiles, use
the longer
bolts (packet
D) and spring
washers (pack-
et C) to secure
the hinge plate
on top of the
narrow corner
bracket. POINTING DOWN
14 v1231019
Pair a narrow hinge with a wide hinge. Place
a wide hinge and narrow hinge on one platform
half. On the 2nd platform half, place the wide
hinge opposite the narrow hinge on the 1st plat-
form half.
Don't get ahead of yourself. Do not bolt the
hinges together yet. We will attach the platforms
to each other at a later step!
15 v2231126
• Complete this step and fasten hinges and
brackets for the remaining 3 center corners.
Standard Slats
INSTALL PLATFORM SLATS
SUMMARY Use the sleeve nuts and bolts (packet
E ) to fasten the slats to the outer and center pro-
files. The track slats have 6 holes. These track slats
are for attaching the tracks that will be used to
secure the Rev Platform to your cross bars or roof
rack. These track mounting slats all go on one
platform half. The standard slats with 2 holes are
grouped together on the other platform half.
Track Slats
16 v1231019
• Install track slats. These track slats have 6
holes in them. These are all grouped together
on one side of the platform.
The holes must face up, the cut out openings
face down.
Use the sleeve nuts and bolts (packet E) to
attach the slats to the center and outer profiles.
Use 2 hex keys to tighten. Do not overtighten.
17 v1231019
Angle the slats to fit them in. You may have to
stand the Rev Platform halves on their sides to
properly seat and line up the holes
• Install standard slats. The standard slats have
2 holes in them. These are all grouped together
on one side of the platform.
Remember to only slightly tighten. You will do a
full hardcore tightening pass soon. Promise!
• Once all slats are bolted in, turn each platform
half over. You are now looking at the TOP SIDE
of the Rev Platform.
Getting there!
18 v1231019
ASSEMBLE OUTER CORNERS
& TOP BRACKETS
SUMMARY With the platform halves turned over,
you are now looking at the top of the platform.
It’s time to install the top brackets on all the
OUTER corners using the shorter bolts (packet B),
spring washers (packet C) and slider nuts (packet
A). Each top bracket also uses 2 sleeve nuts and
bolts (packet E).
A friendly
reminder: the
outer corners are
ones that do not
have hinges!
19 v1231019
• Insert 2 slider nuts
(packet A) in each
corner channel. Line
up the slider nuts
with the holes in the
brackets.
• Gather the top brack-
ets. You’ll be using the
same mounting points
as with the narrower
bottom brackets from
the earlier step.
If the slider nuts don't line up perfectly, you
can always nudge them into better position with
a hex key.
• Screw in the shorter
bolts (packet B) with
spring washers (packet
C) in the 4 positions.
Half turn only! We’ll
do the full tighten at a
later step.
x4
20 v1231019
• There are 2 additional
connection points. Use
the same sleeve nut and
bolt used to secure the
slats (Packet E).
These holes may not be perfectly aligned.
This is the reason you haven't fully tightened every
corner yet. If you need to carefully and forcefully
adjust the corners and profiles to get the sleeve
nut to drop in - do it! No one's judging. If you have
a rubber mallet or a hammer with a soft cloth to
protect the platform, you may need to lightly tap
on the outer profiles to adjust.
Do not fully tighten. We'll get to that step. Promise!
• Repeat this step and fasten the top corner
brackets to the the additional 3 outer corners.
21 v1231019
ASSEMBLE CENTER CORNERS,
TOP BRACKETS & HINGES
SUMMARY It's time to attach the corner top
brackets to the center corners. The shorter bolts
(packet B) and spring washers (packet C) are
used to secure the corner top brackets to the
center profiles. The longer bolts (packet D) and
spring washers (packet C) are used on the outer
profile hinge side. And just like the outer top cor-
ners, there are 2 sleeve nuts and bolts that are
used to secure the profiles to the brackets (pack-
et E).
22 v1231019
• Insert in the slider nuts (packet A). 2 per channel.
You can drop them in using the channel slot in the
corners or the channel slot in the profiles.
To adjust the slider nuts to line up exactly
with the bracket and hinge holes you can get in
there and do some fine tuning with a hex key.
OR
23 v1231019
• Place the corner top bracket in position - slide
underneath the hinge. On the center profile with
the holes and no hinge, secure using the shorter
bolts (packet B) with spring washers (packet C).
• To secure
the bracket
and hinge to
the platform,
use the longer
bolts (packet
D) with the
spring wash-
ers (packet C).
• And finally,
use the same
sleeve nuts
and bolts for
the final 2
connections
(Packet E).
Do not fully tighten! You need a bit of relief to
line up the holes in this next step.
If the sleeve nuts don’t drop in, you may
need to adjust the angle of the profiles.
24 v1231019
• Now install the corner top brackets to the re-
maining 3 center corners.
Shew. The corner top and bottom brackets are
assembled. The slats are in place. Look at how
far you’ve come!
STOP. TAKE A BREAK. BREATHE.
You are way more than halfway done.
Preview of what's to come: You still have to tight-
en the bolts, add the tracks, add the hardware for
the ladder and install the latches to lock the plat-
form closed.
Grab a snack. Pet your dog. These instructions can
wait.
25 v1231019
THE MOST IMPORTANT STEP
EVER!
SUMMARY Tighten all the corner bolts and slat
bolts on both sides of each platform tray. Use
the hex keys and lean in to it. Get them TIGHT!
• Remember where you start. Do one side at a
time. Move clockwise.
• Be sure to use both hex keys on all the slats and
top corner brackets.
• Once you have gone all the way around each
side of each tray - go around again. Make sure you
didn't miss any. This is the most annoying yet im-
portant step you will ever do in your life! Really.
WARNING
Regularly check nut and bolt connections. Re-
tighten if needed.
26 v1231019
ADD TRACKS TO BOTTOM OF
TRACK SLATS
SUMMARY Choose the position and bolt on the
tracks with the hardware in packet F.
27 v1231019
• Center the square tracks underneath the track
slats.
Depending on the length of your cross bars you
may choose to mount the cross bars in the inner
narrower position. If your cross bars or rack slats
are long enough, use the wider / outer position.
It's easier to access the mounting brackets when
the tracks are closer to the edges of the platform.
You may need to put a knee on the platform
to push it closer to the track. Put pressure on the
hex key as you turn to force that spring washer
down to allow the bolt to reach the threads in the
slider nut below.
• Adjust slider nuts (pre-installed on track) to
line up with the track slat holes.
28 v1231019
• Bolt together
using the hard-
ware in Packet F.
Follow placement
of spring washer
and standard
washer.
SLIDE IN STOPPERS
SUMMARY Slide the stoppers (Packet J) in the
outer profile channel of the bottom platform (the
platform half with the tracks). Position them at the
end of the first inside slat.
• Drop both stoppers
(packet J) in the center
channel slot and slide in
to position.
29 v1231019
BOLT TOGETHER HINGES
SUMMARY Use the hardware from packet G to
bolt the hinges together.
• Line up the
platforms. The
narrow hinge
should sit just
inside the wider
hinge. Position
bolt, washers,
nut as pictured.
Washers
• Using the sup-
plied m13
wrench and
larger hex key,
tighten.
30 v1231019
INSTALL LOCKS
SUMMARY Almost done! Packet H contains the
locks, small slider nuts and flat head screws and
small spring washers used to attach the 2 locks
and 2 latches to the top and bottom halves of the
platform.
31 v1231019
• In the same outer
profile channel as
the spacers, slide in
slider nuts from
Packet H. 2 on each
side. Note direction.
• Position lock latch and use 2 screws, 2 spring
washers from packet H to fasten the top of the
lock latch to the nut sliders using the included
screwdriver.
• Center the slider nuts between the slats.
32 v1231019
• Repeat this same step to attach the top of the
2nd lock latch near the other stopper.
• Turn the Rev Platform over and secure the
bottom of each lock latch. Use 1 slider nut, scew
and washer.
x2
• Flip the platform back over. Now you're going
to add the latch hooks to the other platform half.
Yeah. This sucks. But you’re almost done!
33 v1231019
• Use the latch hooks and hardware from packet H.
x2
• Insert 2 slider nuts
using the outer profile
bottom channel center
slot opening. Install latch
hook lined up with
bottom lock latch (be-
tween the 2 slats), hook
facing up.
34 v1231019
NEVER travel without first latching the Rev Platform
closed! Always quadruple check that the Rev Plat-
form is locked closed before moving the vehicle.
• Close and latch. Slide latch hooks into better
position if necessary and re-tighten. Twist stem
of latch lock to length. Use nut to lock stem
length. Make sure there's tension enough to
slightly squeeze the spacer. The latch shouldn't
be too difficult to close. but there should be ten-
sion enough to keep the latch firmly locked.
35 v1231019
INSTALL LADDER HINGE PINS
SUMMARY With the platform opened, mount the
quick-release ladder hinge pins (packet I) on the
top platform half.
BTW - this is the last step. F-Yeah!
• Open the platform. The ladder hinge pins will
be installed along the single channel on the top
of the open platform on the end of the platform
with the latch hooks (not on the end of the plat-
form with the latch locks).
36 v1231019
• You know the drill by now.
Insert 2 slider nuts from
packet A.
• To find the exact place-
ment of the ladder base,
we will use the ladder as
reference.
Take ladder and remove
the ladder hinge plates
from their bag, and lock
them in to the ladder.
• Take the ladder
base hardware
(packet I) and
bolts (packet D)
and spring wash-
ers (packet C)
and secure loose-
ly. Only a few
turns.
Click!
• Repeat for
the 2nd
ladder base.
37 v2240105
Center ladder along width of platform.
Slide ladder bases on platform to line up up
with the hinge plates on the ladder.
• With ladder centered and hinge pins of
the ladder bases lined up, tighten all 4
ladder base bolts.
38 v2241005
WOO HOO!
The platform is built. Jump up and touch the
sky. You did it!
Remove your C6 Outdoor Wristband. Put it in a
safe place. Let it serve as a reminder of your
perseverance and smarts. This is an accom-
plishment that should not be forgotten.
REV ROOF TOP TENT
INSTALL & USE INSTRUCTIONS
To mount the Rev Platform X to your vehicle
for camping with a Rev Tent, please see these
instructions :
Available to download at c6outdoor.com for
smart phones, tablets or to print.
39 v1231019
v1231019
WARNING
Refer to your specific vehicle manufacturer's rec-
ommendations for roof load rating. Refer to your
specific cross bar or roof rack manufacturer's rec-
ommendations for load ratings. C6 Outdoor
cannot be responsible for improper loading
beyond the vehicle manufacturer and cross bar
manufacturer's stated load capacity.
The Rev Roof Top Tent system weighs @87lbs /
40kg.
IT IS CRITICAL THAT ALL C6 OUTDOOR GEAR IS
PROPERLY AND SECURELY ATTACHED TO YOUR
VEHICLE. IMPROPER ATTACHMENT COULD
RESULT IN AN AUTOMOBILE ACCIDENT AND
COULD CAUSE SERIOUS BODILY INJURY OR
DEATH TO YOU OR TO OTHERS. YOU ARE RE-
SPONSIBLE FOR SECURING THE PLATFORM,
TENT & ACCESSORIES TO YOUR CAR, CHECKING
THE ATTACHMENTS PRIOR TO USE, AND PERIOD-
ICALLY INSPECTING THE PRODUCTS FOR AD-
JUSTMENT, WEAR, AND DAMAGE. IT IS RE-
QUIRED THAT YOU READ AND UNDERSTAND ALL
OF THE INSTRUCTIONS AND CAUTIONS SUP-
PLIED PRIOR TO INSTALLATION OR USE. IF YOU
DO NOT UNDERSTAND ALL OF THE INSTRUC-
TIONS AND CAUTIONS, OR IF YOU HAVE NO ME-
CHANICAL EXPERIENCE AND ARE NOT THOR-
OUGHLY COMFORTABLE WITH THE INSTALLA-
TION PROCEDURES, YOU SHOULD HAVE THE
PRODUCT INSTALLED BY A PROFESSIONAL IN-
STALLER SUCH AS A QUALIFIED GARAGE OR
AUTO BODY SHOP.